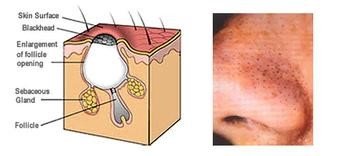
What Causes Blackheads?
Blackheads, which are also known as open comedones, are tiny, dark pigmented plugs in the skin. They are caused by pores which have been clogged by excess oil and dead skin cells. They turn black because the open pores cause the excess oil to be exposed to oxygen, which causes a chemical reaction that turns the plug dark when it comes to a head at the surface of the skin - thus the term "blackhead".
Tips to Keep New Blackheads from Forming
Since blackheads are caused by excess oil, it is important to note that if you have oily skin, you need to use a water-soluble acne cleanser. Never ever use any type of bar soap because the ingredients that are keeping a bar of soap together can also clog up your pores. This will make it more difficult to remove blackheads from the skin.
If your skin is oily, it would be helpful for you to absorb excess oil as much as possible. A clay mask which does not contain any irritating ingredients, like peppermint, would be helpful.
Also, although excess oil is the main culprit in the formation of blackheads, this does not mean that people with normal or dry skin cannot get blackheads. Blackheads can form on all skin types.
Remedies to Remove Blackheads
A common remedy to remove blackheads is to simply pop them out from the skin. However, this can often cause more irritation, infection, bruising and scarring.
Another remedy people have used to remove blackheads is attempting to pull them from the skin with pore strips. This can remove the superficial blackheads but it will also remove some healthy skin by tearing it. So be very careful with this and be sure to read the warnings on the labels for pore strips.
A good thing to do for blackheads, however, is to exfoliate or slough the skin. This helps open up clogged pores and eliminate dead skin cells.
This post is an excerpt from my acne control and cure treatment ebook. I will be adding more acne-related informational post, including is the actual regimen I used to cure my cystic acne (shown below). I hope it helps you cure your acne, no matter what type
Amarie’s Acne Control Treatment System
You are now about to begin the process of recovery. Follow each step as it is written, as each step is important to the success of the entire system and to getting rid of your acne. Understand that dead skin cells, oil, and bacteria trapped beneath the skin are the source of the cause of acne (bumps, boils, pimples, or pustules). Therefore, to heal acne, it is essential to eliminate the poisons beneath the skin that cause it.
Now for the process – remember do not let the simplicity of the process or the common everyday products fool you. Again, the proof is in the process. Don’t skip and skimp. You must follow the steps to get the results.
Products You Will Need
Below is a list of the products you will need for success with healing your acne with this system. I have included some brands that I use. I find these to work best, but you should choose according to your own skin’s sensitivity.
Facial cleansing sponges/buff pads (Name brand or store brand, some with added cleanser, some without. Any will do but choose what’s best for you.
Acne wash (I prefer Neutrogena liquid.)
Anti-fungal cream (Yes! This is the key ingredient other acne treatments overlook!) This is usually used to treat athlete’s foot. Yes, that’s right, an anti-fungal cream such as Lamisil, Tinactin, or Lotrimin. I use Tinactin. The active ingredient in Tinactin is Tolnaftate. This is what has worked for me. However, I have not used the other anti-fungals, so I cannot speak for their effectiveness.
Mild Moisturizer Wash (I prefer Noxema.)
That’s it!
With this system, you will have two daily skin regimen routines to follow. One routine at night and one in the morning. I recommend you begin with the night routine.
Night Routine
Step 1: Cleanse the Skin
First, if you have on any make-up, remove it. Then, with a clean wash cloth (not the facial sponge/buff pad at this point), using circular motions, wash your skin gently with acne wash for 15-20 seconds.
Step 2: Rinse
Thoroughly rinse with warm water for 20-30 seconds or until cleanser is rinsed away.
Step 3: Steam-bathe the Skin
Very important. Gently bathe blemishes with very warm compresses (use a wet wash cloth soaked with plain, very warm, almost hot, water). Hold the compress to each acne affected area for 10-15 seconds. Do this 5 times for each affected area. This will help bring the impurities beneath the skin to the surface and induce drainage.
Remember: It is important for infectious waste harboring under the skin to be discharged.
Step 4: Exfoliate (This is where you use the facial sponge/buff pad)
Very important. Wet a clean buff pad, add a small amount of acne cleanser if buff pad does not already have cleanser in it, then using circular motions, thoroughly but gently soft-scrub (not too abrasively) the acne affected areas of your skin. Do this for 20-30 seconds (be very gentle around the eyes). Our bodies produce a completely new skin surface every day (including on the face). Exfoliating the skin sloughs off excess dead skin cells that clog pores and contribute to causing acne. Note: Do this step daily the 1st week, then every other day the 2nd week, every 3rd day the 3rd week, then once a week.
Step 5: Moisturize and Rinse
With your hands, apply a generous amount of moisture cream wash to skin (affected areas and non-affected areas) massaging gently for 15-20 seconds, then rinse with warm water for 20-30 seconds. This helps hydrate the skin and cut down on dryness.
Step 6: Steam-bathe the Skin (again)
Repeat Step 3 here. Pat dry.
Step 7: Topical Medication (Anti-fungal Cream)
Apply a moderate amount of anti-fungal cream to acne affected areas, rubbing cream in completely. Repeat.
Now apply a generous amount of anti-fungal cream to acne affected areas, but do not rub in completely this time. Just allow the cream to sit on top of the blemishes. Now, of course, you will need to sleep in whichever position is appropriate so you don’t wipe it all off. Also, if necessary, apply your favorite moisturizer or lotion to areas of the skin not affected by acne. Do not mix moisturizer and anti-fungal cream.
Have a good night!
Tip: Keep the anti-fungal cream next to your bed. If you wake up during the night, apply more cream to affected areas.
Note: When my acne was more severe and the blemishes seemed to be more painful and “sore-like”, I used some Neosporin instead of the anti-fungal cream for a couple days, then I switched back to the anti-fungal cream.
Morning Routine
Step 1: Cleanse the Skin
With a clean wash cloth, using circular motions, wash your skin with acne wash. Then, with your hands, apply moisture cream wash and go to step 2.
Step 2: Rinse
Thoroughly rinse with warm water for 20-30 seconds.
Step 3: Steam-bathe the Skin (Don’t skip this step!)
Very important. Gently bathe blemishes with very warm compresses (use a wet wash cloth soaked with plain, very warm, almost hot, water). Hold the compress to each acne affected area for 10-15 seconds. Do this 5 times for each affected area. This will help bring the impurities beneath the skin to the surface and induce drainage.
Remember: It is important for infectious waste harboring under the skin to be discharged.
Step 4: Topical Medication (Anti-fungal Cream)
Apply a small to moderate amount of anti-fungal cream to acne affected areas, rubbing cream in completely. If necessary, apply your favorite moisturizer to areas of the skin not affected by acne. Do not mix moisturizer with anti-fungal cream.
Tip 1: Take the anti-fungal cream with you to apply small amounts throughout the day, rubbing in completely.
Tip 2: Do not apply any make-up, moisturizer, or lotion to acne affected areas until they are healed. It will inflame the blemishes and prevent healing.
That's it. Happy Healing!