
There is something very satisfying about animating vector graphics.
Perhaps it is because I also know how it feels to animate raster art. Even art as small as 32x32 can prove a painstaking job to animate, dot by dot.
Raster?
In case I've already lost you, raster art is also known as pixel art. Its pictures made up of square dots. Vector art, on the other hand (what we'll be talking about today), can easiest be described as shapes that are mathematically expressed. You have our points and lines are drawn between them, not too unlike those 'connect the dots' activities you may have liked as a kid.
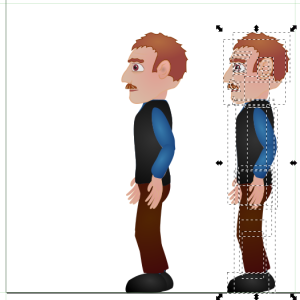
To give you an idea of what we're talking about - the following illustrates our character - along with another copy of the same character with all its shapes' (and groups of shapes') areas highlighted. Everything you see is just shapes and shading. Some things have thicker outlines or none at all.
If you were to focus upon the legs, you will notice how sections overlap around the knees. This is because two or more shapes (in this case of similar color) overlap each other. Similar colors allow for multiple shapes to overlap and seem like a whole - which makes animation easier.
Now that I have my standing character frame, I will want to begin my animation.
Now there are multiple ways that vector art can be animated. One way is to use 'bone-based animation' - and this involves separating the different body parts at the joints and place them upon an image. Then, within a powerful game development environment such as Unity, the parts are mapped into the game to have animation sorted within.
However, since I'm on a 32-bit machine and my team decided to go with the new 2017 64-bit-exclusive version of Unity (thanks Unity), and since the programmer thinks its going to involve too much work... I've no recourse but to animate these vectors the traditional way - sprite sheets (Gripe over ^_~).
What is a sprite sheet?
The concept of a sprite is that when similar images replace each other to produce the illusion of movement.
To illustrate in the simplest ways possible, imagine that the following lines represent a single line in various stages of movement - turning the page in a book for instance.
_ \ | / _
You start left, you pick up the one end of the page and start turning it to the right (maybe you forgot something on the previous page). Do you 'see' it? If so then congratulations - you have visualized a very simple sprite of a line flipping over.
While there is a lot of angles between those lines above that 'could' be filled in, between the various stage (and such would make the animation smoother), presenting this reduced set of angles at the right speed will still fool the eye into thinking that there is motion going on - and the mind will 'fill in the gaps'.
Welcome to Inkscape

Source
The program that I hall be using for the purpos of animating this human is a free application called Inkscape.
At this point I would say that it is a little less powerful powerful than Adobe Illustrator.
That is as best as I can tell, as Inkscape doesn't technically natively support animations.
On the other hand Inkscape is free - and otherwise does a pretty good job of keeping up.
Operations are otherwise very similar also, again from what I can tell.
Preparing to Animate
A sprite-sheet that shall consist of several images is going to need a fair bit of area. For this project I am working with frames (singular sprite image sizes) of 512x512 pixels in size - and to assist me, I've also set the 'major guide lines' to 512 pixels in size within the 'Document Properties' accessible via the file drop-down menu.
Since my sprite shall require 6 different stages to make up a 'walk', I simply (use a calculator (because I'm lazy) to) mutiply the 512 by 6 - to produce a pagearea that is 3072 pixels wide.
You can work in smaller sizes if you like. Ideally try to choose between 32x32, 64x64, 128x128 or any multiple of two before or beyond this range.
The Importance of Consistency of Location
One reason why it is important to know the precise size of your frame is because you will want to ensure that your character is located in the same location of each frame (unless you are going for more complicated animation that factors in a lurching of a character back and forth - but lets presume not as its rarely the case).
The truth is that ou don't want your character's location to shift back and forth between different frames. The animation won't look right.
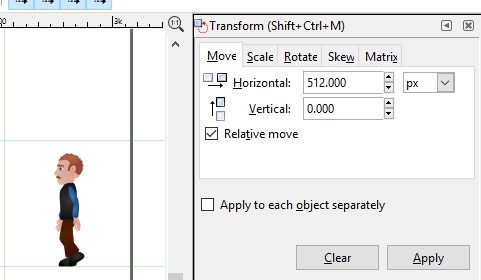
This brings us to the 'Transform' tool and The 'move' sub-section, as illustrated below on the right.
This tool allows you to move entire selections of shapes a fixed amount of pixels horizontally and/or vertically.
Before you do this, and presuming that you still want the standing frame for something else, you will want to duplicate it using the Ctrl+D shortcut on your keyboard.
This creates an exact duplicate of whatever you have selected in the precise same location that the original was - and it is the duplicate that you now have selected.
After creating a duplicate, it is time to shift it to its new location. Calculate how many pixels you need to move to place it precisely in the desired frame (shifting vertically or horizontally by the same number of pixels as your frame size will ensure the precise location of the new sprite).
Adjusting the Position of the Limbs!
Alright! Now that we've done the relatively tedious stuff we can get to animating our character.
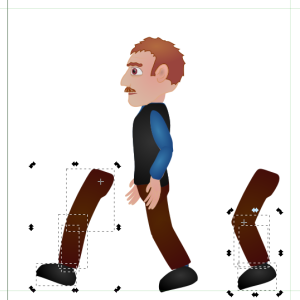
I personally went for a mid-stride position to begin with - and below you get to see how I changed the standing legs into mid-stride legs.
Well... actually you will notice that there is an extra leg. Its just for demonstration purposes. This human has a standard pair of legs.
So as to reposition them I click upon one leg (which has all the leg components grouped together), and move it out of the way. I do so using Shift + Left or Right direction buttons as doing so allows me to move the entire leg much faster and consistently - and it only requires 2-3 such processes to ensure that the leg is entirely clear of the body.
Now I ungroup the leg so that I can do some more intricate work upon it (via Shift + Ctrl + C on your keyboard).
Now to rotate the leg!
If I drag the mouse over the entire leg then it will get boxed within a selection box with arrows pointing inwards and outwards, indicating that I can stretch from the respective borders if I so choose.
Since I wish to rotate I click any section of the selected leg. The arrows now run along the selection box area, indicating that I can now rotate it.
However, typically at the center of the selection, there is also a '+' symbol.
This is called an anchor point - and we will want to move this around quite a lot while making our animation.
An anchor point affects the 'point of origin' of an object.
this both for the purpose of scaling as well as rotation.
For our purposes our lives would be so much easier if we could make it that rotating has the entire leg moving from the thigh area (as has occured for the leg between the standing position of the earlier image, and the left leg on the following image). As such we first click and drag the anchor point upwards to where we'd like the rotation to occur from, and 'then' we get rotating.
This rotates the entire leg - but as with most walking movement, our legs are rarely completely straight while in motion. Hence we next need to focus upon the lower part of the leg.
And this is where the 'spare' leg comes in to demonstrate. Note that when you un-select the upper leg you might find that the anchor point remains in the same place.
Since we are moving down the leg and the knee is the next point of rotation, this is where we adjust the anchor point accordingly, before proceeding with adjustment.
If we wish we can also adjust the foot - and if so then a similar process applies.
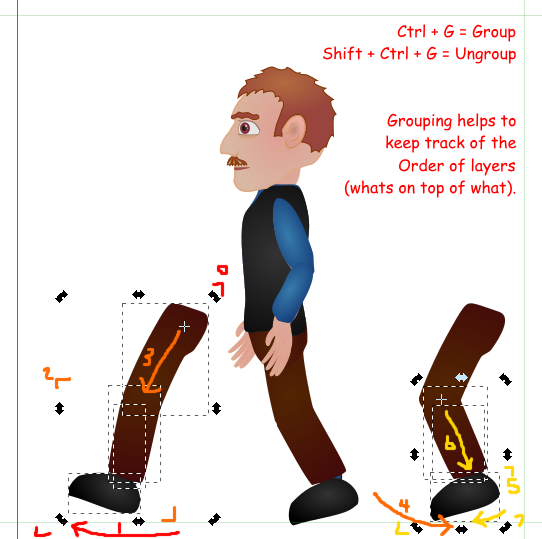
Here is a handy summary of the above.
Since we are moving down the leg (because we want the thigh to remain more or less in the same location) the selection areas (depicted with opposing 'L' angles) grow smaller and smaller.
Once you are satisfied with the position of the leg you can regroup the shapes that make up the leg by first selecting them all and using Ctrl + G on your keyboard to group them.
You will want to group some parts of the body together so as it to be much easier to select all parts of, say, the left leg without interfering with the right leg. When grouped, use Shift + Left or Right Direction button on your keyboard to place it precisely where it was.
You may find that the fit is not 100% (and that a bit of thigh hands off behind the character's butt). A couple of adjustments with the directional buttons should resolve this. Also don't be afraid to re-align other parts like knees so that you don't end up with weird geometry.
Thats it!
Now that you know how to adjust one limb you can adjust the rest. Group and un-group as needed, accurately move the parts out and back into place, and try to keep the shoulder/ thigh points as consistent in position as reasonably possible.
Now that you have a completed single sprite, you can duplicate it (Ctrl + D), and move it precisely to the next frame, and make further adjustments on that duplicate.
Hint! Try to avoid letting any limb get completely obscured by another as its easier to select what shows.
Hint! You can save a lot of time animating a person by simply copying a frame, re-sorting the arms and legs so that they switch order, and adjust slightly to retain shoulder/ thigh position. Look at the following image for an example of such. Notice how the former three frames look quite a lot like the latter three frames?
Hint! There is more to movement than just moving one's legs back and forth. If you walk forward and focus upon what is level with your eyes then you should notice that that point is not fixed. As you plant your foot upon the ground and bring your body forward, your body weighs down upon your leg and you are slightly shorter, whereas - between steps, your body is at its most elevated.
The easiest way to achieve this is to select the entire upper body on food-planting sprites and press the down key once or twice - perhaps more if one is aiming for a more animated and exaggerated version of this. Its often the small details that make an animation more believable - but for some styles exaggeration is a workable approach.

Saving a Sprite Sheet
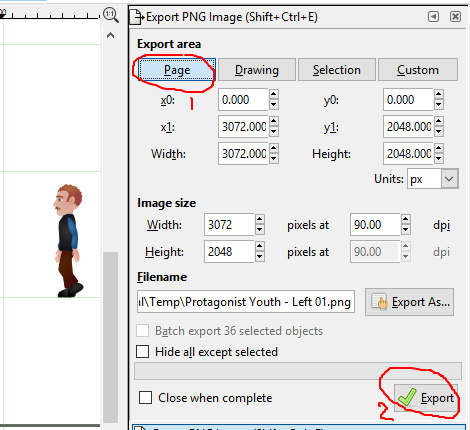
Now saving the file is all well and good but to produce good quality sprites you will want to export the file as a png image (a format chosen both for its 'lossless' format (information doesn't get lost in compression, unlike jpeg files), and the transparency of the background.
Otherwise you'll end up with a semi-OK animation as posted in the beginning of this post, where the white background was manually removed - with traces remaining.
In the 'File' drop menu one will find the 'Export PNG Image' option.
For this purpose we set it to 'save page' and then proceed merrily to 'Export' (you might be prompted to give the file a name).
And now you'll have a sprite-sheet with a transparent background (unlike the white background of the previous image).
Well its hoped that you found this quide helpful. It is my intention to revisit this subject with a focus on how to build believable humanoids out of vector art.
Well that is everything for the moment. Thank you for following. _
If you found this post interesting and would like to share this with your followers and friends then a resteem would be appreciated.
If you have some feedback for me then feel free to share such in comments. A civil conversation can go a long way.
Sincerely,

Previous Post: Discussion Time - If it is We Who Give Value to Money - What of Crypto?
