
We're living in the digital age. It's rare even in Hollywood for films to be shot on actual film. This style of movie making took me back past several generations of technology.
This isn't shot on a cellphone or digital cinema camera.
This isn't shot on a video camera.
This isn't edited with a non-linear editor.
This is film.
This is real, black and white, Eastman Kodak Double X Negative 16mm film...

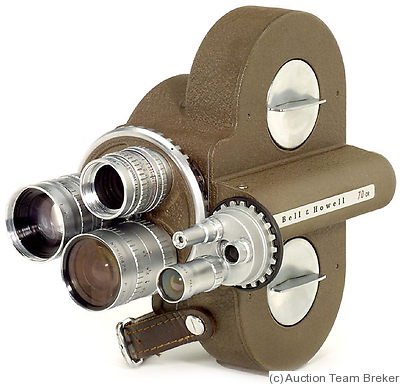
...shot using a 1940s Bell & Howell Filmo 70-DR...
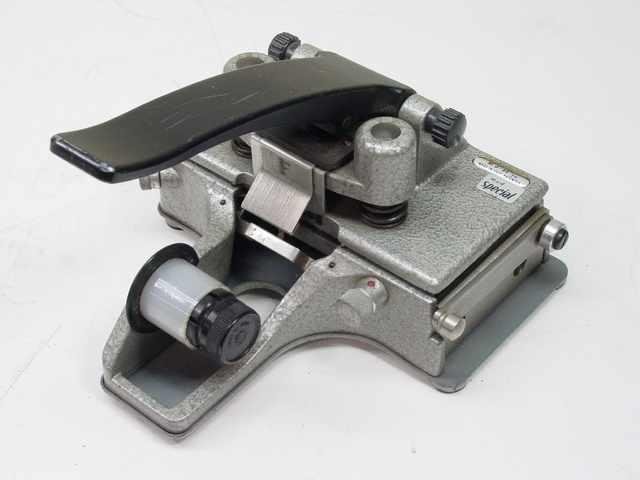
...edited using a simple film cutter/splicer...
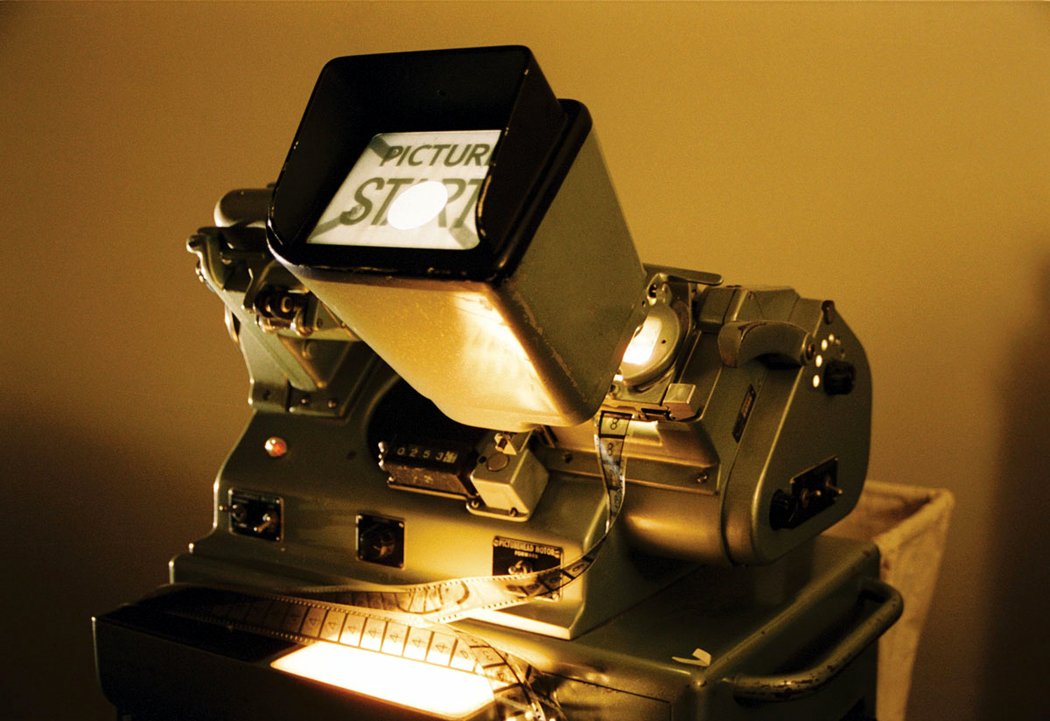
...and a Moviola.
Now, without further ado, I'd like to present to you my short, 16mm film...
L'Amour (2011)
A young couple face a supernatural obstacle that prevents them from being together. No, your speakers are not broken, this film is completely silent. The film was originally presented on a 16mm workprint without any sound and that style was preserved for the digital edit.
You may notice a credit for music. Originally we intended to have a score produced, but now that misplaced credit is the only legacy of that idea.
The Process
Let me begin by admitting that I lied. But I was only slightly lying. This isn't my very first film. I shot two films before this one on 16mm, but I never had them digitized. Maybe one day... and if it happens, I'm sure my Steemit followers will be the first to know!
1. The first step in making this film was storyboarding
I'm not big on drawing storyboards, but when you're shooting on film, every second is precious. I wanted to make sure I had everything right.

Let me explain why careful planning was so important: I'm trying to remember back to my first year of film school... I believe I bought only one package of 100 ft. Kodak film, which was good for approximately 2 minutes and 45 seconds of footage if I shot everything at 24 fps. The assignment was to make a 1 minute to 1 minute, 30 second film. That's a 2:1 shooting ratio. For any of you that aren't familiar with the film editing process, let me tell you something: That isn't a lot.
2. The next step was shooting
I assembled my cast of non-professional actors (a friend of mine and a fellow classmate) and my film crew. There were only 2 of us: myself and a camera assistant. This was not a large scale production!
2 minutes and 45 seconds hardly leaves any time for multiple takes, so for most of the footage we had just one chance to get it right. I also had to be careful about shooting dead space at the beginning and end of each take. I would roll the camera the second I yelled "action" and stop rolling just before yelling "cut."
And let me tell you something about this camera: It had no electrical components. It was completely mechanical. Much like a wind-up toy, we had to crank it to "wind it up" before rolling. Once it was wound, I would hold down a button to start shooting.
This wasn't the only difficulty: The viewfinder lens and the camera lens were not the same. So the viewfinder told me nothing about the camera's focus. In order to ensure that my subjects were in focus I had to physically measure their distance from the lens, like... with measuring tape.
I also had to use a light meter to determine what shutter speed to use on the camera.

This is so much different from digital filmmaking where one can immediately see the results of what they've done. We were truly shooting blind, putting our trust in math and measurements and mechanisms to accomplish my vision.
3. Into the edit room
Watching the footage for the first time is a wild experience. First, there's the fear: I don't know if anything will look the way I intended it to. Second, there's excitement: Wow! I did a pretty good job. Finally, there's the realization that this will take a lot of work to finish.
Film editing is very physical. There's a lot of moving around the editing room, cutting shots apart, hanging them up, taping them back together, running them through the Moviola... on and on it goes.
First, I slice up my film reel into the different shots, then I splice those shots together into what's called an "assembly cut." This is a first cut where nothing is trimmed down. Everything has simply been put together into its proper order. At this stage I make notes about the pacing and any obvious problems.
Then I go back into the editing room and refine it.
Then I watch it, then I refine it again.
Then I watch it, then I refine it again.
Then I watch it, then I refine it again.
Then I watch it, then I refine it again.
The process produced quite a few bags of scrap film:

It's a long and tedious process. But the results are incredibly rewarding. And this is what I ended up with: a finished film wrapped around a reel in all its glory!

4. Digitizing the film (starting over...)
I decided that I wanted a digital copy of this film. So I brought it to the lab and paid to have it the film scanned. A week later, I got back a DVD with all of my raw footage.
Now I had the task of re-editing everything to match the original workprint cut. Why didn't I just scan the workprint? The best way to get the best quality is to go back to the original source: the film negative. The workprint edit would be covered with scratches, dust and imperfections.
I decided that the easiest way to re-edit would be to film the projected workprint with a camorder and use that footage as a template. That way I would be able to get the timing of the digital cut as close to the original as possible.
After translating the edit to digital, I decided to make a few extra tweaks, just to refine it a little bit more.
And that's how it's done!
I hope you enjoyed watching the film and reading about my process. Thanks for stopping by!
~Seth
- Check out this animated demonstration of my feelings toward statists.
- Anarcho-Memes: Where memes and anarchy come together to make beautiful babies.
