Hello Steemit friends!
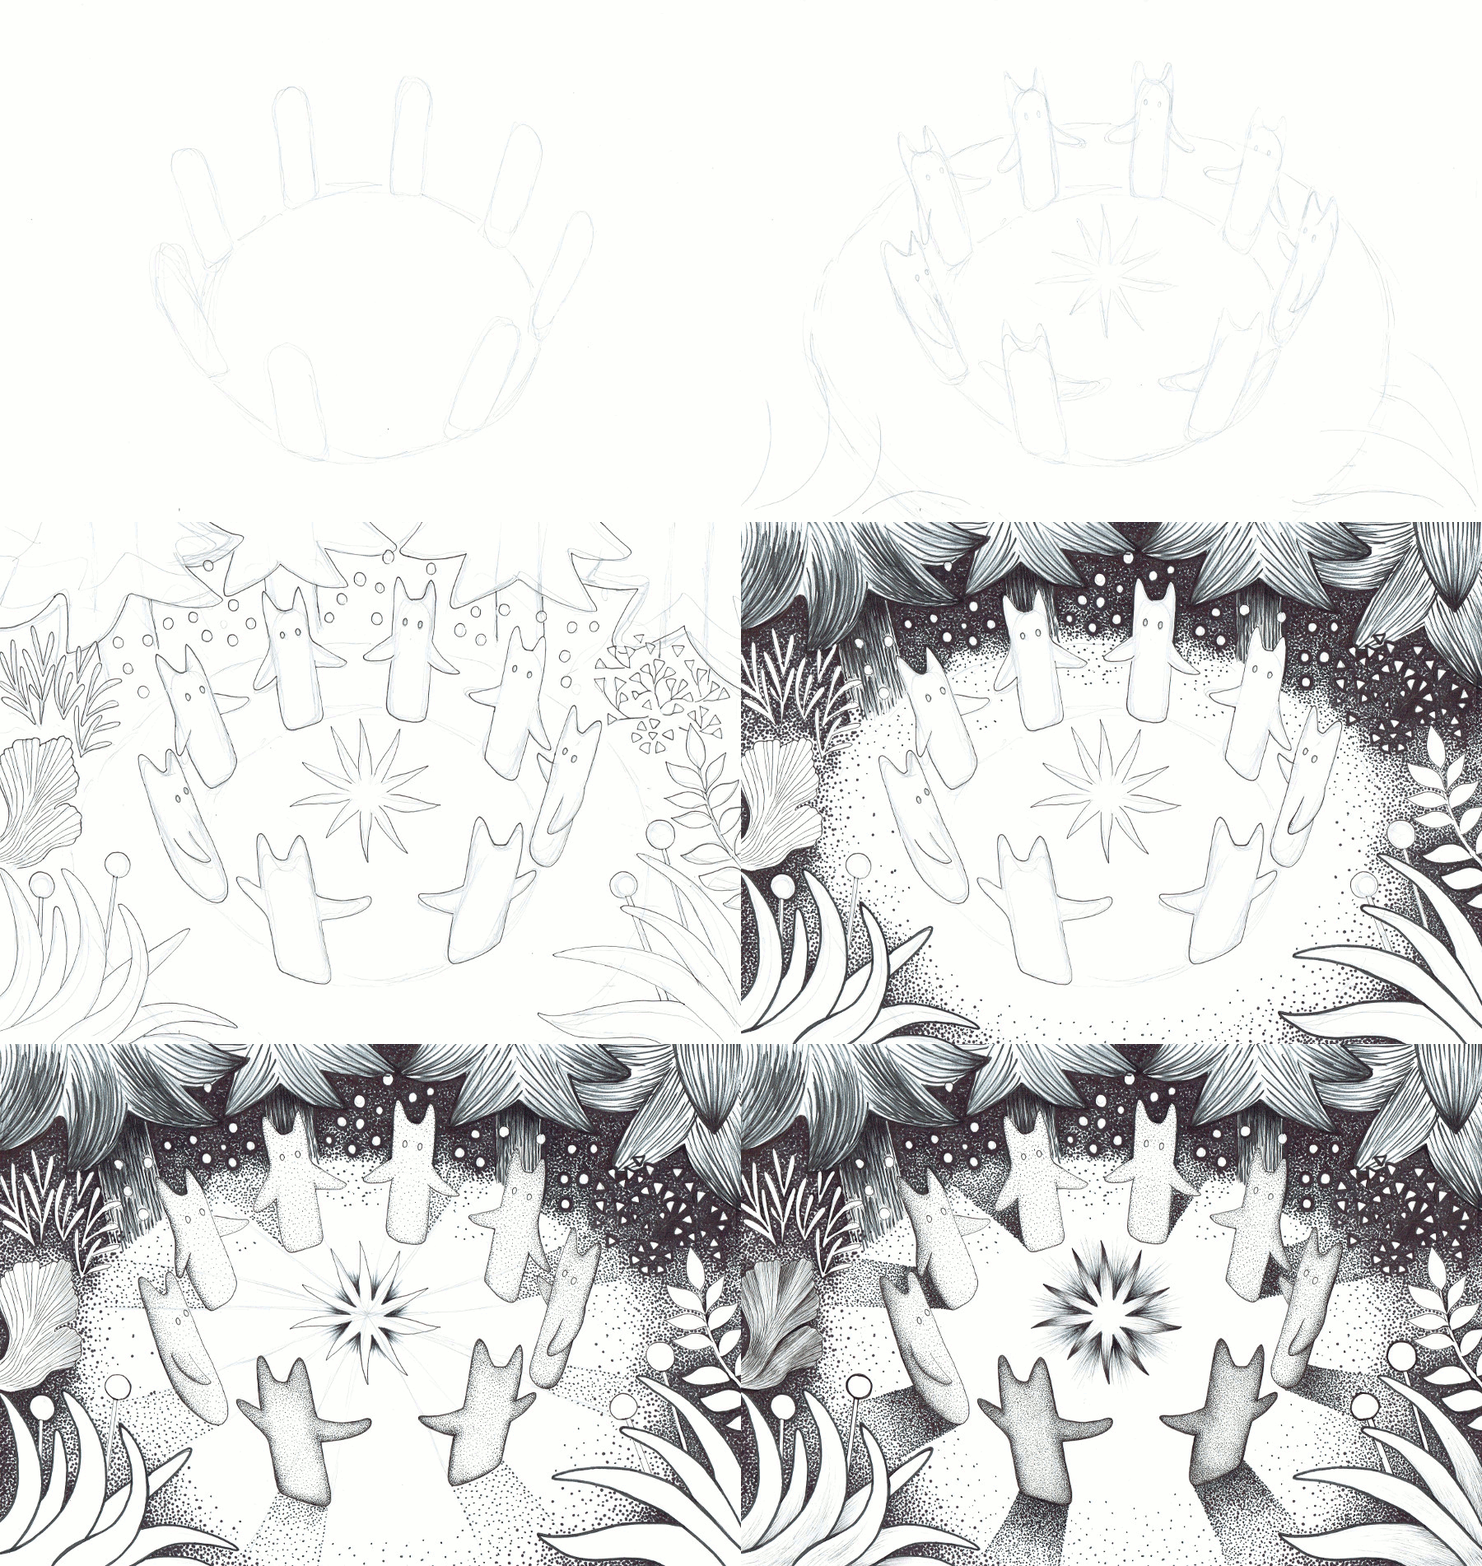
Today I want to share with you my first step by step tutorial, showing how I created my ink drawing. I also made a GIF to show you the progress of the work. You can see it at the bottom of this post :)
Here's the finished artwork:

These are the forest ghosts having some kind of secret ritual. This imagined scene has often come to my mind, and the time has come to capture it and put in on paper! I created this work using pencils, black fineliners and markers. I used the most ordinary of papers, printer paper size A3 (my favourite paper medium).
This post is inspired by and dedicated to @mikepm74 for all his great advice and support he has given me so far :) Thank you!
STEP BY STEP PROGRESS:
Ok, so I started with drawing the outlines of the circle and the ghosts, using pencil. As you can see I wasn't trying to be very neat, it was just a sketch.

Then I decided to sketch my ghosts with greater detail. I love their oval shape, sweet pointy ears and big eyes. You can find these ghosts in my other artworks.

Here I drew a star in the middle of the ghosts' circle, and thought that it would be nice if the ghosts were standing in the middle of a bigger forest clearing, hence the second circle around.

You know, when I sat down to draw this scene, I didn't know exactly what I will draw. I added different parts of the drawing based on what I thought would look nice ;) At this point I decided to model some of the front. I drew big grass leaves in the corners.

Then I added some background. I love the shape of the spruce, so spruce it was.

...and I put some sweet little plants in the middle, together with small circles of (future) light.

At this point I knew that I won't add any more elements to the drawing, and I redrew all the outlines with a fineliner (ink).

After that I started to create a dot shading in the corners. I really like how the dot shading feels. It's a bit cartoonish. Also it gives some sort of oldfashioned feel (and lots of magic) to the scene.

I gradually added more shading around the circle. The markers did their work here, the fineliners would take ages.

It was extremely pleasurable to create the dot shading under the spruces.Also I thought that spruces would look nice if I filled them with some crude lines (making sure that the tips would be darker than the rest of the spruce).

Dot shading takes some time, but I find it relaxing.

Ok, so I decided to move on to the next step, meaning ghosts and the star. Ghosts were also shaded with the help of dots, but this time I did make them using fineliner. This caused the difference in texture, and added a soft touch to the overall impression.

I thought that it would look cool if: 1. the star had some more dramatic and linear shading, 2. I added shadows behind the ghosts. I sketched lines from the centre of the star (casting light on the ghosts and the forest) and made them go through the both bottom sides of the ghosts. This way I made sure that the shadows would be accurately drawn.

I wanted the shadows to have a gradient. The closer to the ghost, the darker the shadow.

Last moments with the drawing. I added couple more dots, some fine lines here and there.

Here I got rid of the pencil sketching, and added more and more dots to get more vivid, intense look.

Last take on the drawing- even few more dots and lines. Some tiny details... And I finished!

Here's the GIF version of my tutorial. I made it quite slow so it would be nice and easy to watch.

Thank you so much for checking out my tutorial, I hope you liked it!
I must admit that 'I'm liking' the direction that Steemit makes me take. If it wasn't for Steemit it would take me much more time before I made my first artwork tutorial with GIF :)
Hope you enjoyed what you saw here, please let me know what you think! If you like my artwork, please feel invited to visit my Instagram, Facebook, Website and my newly set up Etsy shop :)
Thank you and all the best,
Klaudia
