兩天前寫了有關Bitcoin交易費用的文章,之後我再看了一次,還是不夠清楚,所以決定今日再寫其續篇。(English story can be found in the middle of this page.)
從SegWit錢包發送Bitcoin
首先上一篇其中一個不足就是關於SegWit的部份。有朋友跟我說我只是把Bitcoin由舊有的1字錢包送到SegWit的3字錢包,並沒有提及有關SegWit錢包實際情況如何,特別是怎樣計 virtual bytes。
首先多謝提醒。要了解virtual bytes,我想是比較複雜,而且現在多數是Hardware Wallet才有提供SegWit,所以我只簡單再做了測試,於Ledger Bitcoin Wallet > SegWit > Send 選Custom fees,然後打入100 satoshis per byte。
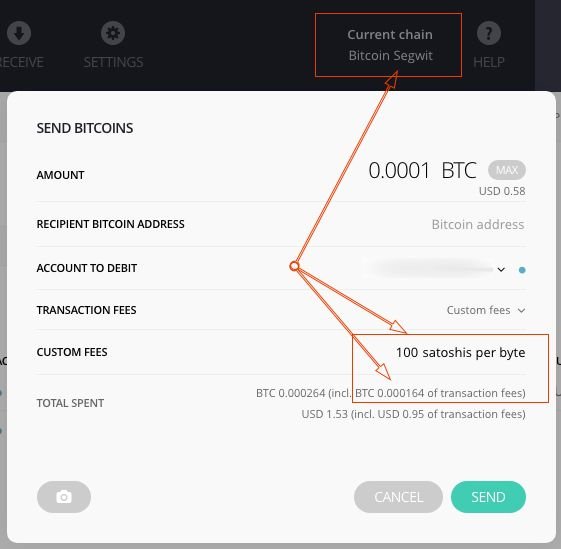
可以見到,Ledger Wallet自動計算了交易費用為0.000164。100 satoshis即是0.000001,把交易費用除以per byte的交易費用,0.000164 / 0.000001 = 164 bytes。可以見到跟上一篇所說的226 bytes有明顯的差距。節省了的空間容量為 (226-164)/226 = 27.4%。這個就是理解SegWit節省費用的簡單方法了。
由舊有地址發送至SegWit地址,不能節慳?
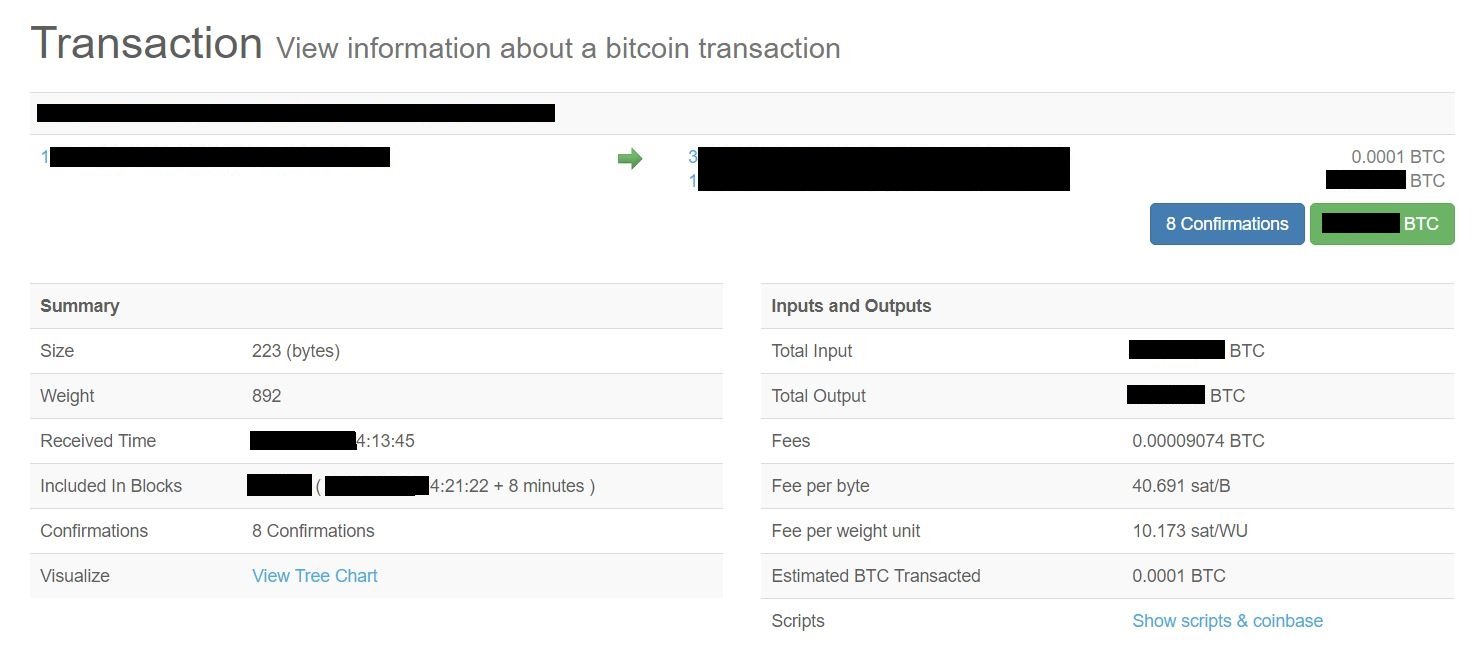
再看一次上篇第一個交易的大小,是223 bytes的。這張圖是由上一篇中直接拿出來的,留意交易是由1字首的錢包,發送至一個3字首及一個1字首的錢包。這裏的意思是我把錢包中的部份Bitcoin送至3字首的錢包,其餘的Bitcoin最後必定要自動發送到另一個不同的1字首錢包地址,這是在我原本的錢包內的其中一個地址。
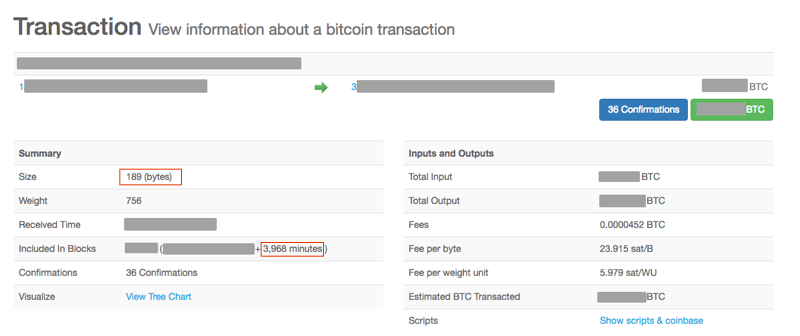
另一張是上一篇中等待了很久的transaction,只在其中一圖略有提及。跟上一張圖不一樣的是我把錢包清空了,交易是由1字首的錢包全部及只發送至一個3字首的錢包,使用了 189 bytes。雖然最初我以為是SegWit的原因所以交易大小細了,但之後我對比過SegWit啟動前自己清空舊有錢包的紀錄,都是大約190 bytes,所以這跟SegWit錢包是沒有關的。
設定交易費用過低的後果
上一篇提及,因為我把第二個交易設定費用過低,令其停留在unconfirmed的狀態,不知要等多久才能完成交易。上圖就是那個結果了。很好運,等了3968分鐘後,終於都被接納。這次真的只是幸運,用了不到3日就可以解凍。正常來說我是不應該慳錢的,因為所節省的其實並不多。
怎樣看清交易費估算的那兩頁
那兩個估算費用的網站其實都是很簡單的,第一個就只需要找出綠色顯示的價錢即可。可以看到綠色那一行就是解作沒有延遲。
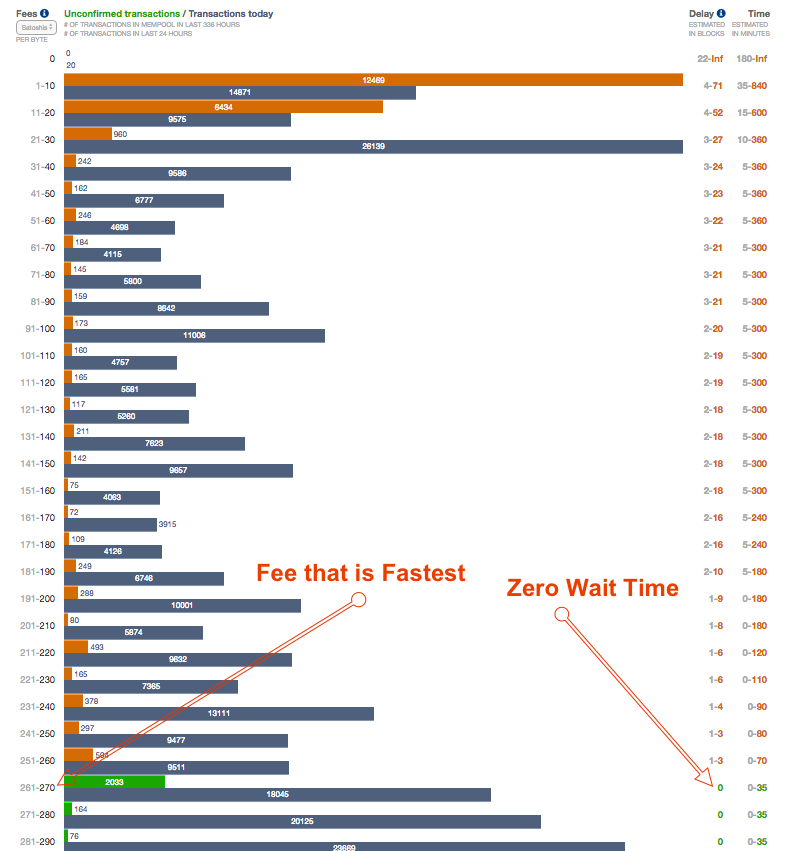
而第二個網站的計算方法其實是看最右邊的Size Count。把數值由最上向下加至大約1MB,就是最先會在這一個block處理的交易費用範圍,當中最低的那個就是最佳交易費用。所以其實只需要看最上的那個最佳的交易費用就可以了。
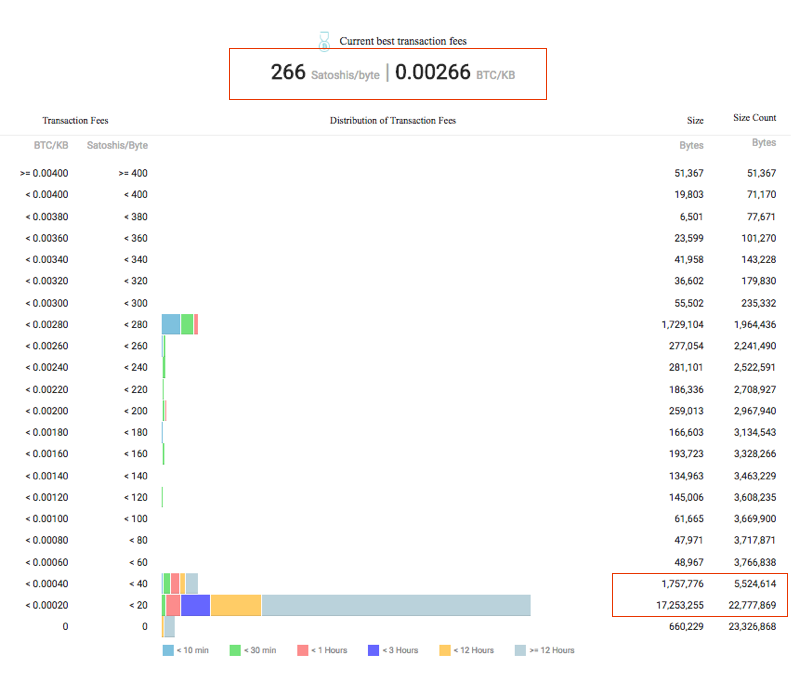
不過,這兩個圖都給了很多有用的資訊給我們。其中最有用的就是最低費用的幾行,永遠都有很大數量的交易在等待處理。換言之,有很多用家是刻意把交易費用設至那些水平,足見其實這樣做都是可行的。不過我想他們跟我一樣,都是用可追加費用的錢包,要是突然急於完成交易,他們是可以即時增加費用的。
Donation Banner
由今日開始,我會在文末加入一張接受捐贈的banner。我覺得總是會有非Steemit用家由Google直接到達我的文章,他們並沒有Steemit Account,即使他們想支持我也沒有方法。所以我就造了這張banner好讓他們能用別的加密幣支持我。如果你們對這張banner有甚麼意見,請定必告訴我,讓我改進改進。

Not a Steemit user? Support me by other Cryptocurrencies!
喜歡我的文章但沒有Steemit戶口?可以用其他加密幣鼓勵我。
English version
After a review of my story related to Bitcoin transaction fees, I think I should write a follow up story to say more on the topic.
Sending Bitcoin from SegWit Wallet
Last story, I talked about sending Bitcoin from non-SegWit wallet that starts with 1 to a SegWit wallet that starts with 3. I did not come across in detail how to calculate the virtual bytes.
Indeed, the concept of virtual bytes is hard to explain in a few words. Therefore, I think the most important point you might need to know is how many virtual bytes it would take. There are not so many wallets that support SegWit yet, so I only use my Ledger Wallet app as an illustration. In Ledger Bitcoin Wallet > SegWit > Send > Custom fees, I enter 100 satoshis per byte and here is what I get:
You can see the Ledger Wallet Bitcoin app automatically calculated the fee as 0.000164. As 100 satoshis is in fact 0.000001, we can get the size by this formula:
0.000164 / 0.000001 = 164 bytes
It is way smaller than the size we used in last story – 226 bytes. The saving is (226-164)/226 = 27.4%. Although the size depends on your actual transactions, it should be more or less like 164 bytes for SegWit transactions.
Non-SegWit to Segwit, any savings?
Let us take a look again on the size of the transactions from this picture taken form the last story.
It was 223 bytes. In this transaction, I only instruct my wallet to send some of the Bitcoin to SegWit wallet. It needs to send the rest of the Bitcoin in my wallet to anther non-SegWit address in my original wallet.
This is a new transaction I briefly mentioned in last story. I tried to empty my wallet and you can see the transaction was sent from the wallet that starts with 1 to the SegWit wallet that starts with 3, no additional output to non-SegWit address. The size was 189 byes. At first, I thought it could be the magic of SegWit. I later found out it is not. I look at a transaction of mine that empty wallet before SegWit activation and it was 192 bytes. So I can see these transactions will not be benefit by SegWit.
Result of setting a very low transaction fee
The same picture also let us know the result of setting a fee that is too low. It took 3968 minutes to get processed. I am lucky it takes only 3 days. Don’t set the fee too low!
How to use the 2 websites for fee estimation
It is like I previously said, just look for the 1st green bar in the 1st website, that shows the lowest fee that has 0 delay.
In the 2nd website, simply look at the right-hand side - the Size Count column. It adds up from the top and the best transaction fee is the lowest fee within the first 1MB, that is the 1st 1MB block Bitcoin network should be processing. This gives us the suggested best fee at the top.
In fact, there is one more point I found interesting. For most of the time, there are a lot of transactions placed below 40 satoshis. Those who placed these transactions probably think their transactions should be processed some time when the mempool is less busy. They are also probably using RBF that they can increase the fee if they need to get the transactions be made faster.
Donation Banner
Starting from this story, I will be placing a donation banner at the end of the story. I believe there must be non-Steemit readers found my story from search engines. They don’t have Steemit Account and therefore have no way to support me. I just hope the banner can give them a way to send donations to me if they like my work. If you recognize a way I could improve the banner, please kindly let me know.

Not a Steemit user? Support me by other Cryptocurrencies!
喜歡我的文章但沒有Steemit戶口?可以用其他加密幣鼓勵我。
Copyright © RyoPlasmic 2017. All rights reserved.
本文可供傳閱及引用,唯必須提及出處(本頁)。禁止未經授權出版複制至任何牟利刊物及網站。
