Joining the ranks of people scammed by centralized exchanges is perfectly avoidable. In this series, I will show you how..
Notice
The images in this article are appearing way too small on my display, but only when loaded from steemit.com.
If the same happens to you, please open the relevant images in a separate tab, they will then be the right size.
Sorry for the inconvenience!
Introduction
Recent events once again demonstrate that we should think twice before resorting to the services of a centralized crypto-currency service.
It is not just the privacy implications (jump to "What is wrong with Bitcoin Exchanges?", or even better, read the whole article, I consider it Part 1 of this series) that should make you pause and assess the situation.
If you use these centralizes services, your funds are at risk too.
There are better alternatives.
As part of my unofficial campaign to raise awareness of alternatives to centralized crypto-currency services, I would like to continue developing the topic of Bitsquare for Steemit users.
For an introduction to Bitsquare (what it is, what it aims to do, and how to create more synergy between Bitsquare and Steemit, read this.
Scope of the series
While it is possible to convert from/to Bitcoin to/from Altcoins (say, STEEM to/from BTC), here I am aiming exclusively at demonstrating how you can go to/from money in a bank account (and Alipay, Perfect Money, OKPay, even Swish (for our Swedish friends) to Bitcoin.
(disclaimer: I do not endorse any of those services, as I do not use them personally)
We will do this without setting ourselves up for identity theft (by providing sensitive documents to companies of questionable reputation and competence) and without putting our funds at their mercy.
Desired end result
By the end of the series, you will be able to effortlessly go to and from fiat money to Bitcoin, at which point it is very simple to change to many other crypto-currencies (including SteemUSD)
Once you understand the basic routines of using the Bitsquare software, signing away your privacy and sending your money to an untrustworthy third-party will all be distant memories in the past.
Preparations

Naturally, we begin by installing the software.
It is also very important to verify that your download has not been tampered with.
This should never happen, but since it is software that handles crypto-currency that we are talking about, you really should verify the authenticity of your download.
Thankfully (so that I do not have to) the good folks over at The Tor Project have already written a guide on how to do so for Mac OS X, GNU/Linux and Microsoft Windows.
Verifying the download

This section is, necessarily, technical.
I have tried to keep it as simple as possible, but it is unavoidable that some technical terms and concepts have to be introducted.
Truthfully, the chances that you end up with a backdoored version of the software are very, very tiny. If you can live with the uncertainty, feel free to skip this whole section.
Otherwise...
When you click the download link for Bitsquare above, you are taken to their GitHub page.
In that page, you will find a few more files, besides the .dmg (if you are on a Mac), .deb (for Debian-like linux distributions) or .exe (for Windows users).
Go ahead and download the one for your operating system.
Other than that, the two files that you are interested in, for purposes of verifying the download (.dmg, .deb or .exe), are F379A1C6.asc and signed_sha256_hashes.txt.
The former is a public key that you will import to gpg-compatible software.
The latter is a cryptographically signed file with the hashes of the Bitsquare file (.dmg, .exe or .deb).
If all of this is over your head, the important things to understand are:
- You import the public key (F379A1C6.asc) to your GPG-compatible software, as described in the TorProject Guide above.
$ gpg --import /tmp/F379A1C6.asc
gpg: key F379A1C6: public key "Manfred Karrer manfred@bitsquare.io" imported
gpg: Total number processed: 1
gpg: imported: 1
gpg: 3 marginal(s) needed, 1 complete(s) needed, PGP trust model
gpg: depth: 0 valid: 15 signed: 0 trust: 0-, 0q, 0n, 0m, 0f, 15u
gpg: next trustdb check due at 2020-06-15
- You verify that signed_sha256_hashes.txt has not been tampered with:
$ gpg --verify /tmp/signed_sha256_hashes.txt
gpg: Signature made Sat 30 Jul 2016 12:56:16 AM WEST using RSA key ID F379A1C6
gpg: Good signature from "Manfred Karrer manfred@bitsquare.io" [unknown]
gpg: WARNING: This key is not certified with a trusted signature!
gpg: There is no indication that the signature belongs to the owner.
Primary key fingerprint: 1DC3 C8C4 316A 698A C494 039C F5B8 4436 F379 A1C6
- Now that you know that the hashes inside signed_sha256_hashes.txt have not been tampered with (because the cryptographic signature checks out), you compare the hashes - if they match, you have the correct file.
$ sha256sum /tmp/Bitsquare-64bit-0.4.9.2.deb
1826d8c9a205db5a6dc4a2d1c56a52be95955817088e0989ab832dd8b915b07b /tmp/Bitsquare-64bit-0.4.9.2.deb
$ grep Bitsquare-64bit-0.4.9.2.deb /tmp/signed_sha256_hashes.txt
1826d8c9a205db5a6dc4a2d1c56a52be95955817088e0989ab832dd8b915b07b Bitsquare-64bit-0.4.9.2.deb
- For Windows, sha256sum and grep are not available.
- You need instead to open signed_sha256_hashes.txt with notepad and visually compare (the hashes).
- For computing the sha256 hash on Windows, I found this online.
As you can see above, the output of sha256sum matches the hash for Bitsquare-64bit-0.4.9.2.deb, as described in signed_sha256_hashes.txt, which I verified was the original file, by checking the digital signature.
All good, we have the right file.
Installation

I can only provide an example for Linux. Installing on a Mac or a Windows system should be equally (if slightly more graphical) simple.
$ sudo dpkg -i /tmp/Bitsquare-64bit-0.4.9.2.deb
(Reading database ... 91859 files and directories currently installed.)
Preparing to unpack .../Bitsquare-64bit-0.4.9.2.deb ...
Removing shortcut
Unpacking bitsquare (0.4.9.2) over (0.4.9) ...
Setting up bitsquare (0.4.9.2) ...
Adding shortcut to the menu
That is it! We are now ready to begin using the software.
Setting Bitsquare up
Congratulations! You have (perhaps) made sure that you are installing the software as the authors intended, and you are now ready to start it up.
Launch the software. You should be greeted by something like the following image.

Warning!
This guide assumes that you live in a country where direct access to the Tor network is not censored.
Bitsquare operates over Tor, and if you cannot connect to the Tor Network directly, you will need to use bridges. That is outside the scope of this tutorial, but drop a comment below if you are in this situation.
First launch
Give the software some time to catch up with the network, and eventually you should see ..
The main screen

At the top, we have a series of clickable icons separated by the bitcoin price (fiat denominated) and the available Bitcoin balance.
Bitsquare is also a bitcoin wallet, which you will learn to fund and operate in the next article in this series.
Since you have just installed the software and the Bitsquare developers are not that generous, your BTC balance sits predictably at 0.00.
The two icons at the far right (Settings and Account) will be the focus of this article.
The central part of the screen is taken by the order book pertaining to the relevant (crypto-)currency - by default, the US Dollar.
Under the order book, on the left you will see the top 3 offers to buy bitcoin, and on the right, the top 3 offers to sell bitcoin.
Securing Bitsquare

There are only a handful of settings that you need to change in order to improve the security of your installation.
By this I mean settings inside the Bitsquare application - I am not addressing the bigger scope of your opsec here.
First and foremost, you will set a high-quality, random password.
This topic has been beaten to death on steemit already, so I will not repeat everything that has been said once again.
Merely, I will tell you this: you need a password manager, and I recommend KeePassX - the Classic Edition (1.31 at the time of this writing).
You must keep regular backups of this application, and you must choose a strong password to secure the password manager itself.
So go ahead and generate a giant password for Bitsquare, using KeePassX (or your choice of password manager).
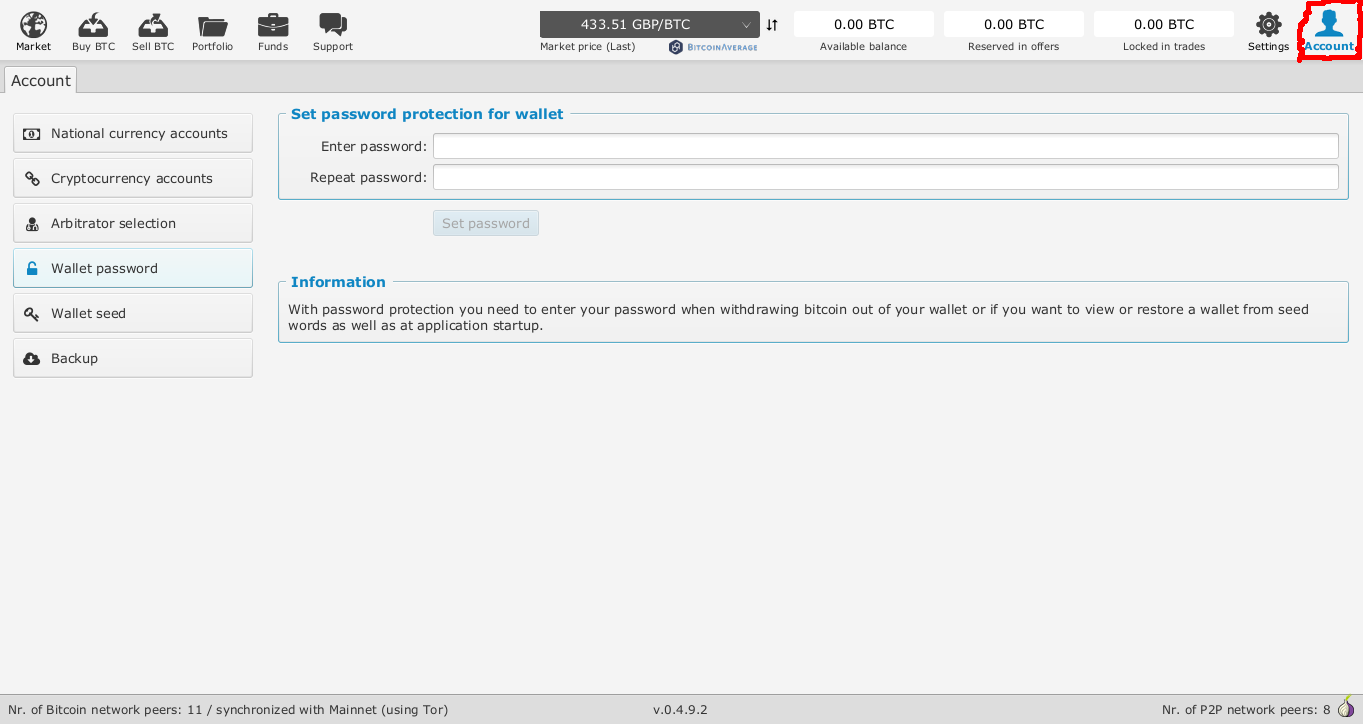
Then, in Bitsquare, click the Account button (top, far right), then on the left side, Wallet password.
You will see a healthy privacy disclaimer, which will become relevant later (see: "Customizing Bitsquare", below)

Copy-paste the randomly generated password from the password manager
You will receive the following confirmation:

From now on, your password will be required for certain operations, including starting up the Bitsquare application.
The other setting you should change is to make Bitsquare connect to the Bitcoin network via Tor - this will make your transactions more private, as they will no longer be tied down to your IP address.
To do that, click the Settings button (next to Account, top right), then click the Network info tab, and check Use Tor for Bitcoin Network.

Click "Apply and Shutdown", and wait for the application to come back - or restart it manually if it does not (happened during this demo session)
The startup screen will change slightly to reflect this change:

A few seconds later you should be back to the main screen. You should have also been asked during startup to input your Bitsquare password.
Account setup

None of the account information we will set up is transmitted from your computer (preserving your privacy), up to the point it has to be - and only to the person that needs it (your trading partner))
When it is time to trade crypto-currency for fiat (you want your SteemUSD to show up in your bank account as USD, EUR, etc), a peer-to-peer trading partner will send you fiat money in exchange for your Bitcoin (to recap: you are selling bitcoin and buying fiat money in this case)
For this to happen the trading partner needs to know where to send the fiat money.
Thus, we set up one or more accounts.
The first step is choosing which payment method to use.

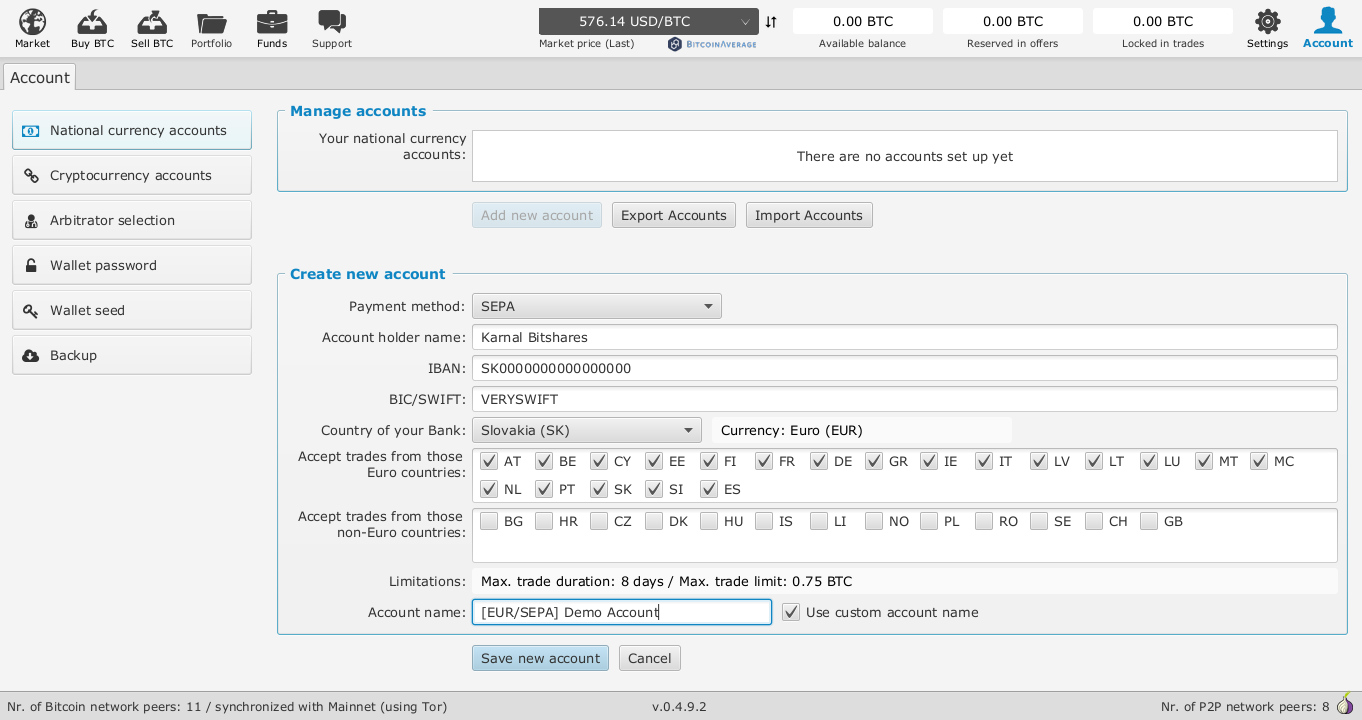
For purposes of this demo, I have set up an EUR account using SEPA, and a USD account for national transfers in the US.
NOTE: Once you create an account, it is not possible to edit the details - you have to delete the account, and start over. So, make sure all the details are correct before clicking Save new account.
Once again, click Account (top right corner). Then, click (on the left), National currency accounts.

(fictitious details, demo)
As you can see, for SEPA, it is even possible to select which countries we will be accepting business from.
Double-check your IBAN, SWIFT, and account holder. Name your account properly (I like using "[CURRENCY/PAYMENT_METHOD]: Description".
Finally, click Save new account.
For a national bank transfer in the US, here is how it might look like instead:

(fictitious details, demo)
Final customizations
Click Settings (top right).
The main screen there has some options that you should explore:

add and remove the national currencies that are relevant to you, ditto for crypto-currencies
Recap
We have installed and secured our Bitsquare installation, which will allow us to trade in and out of crypto-currency without recourse to a third-party exchange.
Furthermore, we have set up one or more bank accounts, where our trading partners will be sending fiat money in exchange for Bitcoin.
Though Steemit does not use Bitcoin, it is trivial to exchange SteemUSD (or indeed, STEEM) for Bitcoin using blocktrades (simple tutorial).
This makes it possible - and easy - to materialize some of our Steemit profits in our bank account(s).
We have also customized the software to our liking, ignoring all currencies that do not interest us.
