Welcome back on the road towards witnesshood.
In the first episode, we selected and ordered a brand-new dedicated server.
Today, we'll log into it and admire the new-car smell!
Since this is a from zero series, I'm not going to skip any details, so learning how to connect will take up the whole of today's session.
Connecting to a remote server
After ordering a dedicated server or a VM, the hosting company will give us the details needed to connect to it. In the (very typical) case of Hetzner, we get:
- IP address - the unique address of the server, in a format like 123.123.123.123
- Username - always "root" at the moment; more about that next episode!
- Password - the password for the root user
- Host key - a unique fingerprint that we can use to make sure we're really talking to the computer we think we are
Some other providers may also provide an SSH Port Number, but Hetzner uses the default so they don't include that.
That's all we need in order to log in, but before we can connect to our server, we need to install an SSH program on the computer that we'll use to access the server; in my case, that's my main desktop PC. SSH stands for Secure Shell, and is a standardised way to connect to a remote machine. SSH programs are available for practically every operating system, so follow the appropriate section below.
From a Mac
If you're on a Mac, SSH is already installed for you by default and available from the Terminal. There are 2 methods to start the Terminal, depending whether you prefer to use the Dock Launchpad or the Finder.
Launchpad method: Click the Launchpad icon in the Dock, type Terminal in the search field, then click Terminal.
Finder method: In the Finder, open the /Applications/Utilities folder, then double-click Terminal.
Whichever way you start the Terminal, you'll find yourself looking at a fairly blank window with a "$" prompt. To connect to your server, type the following, replacing 123.123.123.123 with the IP address your hosting provider assigned you:
ssh root@123.123.123.123
If your hosting provider mentioned a particular SSH port, specify it like this:
ssh root@123.123.123.123 -p 9222
From a Windows machine
There are 2 main options here. If you already use WSL2, the Windows Subsystem For Linux, or would like to install it, simply open a Linux shell and proceed as for the Linux instructions below.
However, most people will prefer to use PuTTY, a great free SSH program. Download the latest version here. In all likelihood you want the "64-bit x86 Windows Installer". NOTE: Please use that specific link rather than searching for PuTTY yourself. Sad to say, but there are some fake versions in the wild that only exist to steal your login details.
Don't worry, this isn't going to turn into a big list of stuff you need to install on your PC; PuTTY is the only thing we'll need to install for the entire Zero to Witness series.
Once downloaded, double-click on the installer, click "OK" through all the options, and you'll end up with PuTTY in your start menu.
Start it, and fill in the details as below.
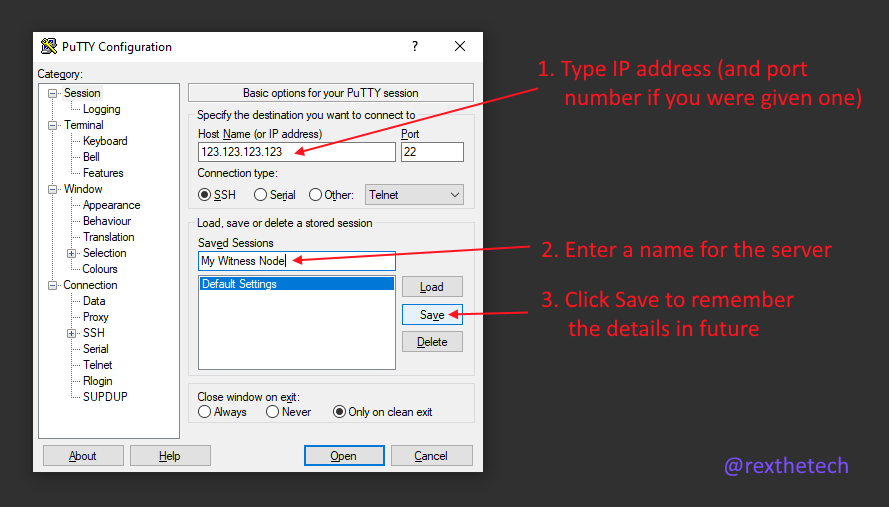
Finally, click the Open button. In future sessions, you'll be able to just double-click "My Witness Node" in the session list to open the connection.
Unlike the other ways of using SSH, with PuTTY you'll additionally need to type "root" when it asks you for the username to log in as.
From a Linux desktop or another Linux server
Like on a Mac, SSH will already be available for you.
Open a terminal (aka shell), and type the following, replacing 123.123.123.123 with the IP address your hosting provider assigned you:
ssh root@123.123.123.123
If your hosting provider mentioned a particular SSH port, specify it like this:
ssh root@123.123.123.123 -p 9222
First Login
Whichever way you've accessed SSH, you should now be looking at a password prompt. However, the very first time you connect to a given server, you'll see a message like:
The authenticity of host 123.123.123.123 can't be established.
ECDSA key fingerprint is SHA256:JdfwWC1nZKwW8MRfnxrHz4LYtS0WccrsAqd+eQw82Go.
Are you sure you want to continue connecting (yes/no/[fingerprint])?
If you're feeling paranoid, you could check back to the hosting provider's welcome mail and verify that the "ESDSA key fingerprint" shown in the message matches the "Host key" from the email. Hetzner provide this in 4 different formats in their welcome mail; we want to compare the one listed as "ECDSA 256".
Once you've verified the fingerprint (or skipped that process), type "yes" and hit enter. In the future, SSH will remember that you approved the fingerprint and won't ask again.
You should see a welcome screen something like this:
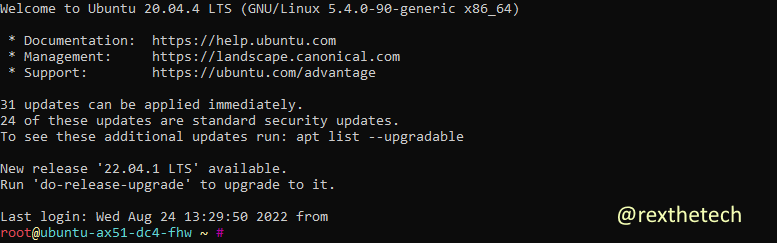
Woohoo! We're able to successfully connect to our new server. Next episode we'll be dealing with those updatable packages the welcome screen mentioned, but we're not going to do anything else with the server today.
Take a moment and bask in your success, then type:
exit
to close the session.
Optional Pro Tip: Give our server a hostname
This step is optional, but personally I find it annoying to deal with IP addresses and much prefer to think of server names. In the future, we might end up registering our own domain so that for example, our Witness Node has a globally-addressable name like "witness.rexthetech.com".
However, for now, it's enough to make it so that the server has a name that only works from the PC we're running SSH on, so that we can least do "ssh root@witnessnode" rather than having to remember the IP address.
The way we do this again depends on the type of computer we're using - but it may be the very last step of the whole process which does.
From a Mac
Open a Terminal as before, then paste this, replacing 123.123.123.123 with the server IP address:
sudo -- sh -c -e "echo '123.123.123.123 witnessnode' >> /etc/hosts";
It will ask for your password to confirm.
That command adds an extra line to your hosts file so that your computer interprets the name "witnessnode" as the IP we gave.
I'm going to gloss over the details of exactly how that command achieves that for now, though we'll learn in subsequent lessons what the various parts of it mean.
From a Windows machine
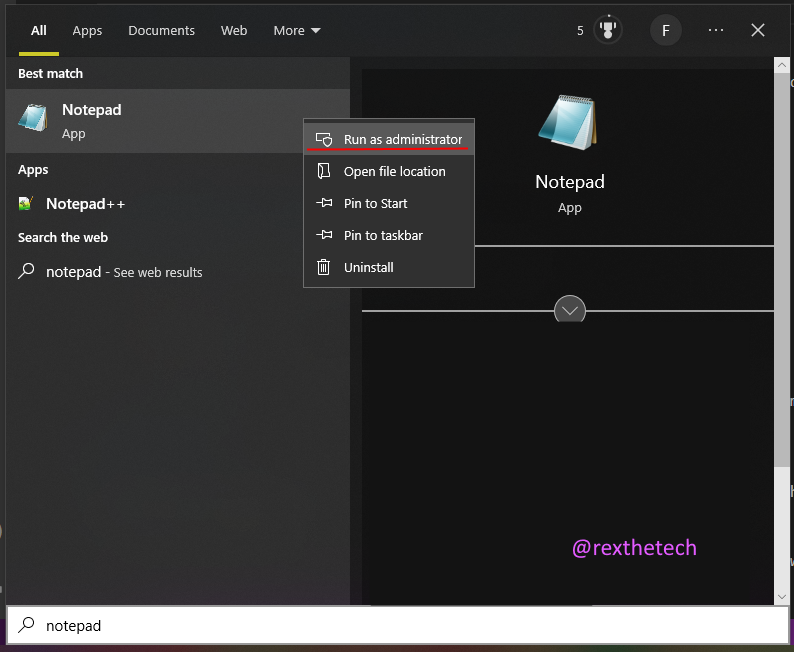
Start Notepad with Administrator rights by finding Notepad in your start menu, right-clicking on it, and choosing "Run as administrator":
Open the file C:\Windows\System32\drivers\etc\hosts.
At the very bottom, add the following line, replacing 123.123.123.123 with the server IP address:
123.123.123.123 witnessnode
From a Linux desktop or another Linux server
From a terminal, paste this, replacing 123.123.123.123 with the server IP address:
sudo echo "123.123.123.123 witnessnode" >> /etc/hosts
All platforms: Test the hostname
If using PuTTY, replace the IP address in the saved session with the name witnessnode.
Otherwise, check that you can now log into the server using:
ssh root@witnessnode
Or if you need to specify a port number:
ssh root@witnessnode -p 9222
What's Next?
Next time, we're going to learn how to navigate around the remote machine when using SSH, and perform a few basic tasks to update and secure the server before installing the Steem infrastructure.
This may have seemed like a slog, with all the different instructions depending on which operating system you're using. But, fear not! All setup we need on your main PC is now complete. For everything to come, we'll just be logging in to the server via SSH and issuing commands there.
If you have any queries about this episode, please do drop a comment below and I'll do my best to help.
EDIT: OK, we actually have one more little task to do on your main PC, when we set up certificate authentication next episode. Thanks to @moecki for the suggestion!