Cover Image Created by Adobe PS
Hello Steemians!
Now we are in the second week of Season 5. So, after a short vacation, I have brought another very interesting lesson which is about "How to Create Your Own Crypto Token "
Today I am going to really explain how to create your own Cryptocurrency Token that we can use with any type of financial activity. And also, it will be a valuable opportunity to start your own Cryptocurrency related project. Of course, you can learn it for educational purposes too. So let's go straight to the lesson.


Image Source
First I will explain what a crypto token is. It will be a great help to those who are not aware of this. Actually, when we talk about Cryptocurrencies, there are two major types. These are Crypto Coin and Crypto Token. Crypto Coin is created on its own blockchain such as Tron - Tron Blockchain. Also, if we need to create a crypto Coin, it requires a lot of coding knowledge and a lot of costs. But a token does not require its own blockchain. Actually, it depends on other blockchains. As an example, AXS token is created on Ethereum Blockchain. So, anyone can create Crypto Token with the support of any other blockchain. Therefore, we do not need much coding knowledge and a big cost. There is more information to talk about coins and tokens here, but we will talk only about the essentials as we have already learned them in the basic courses.
However, although anyone can make a crypto token, we have to work hard to get publicity and give it some value. Also, if we are creating a Crypto Token according to our valuable project, we can gain high publicity and higher value to our token. As an example, we can create a Crypto Token to distribute shares in our business. Then, anyone who wants to get involved with our business should buy these tokens. Furthermore, it is better for us to do more research when buying tokens in the market as anyone can easily create tokens here. So, today I hope to explain everything about creating Crypto Token step by step.


Before, creating a Crypto Token, we need to decide on which blockchain these tokens will be created on. Of course, we can choose any blockchain and vary the gas fee relative to each other. However, I will demonstrate it through Binance Chain. You are totally free to choose any other Blockchain according to your choice.
As the first step, we need an extension(Plugin/add-on) supported Web Browser. We can use Firefox, Google Chrome or any other Chrome Based Browser. I think almost everyone is aware of these things because they are very simple things.
Then we need a wallet to receive and store our Tokens. For that, we can use MetaMask Wallet. Here I will not explain the steps of installing MetaMask wallet as we have already discussed it in previous lessons. However, I will shortly remind it.
You can search https://metamask.io/ through your Web browser and Click on "Install MetaMask for..."
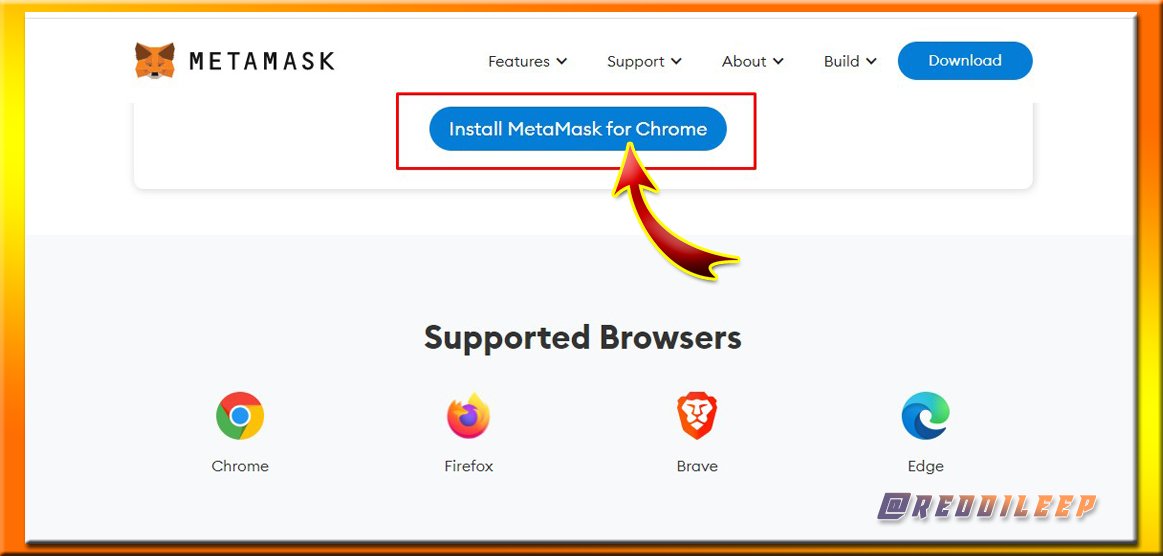
Screenshot was taken from https://metamask.io
After installing MetaMask Extension to your browser, you can easily create a wallet by clicking on "Create Wallet". It is very simple.

Screenshot was taken from MetaMask Extension
After creating your wallet, you have to deposit some amount of BNB (At least 15$ worth of BNB) through an Exchange wallet or any other wallet that you use.
As I have selected Binance Blockchain to create my Token, I can select "Binance Smart Chain" as the network Mode of my MetaMask Wallet. Let's see how it is done.
If you can't see the Binance Chain Network Mainnet in your Network Modes, you have to manually add it following the below settings.
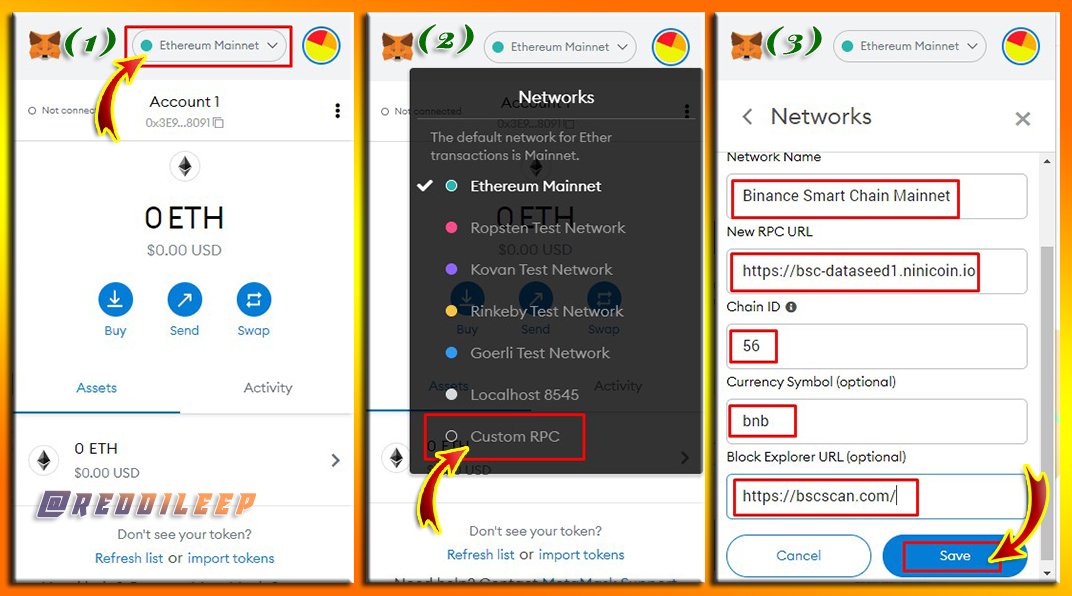
Screenshot was taken from MetaMask Extension
Then you can see Binance Chain Network Mainnet window through your MetaMask Extension. Further, you can deposit some amount of BNB to your BSC address. You can get an idea from the below-attached image.

Screenshot was taken from MetaMask Extension and the Binance Exchange
Now I have successfully deposited some amount of BNB to my MetaMask BSC address. Now we are totally ready to create our Crypto Token.


Basically, the Remix IDE is a web-based application that we can use for coding and deploying Ethereum Smart Contracts. Even we are going to make Binance Smart Chain based Token, we can use this application to code any Smart Contracts based program. Here we can customize the source code easily. Let's do it.
As the first step, we have to open the Binance Chain Docs web page. Now we can select "BEP20 Asset" from the right side of the page and then select "Issue BEP20"

Screenshot was taken from https://docs.binance.org/
After that, we can see a complete tutorial for all the following steps. However, I will demonstrate important content here step by step.
Before opening the Remix IDE, we have to download the source code, For that, we can click on "bep20 token template here" from the above-explained web page.

Screenshot was taken from https://docs.binance.org/
Then we can easily download the Source Code and I will further explain how to customize the downloaded Source Code.


Now I can click on https://remix.ethereum.org to open the web-based coding application. Then we can see the application like the below-attached screenshot.

Screenshot was taken from https://remix.ethereum.org

Now we need to create a new file in the "Contracts" column. And also, we have to rename that file into "BEP 20 Token.sol". Here ".sol" means the file format. We must use this when we create a new file. Then we can press enter. Check the below screenshot to get an idea.
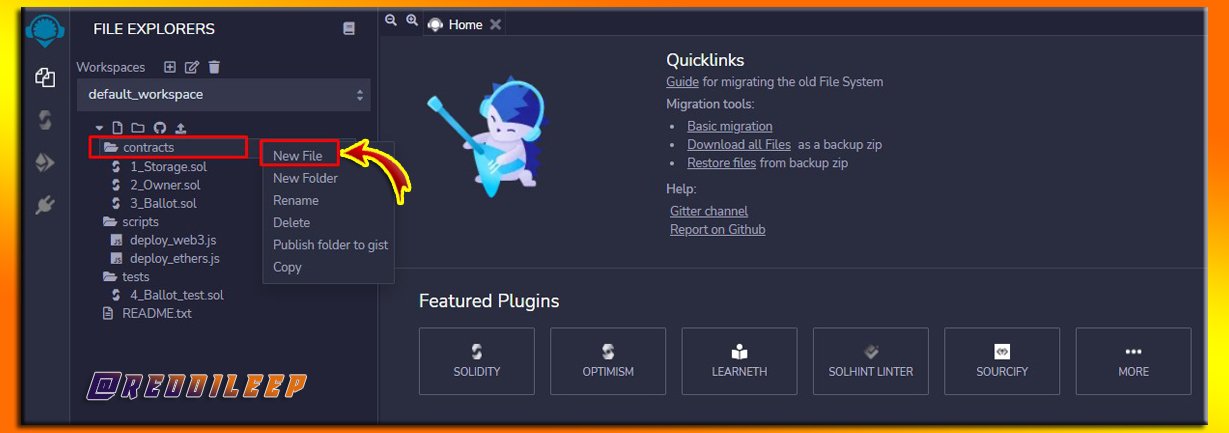
Screenshot was taken from https://remix.ethereum.org

Screenshot was taken from https://remix.ethereum.org

Now we can copy and paste our downloaded source code into this blank space. For copying the source code, we have to open the downloaded "BEP20Token.template" file through our notepad application. Then we can easily copy and paste these data into the Remix IDE application.

Screenshot was taken from https://remix.ethereum.org
Now we can customize this code according to our requirements. Actually, here we can get many advantages customizing these source codes. However, I will explain only the essential things to create our Crypto Token.

Now we have to find the exact code line which consists of constructor details. (Code line 351) In this section, we can include all the main details of our Crypto Token such as Token Name, Token Symbols and Total Token Supply. Below I've attached the screenshot before customizing it.
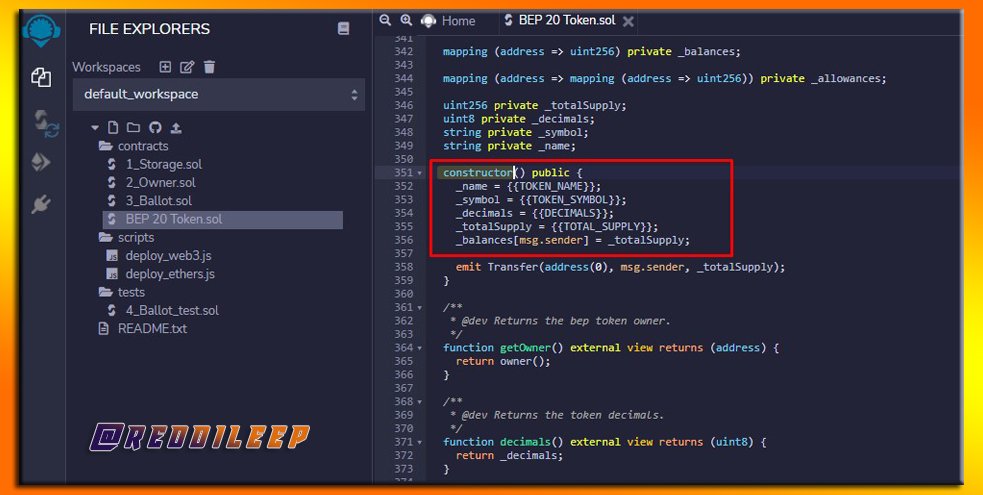
Screenshot was taken from https://remix.ethereum.org
Now we can edit the source code like the below format. (You can include any detail. But you should follow the below format.)
- name = "SCA season 5";
- symbol = "SCA";
- decimals = 18;
- totalSupply = 1000000 * 10 ** 18;
Here I will not explain the meaning of each section as we have already familiar with those names. Below I've included a screenshot after customizing the above details in the template.

Screenshot was taken from https://remix.ethereum.org

After customizing relevant details, we can compile our token. For that, we have to click on the Compiler icon. Then we have to click on "Compile BEP20Token.sol". Check the below-attached screenshot to get an idea.

Screenshot was taken from https://remix.ethereum.org
Then we can select the "Deploy and Run Transactions" icon from the left toolbar. After that, click on "Deploy".

Screenshot was taken from https://remix.ethereum.org
Then we can confirm all the details through this window as seen in the screenshot below.

Screenshot was taken from https://remix.ethereum.org
Now we have completed all the steps of creating our Token. So, it's time to bring these tokens into our own wallets. I will explain it in the next subtopic.


Now we need to connect our MetaMask wallet with the Remix IDE application. For that, we need to open the MetaMask wallet through our installed extension. Then click on "Account option icon" (Three dots icon). After that, we have to select "Connected Sites"

Screenshot was taken from https://remix.ethereum.org and MetaMask Wallet
Now you can follow the below steps one by one. As this is very simple, I will not go too deep into explaining each step.

Screenshot was taken from MetaMask Wallet
Finally, we can click on the "Connect" icon. Then, if we can see the Connected icon from the left side of our MetaMask Wallet, we have successfully connected.
After that, again we can come to the Remix IDE Application window and select the "Injected Web3" option from the Environment section. Then click on "Deploy"

Screenshot was taken from https://remix.ethereum.org
After clicking on the "Deploy" icon, we can see a popup window of our MetaMask wallet and it will show the gas fee of the transaction. Then we can confirm it to complete the transaction.

Screenshot was taken from https://remix.ethereum.org and MetaMask Wallet


Finally, we can verify the Transaction through Block explorer. Therefore, I need to find the hashcode of the transaction. For that, we have to click on the "Arrow Icon"( right to the Debug icon)

Screenshot was taken from https://remix.ethereum.org
Then we need to copy the Hash code which we can find below the page. Check the below-attached screenshot. And also we can find it through our MetaMask Wallet Transaction hash code.

Screenshot was taken from https://remix.ethereum.org
Now I can check that Hash code through the BSC Scan explorer. Below is my Transaction hash code which belongs to "SCA season 5" Tokens.
0xb33b26d9beb8066f62718086da64f63fb58a8cf8aa1de61b9204260fd36a4aa9
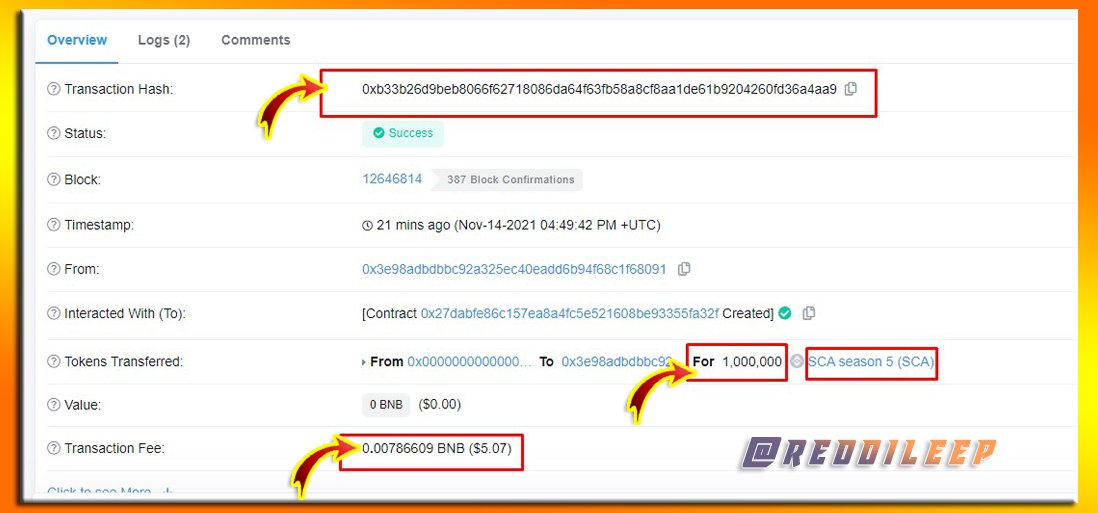
Screenshot was taken from https://bscscan.com
Finally, we need to click on our Token name to find our contract address. Then we can show our Token in our wallet.

Screenshot was taken from https://bscscan.com

Screenshot was taken from https://bscscan.com
Now we can copy the above-Highlighted Contract address. Then we need to open MetaMask wallet and click on "Import Tokens"

Screenshot was taken from MetaMask Wallet
Then we can paste the copied Contract address same as the below-attached screenshot.

Screenshot was taken from MetaMask Wallet
Finally, click on Import Tokens.

Screenshot was taken from MetaMask Wallet
Now you can see I have successfully created 1 Million SCA Tokens and deposited them in my MetaMask Wallet. In the next lesson, I will explain how to list these tokens on a public Crypto Exchange and further activities with these tokens.


In my lesson, I have described only a summary of these topics and you should do better research and answer all the following questions in your own words. You are totally free to use any language. But when you mention something in the screenshots, you must use only English.
1- Introduce how to create your own Cryptocurrency by differentiating between token and coin.
2- Demonstrate how to prepare everything needed to create a crypto token, such as making a wallet and adding a few coins to it to pay the gas fee. (Here you should deposit at least 15$ worth of BNB coins from your exchange wallet to the newly created wallet)
3- Explain the Remix IDE and download the source code by showing each step. (Screenshots required)
4- Customize the source code according to your imagined future project. (In addition to simply stating the steps, you should provide a clear explanation about each customized code)
5- Demonstrate all the steps to add your created crypto token into your any wallet such as Trust Wallet and MetaMask wallet. (Screenshots required)
6- Verify transactions and other details through the relevant Block Explorer. (Screenshots required)


You must submit your Homework Posts in the Steemit Crypto Academy community.
You have to include all the details in your own words without including someone's words in your content. The concept can be the same but your content should be unique.
You must include at least 800 words in your homework posts.
Plagiarism is strictly prohibited in the whole Steemit platform and you will not receive any privileges.
All the screenshots and images should be fully referenced and the referenced images should be copyright-free. And also, include your user name as a watermark in every screenshot.
You should use tags #reddileep-s5week2 #cryptoacademy and your country tag among the first five tags. Furthermore, you can include relevant tags such as #crypto-token , #own-token.
According to new rules changes, only people actively, and successfully, participating in #club5050 will be eligible to get rewards for the Steemit Crypto Academy homework tasks.
Your homework Title should be
[How to Create Your Own Crypto Token ]-Steemit Crypto Academy | S5W2 | Homework Post for @reddileepHomework task will run from Sunday 00:00 November 21th to Saturday 11:59 pm November 27th UTC Time.
If you have a reputation of 65 or above, and a minimum SP of 900, then you are eligible to partake in this Task. (You must not be powering it down and your effective SP should not be delegated-in SP). And also, if you have used any buying vote services to build your reputation, you will not be eligible to partake in this Task.
If you didn't receive the score for your homework post within 48 hours, you can put the link in the comment section. Otherwise, don't leave your post link here.
If you have any queries related to my lesson, you are totally free to ask anything in the comment section.

Cc:
