Hello and Greetings Everyone. This is your very own Haidermehdi, Country Representative of Pakistan and Admin Steemit Pakistan.
As stated earlier, I have been trying to explore adobe illustrator and things went well in the first post as many people showed interest. Thus I am now looking forward to bringing it to shape by teaching more :p I have never ever taught anyone so perhaps I feel that I am a bad teacher. But let's see how we go in this course :p This is our 11th lecture and I am happy that so far I have been able to teach you all in the right way possible..... (As far as I believe lol).

In this lecture, we are going to learn how to make repeated patterns. It's going to be easy. In fact, I should call it very easy as there are not many points to remember.
In this post, I am looking to try to make 2-3 patterns. One of those patterns, we will discuss in-depth and see how we can make repeated shapes or patterns.

Opening The Adobe Illustrator

As soon as we click on create, this will create an art box for us of A4 size. We now shall draw any image. Let's draw an ice cream first :p It's not gonna be exact but I will use simple images and try to make an ice cream :p
Suppose we are done with a simple image.
Select the image and press Ctrl+G. This will group your image as one.
If you don't want to group or want to ungroup, then press Shift Ctrl G.
Once you have grouped the image:
Go to the Windows Tab.
Click on Pattern Options.
A tab will open, click on the three lines on the left corner of the tab and then click on make pattern.
The below screen would then appear in front of you.


After we have reached at this point, We can see on the top of the screen that there are 3 options.
Done
Save a Copy
Cancel
Also, we can change the orientation of the pattern. For doing that,
Select the image you designed, take the cursor to its edge, and then rotate or resize as much as you want..
After setting it in the way you want, Click on done, and then you can see your pattern in the color swatches.
Let's now draw a rectangle or a square and implement our pattern in that.

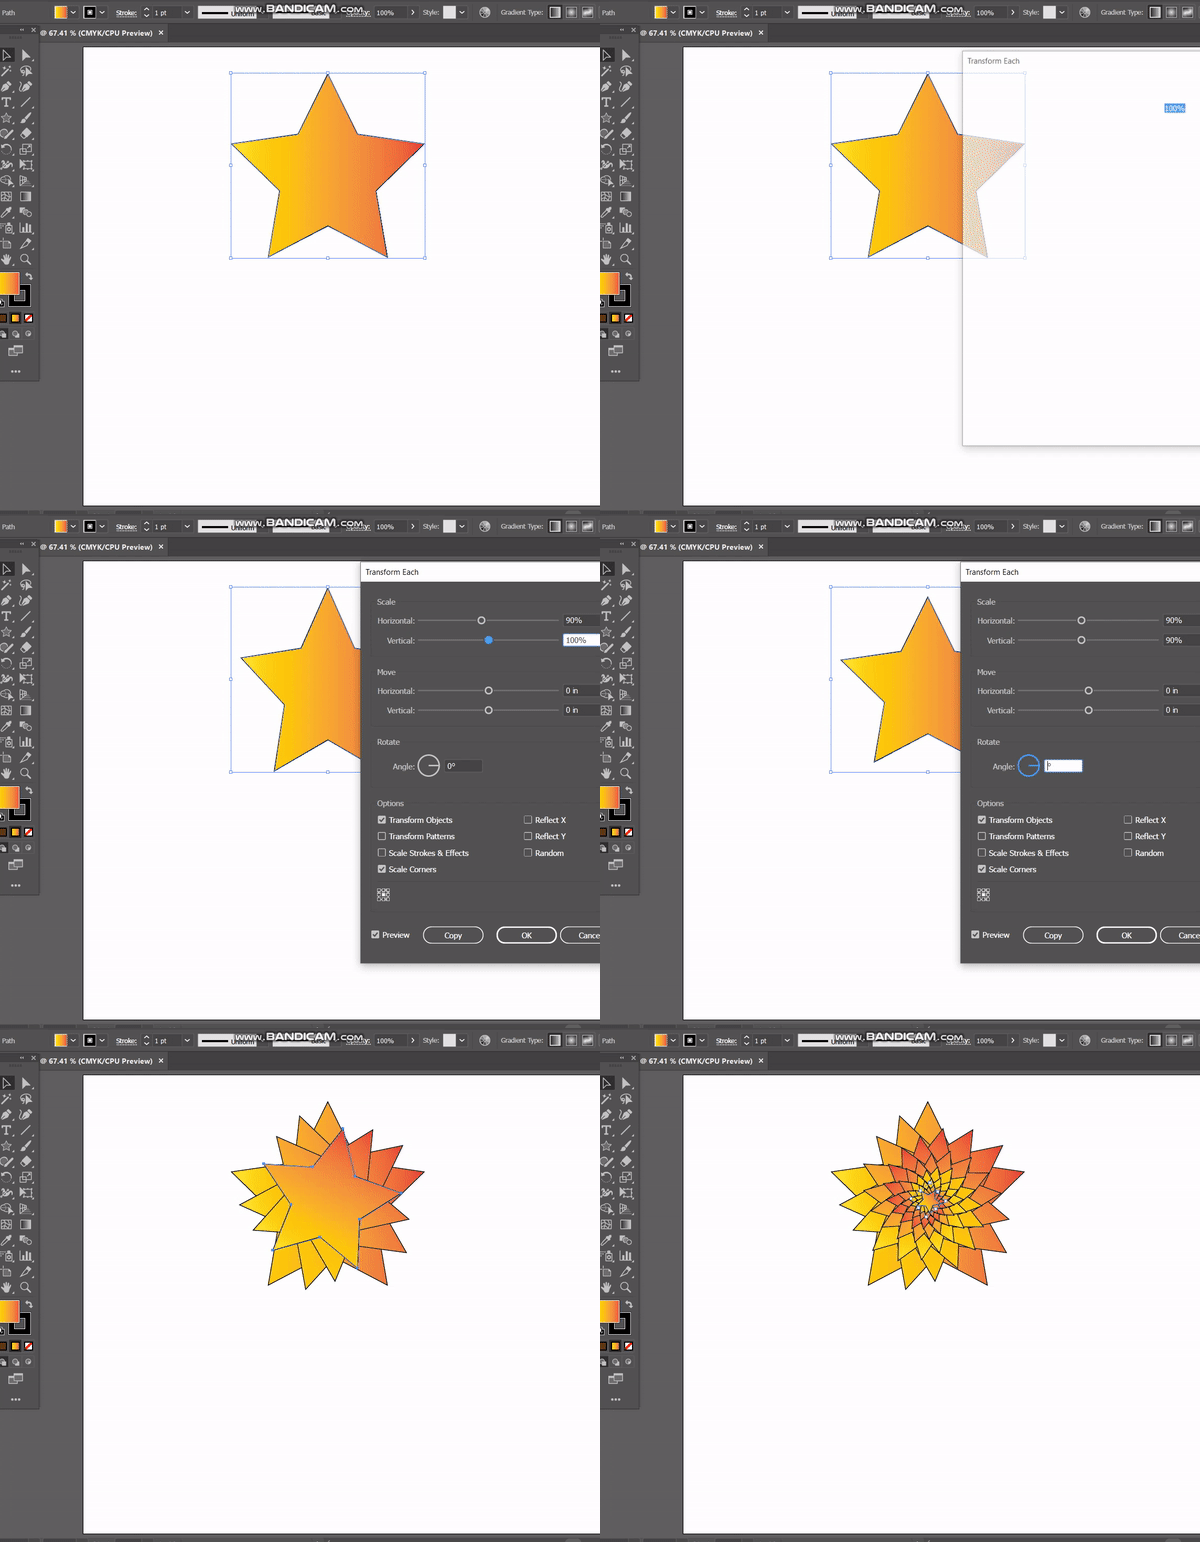
Now let's try to draw some other patterns using a simple star shape and a new tool "The Transform Option".
Draw a Star using the Star Tool. Fill it with some gradient color from the swatches.
Select the Star, right-click on it and then go to Transform.
In the transform dropdown, select transform Each.
Then decrease the height width by 10% and set the angle to 20 as shown in the gif below.
Check the preview box and click on copy. Then continue making the shape using Ctrl+D buttons.
.gif)

Now let's first group this shape and make a few copies. Or No, let's make this a pattern and implement it in a circle using the Simple patter Options :)
Let's first explore another option or a tool. We call in the Clipping Mask. We will learn further about it in the next lecture.
Use Ctrl G to group the shape. Make a rectangle over the shape, not fully covered. Then select both the shapes, keep the triangle above the shape. Then go to Object, click on clipping mask and then click on Make.

- Now let's make it a pattern and put it in a circle :)

I am ending the day # 11 post here. Good Luck everyone with your work.
We will meet again with a new lecture soon IA. Till then goodbye and take care. If you are interested in this one and have followed me, I would love to see your homework on doing this task :p Any problems, feel free to ask and we will solve them together :)
Powerup Commitment:
| Date From | Date Today | Amount Powered Up | Amount Transferred | Club Status |
|---|---|---|---|---|
| 20-10-2021 | 28-02-2022 | 9025 | 0 | Club100 |
Yours, Haidermehdi.
Country Representative Pakistan.
Steem On!
#CLUB100
