Saludos mis queridos amigos de Steem Kids. 💜🎨
Me complace presentarles mi cuarta publicación en la comunidad como Tutora de Dibujo Digital. Mediante mis lecciones de dibujo, les estaré enseñando y guiando en el maravilloso mundo de colores, en base a todo lo que he aprendido autodidácticamente. ¡Espero que sea de su agrado mi trabajo y que aprendan mucho!

¿Eres nuevo en el dibujo o ya tienes experiencia? Mi querido niño, igual puedes participar en esta lección y aprender cada día mas, porque “No necesitas ser un experto para ser un gran artista” – Rui Torres.
Hoy les presento mi cuarta lección, relacionada con la Aplicación de Dibujo Ibis Paint X, la que estaré utilizando para las lecciones y será la mayor protagonista de las mismas. Puedes descargarla mediante el siguiente link: Ibis PaintX
¡Ahora sí! Comencemos con esta lección.
Herramienta "Difuminar"
Ibis Paint X posee muchas herramientas y opciones que nos permiten dar el mejor efecto y acabado a nuestros dibujos. Entre ellas destaca la herramienta "Difuminar" representada con un icono de una mano y ubicada en el menú del ícono de pincel en la parte inferior de la aplicación:
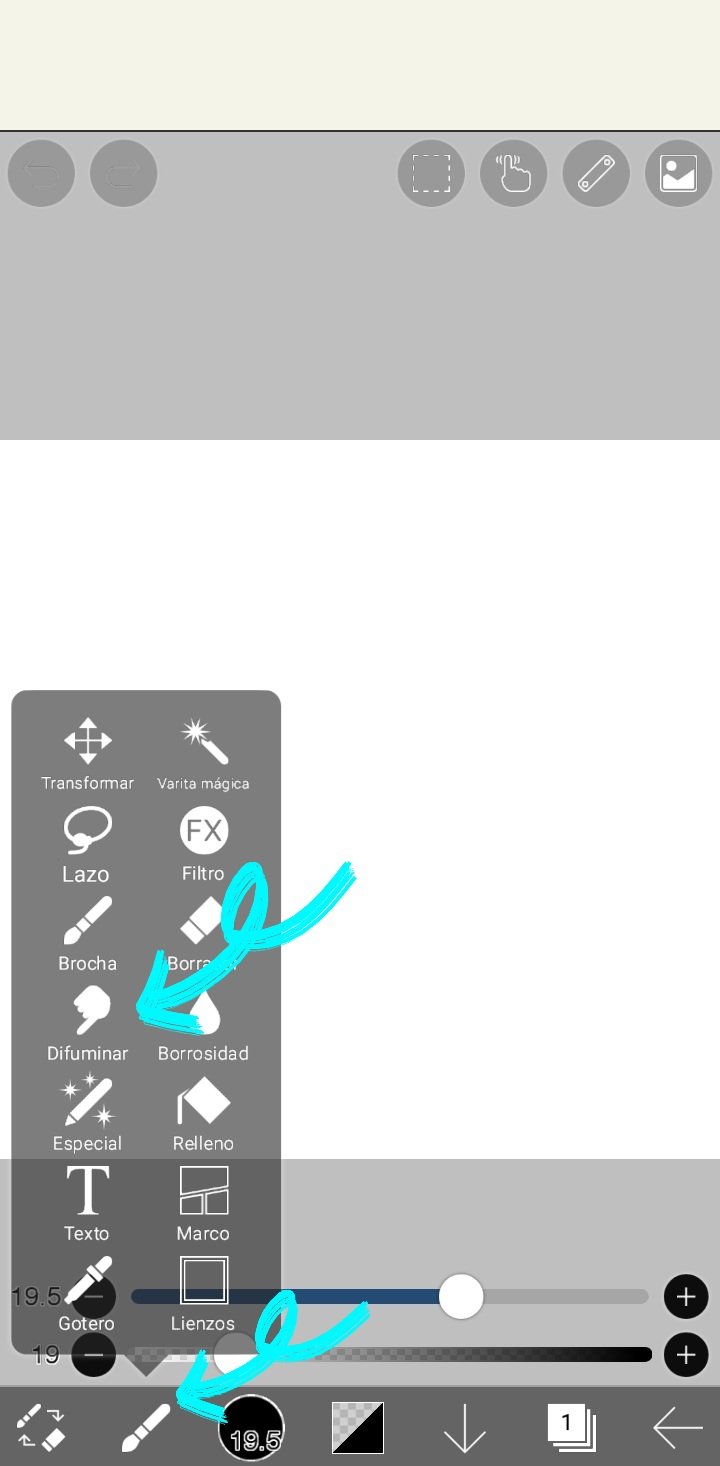
Esta herramienta nos permite combinar colores y desvanecerlos parcialmente.
Al hacer clic en el ícono, podemos utilizar la herramienta. Además, aparecerán las siguientes opciones:
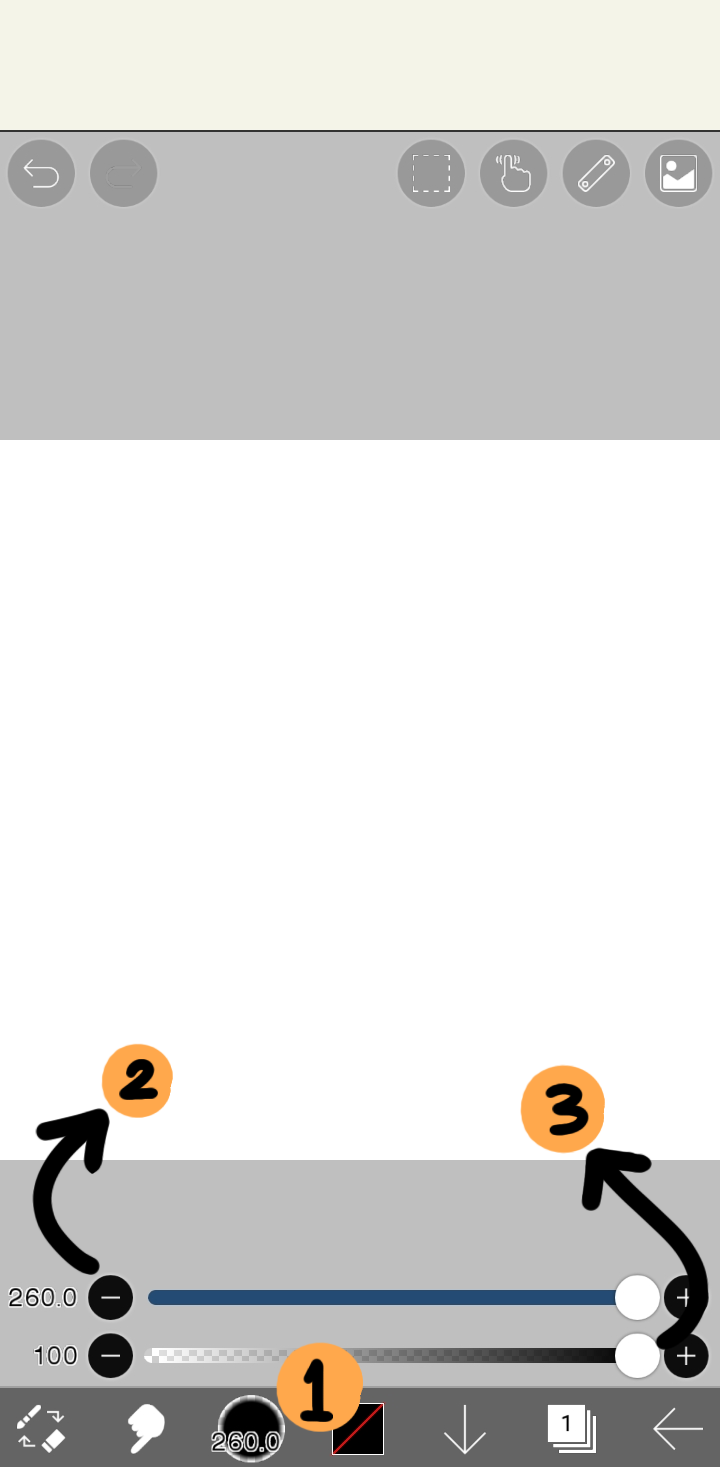
1. Tipo de Pincel de Difuminado: Permite elegir un tipo de pincel para utilizar, así como he explicado en las lecciones pasadas.
2. Tamaño del Pincel de Difuminado: Al rodar el círculo de la barra hacia la derecha, aumentamos el tamaño del pincel, y hacia la izquierda, lo disminuimos.
3. Opacidad del Pincel de Difuminado: Funciona de la misma forma que la opción anterior, y permite que el difuminado sea más intenso o leve.
Esta herramienta suelo usarla en mis dibujos, para dar efectos de iluminación, sombras, y otorgar detalles leves. Sin duda, es muy buena y permite dar a tus dibujos un lindo toque artístico.
Ejemplo de Uso de la Herramienta "Difuminar"
A continuación les presento un dibujo simple que elaboré, de un atardecer y un pequeño bote en el río, en el cual utilicé la herramienta Difuminar para dar el efecto de desvanecimiento del color de todo el lienzo.
Primero seleccioné un lienzo tamaño 1:1, como he explicado en las lecciones pasadas. Luego comencé a seleccionar colores en la rueda que ofrece la aplicación, y coloreé con la "brocha dura", líneas horizontales usando tonos naranja en degradación. Luego activé la herramienta "Difuminar", usé el pincel "Rotulador" en tamaño máximo (260 px), opacidad al 100% y comencé a dar pequeños toques en todo el lienzo.
Luego dibujé la silueta en negro del bote en el agua, y realicé unos puntos pequeños en blanco en el cielo, que simulan las estrellas. Finalmente, usé nuevamente la herramienta "Difuminar" de la misma forma que en el caso anterior, obteniendo de esta forma mi dibujo.


Tarea para la Casa:
Ingresa a la Aplicación Ibis Paint x, y elabora un dibujo digital libre y a tu preferencia, donde utilices la herramienta "Difuminar" explicada a lo largo de esta lección. Presenta el paso a paso de tu lindo dibujo como desees, por ejemplo: mediante capturas de pantalla desde la aplicación.
Puedes utilizar la herramienta sólo en una parte de tu dibujo o en su totalidad. Tu la aplicaras como desees.
Puedes dibujar algo sencillo, como por ejemplo, un paisaje tal como yo elaboré, una cascada, un cielo nublado o con un arcoíris, entre otros.
Contenido de Ayuda: Recopilación de mis Lecciones:
🎨Lección 1: LINK
🎨Lección 2: LINK
🎨Lección 3: LINK
Reglas para hacer tu tarea:
1- Debes ser un niño verificado por la comunidad.
2- Debes realizar tu publicación en la comunidad Steem Kids y dejar el enlace de tu entrada en esta publicación, en la sección de comentarios.
3- Debes pertenecer al club5050, club75 o club100.
4. Tu publicación debe contar con mínimo 300 palabras y los tags adecuados; siendo esencial # steemexclusive.
5. Tu contenido debe ser de autoría propia. Si utilizas información de un tercero, indica las fuentes correctamente para evitar el plagio y sus consecuencias en la plataforma.
6. Utiliza los tags en tu publicación correctamente.
Recomendaciones para hacer tu Tarea:
1. Haz resteem a esta publicación para que más niños puedan unirse a la lección.
2. Si tienes alguna duda, déjamela en los comentarios de esta publicación. ¡Con gusto te responderé!
3. Diviértete y aprende ¡Haz tu publicación sin miedo alguno! Te voy a calificar y corregir con amor y respeto.
Se aceptan las tareas para la casa hasta el vencimiento de esta publicación.
10 % de las recompensas de esta publicación son para la cuenta comunitaria @steemkidss
CC: @patjewell, @ngoenyi
Greetings my dear friends of Steem Kids. 💜🎨
I am pleased to present my fourth publication in the community as a Digital Drawing Tutor. Through my drawing lessons, I will be teaching and guiding you in the wonderful world of colors, based on everything I have learned self-taught. I hope you like my work and that you learn a lot!
Are you new to drawing or already experienced? My dear child, you can still participate in this lesson and learn more every day, because “You don't need to be an expert to be a great artist” – Rui Torres.
Today I present to you my fourth lesson, related to the Ibis Paint X Drawing Application, which I will be using for the lessons and will be the main protagonist of them. You can download it through the following link: Ibis PaintX
Now yes! Let's get started with this lesson.
"Smudge" tool
Ibis Paint X has many tools and options that allow us to give our drawings the best effect and finish. Among them, the "Smudge" tool stands out, represented by an icon of a hand and located in the brush icon menu at the bottom of the application:
This tool allows us to combine colors and partially fade them.
By clicking on the icon, we can use the tool. In addition, the following options will appear:
1. Smudge Brush Type: Allows you to choose a type of brush to use, as I have explained in past lessons.
2. Smudge Brush Size: Rolling the circle on the slider to the right increases the size of the brush, and to the left decreases it.
3. Smudge Brush Opacity: Works in the same way as the previous option, and allows the smudge to be stronger or lighter.
I usually use this tool in my drawings, to give lighting effects, shadows, and give slight details. Without a doubt, it is very good and allows you to give your drawings a nice artistic touch.
Example of Using the "Smudge" Tool
Here is a simple drawing I made, of a sunset and a small boat on the river, in which I used the Smudge tool to give the effect of fading the color of the entire canvas.
I first selected a 1:1 sized canvas, as I have explained in past lessons. Then I started to select colors in the wheel that the application offers, and I colored with the "hard brush", horizontal lines using orange tones in degradation. Then I activated the "Smudge" tool, used the "Marker" brush at maximum size (260 px), 100% opacity and began to make small touches on the entire canvas.
Then I drew the black silhouette of the boat in the water, and made some small white dots in the sky, which simulate the stars. Finally, I used the "Smudge" tool again in the same way as in the previous case, thus obtaining my drawing.
Homework:
Enter the Ibis Paint x Application, and create a free digital drawing of your choice, where you use the "Blur" tool explained throughout this lesson. Present the step by step of your cute drawing as you wish, for example: by screenshots from the application.
You can use the tool only in a part of your drawing or in its entirety. You will apply it as you wish.
You can draw something simple, such as a landscape like I did, a waterfall, a cloudy sky or a rainbow, among others.
Help Content: Compilation of my Lessons:
🎨Lesson 1: LINK
🎨Lesson 2: LINK
🎨Lesson 3: LINK
Rules for doing your homework:
1- You must be a community verified child.
2- You must make your publication in the Steem Kids community and leave the link of your entry in this publication, in the comments section.
3- You must belong to club5050, club75 or club100.
4. Your publication must have a minimum of 300 words and the appropriate tags; being essential # steemexclusive.
5. Your content must be your own. If you use information from a third party, indicate the sources correctly to avoid plagiarism and its consequences on the platform.
6. Use the tags in your publication correctly.
Recommendations for doing your Homework:
1. Please resteem this post so more kids can join the lesson.
2. If you have any questions, leave them in the comments of this post. I will gladly answer you!
3. Have fun and learn Make your publication without any fear! I will grade and correct you with love and respect.
Homework is accepted until the expiration of this publication.
10% of rewards from this post go to the @steemkidss community account
CC: @patjewell, @ngoenyi