È proibito ogni riutilizzo dei contenuti presenti in questo post – e dei loro derivati –, fatta eccezione la diffusione senza modifiche attraverso canali media e social media.

Ciao!
Oggi torno a pubblicare un post incentrato sul cibo. Questa volta colgo l'occasione per partecipare al contest organizzato da y @italygame nella comunità Italy: THE BEST FOOD POST. Puoi cliccare sul nome in grassetto per consultare il post ufficiale. Diversamente dalle volte scorse, in quest'occasione il piatto preparato va un po' in secondo piano, perché ho voluto soffermarmi su un lato più importante che è quello dell'impasto nella preparazione di una focaccia. Qui in Italia ci sono moltissime scuole di pensiero per gli impasti di pizze e focacce. Io non sono un esperto e ho adottato una prova abbastanza indicata per le mie abitudini: un impasto a medio-rapida lievitazione e con una percentuale d'acqua non troppo elevata.
Ovviamente non voglio lasciare nessuno a bocca asciutta, per cui ho infarcito la ricetta con degli avanzi che avevo in casa, ottenendo un risultato davvero squisito. Ma veniamo a noi.
Gli INGREDIENTI e l'ATTREZZATURA
Gli ingredienti sono purtroppo molto indicativi, poiché al solo variare della quantità d'acqua che la farina trattiene (e che noi non vediamo a occhio nudo) cambia per esempio la quantità d'acqua che noi dovremo aggiungere durante la preparazione. Purtroppo, possiamo trovare la ricetta ideale soltanto dopo una serie di tentativi – qualcuno dal risultato vicino all'essere definito scadente – variando ogni volta le dosi quel poco che si può. Qui sotto trovi la ricetta che utilizzo io.
Per una persona, le DOSI APPROSSIMATIVE sono:
- farina 0 o farina 00 (275 g circa)
- acqua (170-190 ml)
- lievito di birra secco (2 g)
- miele (mezzo cucchiaio da caffè) o zucchero (in sostituzione)
- olio extra vergine d'oliva
- sale
- farina di semola
e l'ATTREZZATURA necessaria è:
- scodella
- tazza
- bicchiere o contenitore per l'acqua
- teglia
- cucchiaini da caffè
- piatto
- coltello e cucchiaio
- tovaglia o tovagliolo pulito
- forno
Per la successiva FARCITURA, io ho utilizzato:
- cime di rapa
- salsiccia
- provolone
- formaggio a buchi
- olio extravergine d'oliva
La PREPARAZIONE
Come ho accennato, ci sono mille modi per preparare l'impasto. Quello che io utilizzo di solito necessita di un tempo di circa 8-10 ore (dal momento d'inizio della preparazione a quello del piatto finale).
Per prima cosa prendo una scodella dove verso la farina, ma non tutta: ne verso 190g. In un bicchiere, peso l'acqua: io la consiglio tiepida, mai fredda. Inoltre, la ricetta iniziale prevedeva 190 ml d'acqua, ma, a seconda delle farine che troviamo in commercio (alcune con una percentuale d'acqua maggiore, proprietà spesso indicata come “grado di idratazione maggiore”), dobbiamo abbassarla. Io, per esempio, sono sceso a 170 g d'acqua se uso la farina che attualmente prediligo.
Fatto questo, continuo pesando 2 grammi di lievito di birra secco in polvere e mettendolo in una tazza. Subito dopo, verso all'interno un poco dell'acqua pesata in precedenza e, con un cucchiaino da caffè, inizio a mescolare, cercando di far sciogliere il lievito.
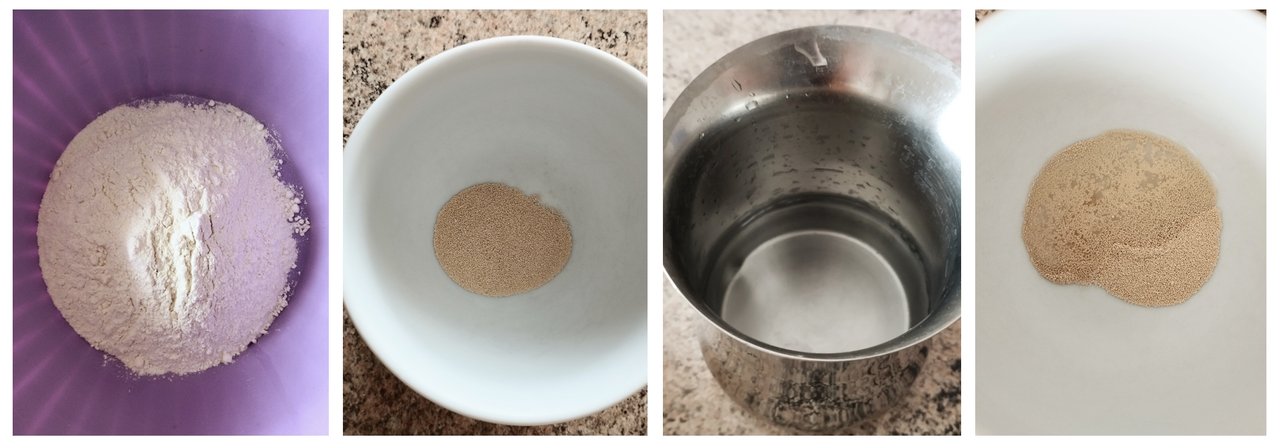
Prendo poi un vasetto di miele e ne riempio mezzo cucchiaino da caffè. Lo verso nella tazza, e verso di nuovo un poco dell'acqua pesata in precedenza. Continuo a mescolare fino a che non ottengo una soluzione apparentemente omogenea.
A questo punto, verso il lievito contenuto nella tazza all'interno della scodella con la farina. Prendo un cucchiaio e inizio a mescolare, aggiungendo tutta l'acqua rimasta nel bicchiere. Si formerà una specie di crema disomogenea. A questo punto puoi aggiungere il sale, anche se io spesso lascio l'impasto senza, considerato che la successiva farcitura sarà ben saporita.

Continuo a mescolare fino a che non vedo una crema più omogenea. A questo punto avvolgo la mia scodella in una tovaglia o un tovagliolo pulito. Attenzione! È importante che la scodella rimanga “chiusa” all'interno del panno, senza lasciare direttamente all'aria il nostro primo step d'impasto.
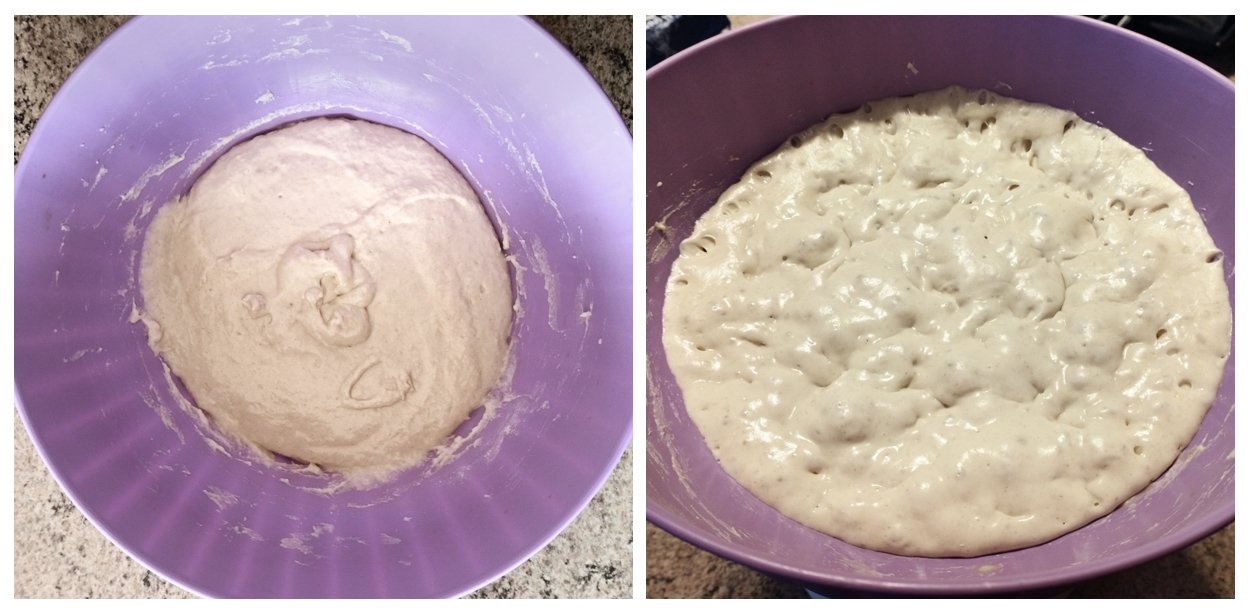
Poso poi il tutto da parte e lascio lievitare per circa 240 minuti. Se la lievitazione avviene, puoi vedere nella foto sotto come la pasta dovrebbe mostrarsi nel momento in cui la scoprirai.
Finito? Certo che no.
A questo punto prendo la farina e peso 85 grammi tondi, cioè quello che mancava per raggiungere i 275 grammi finali indicati nella dosi iniziali della ricetta. Aggiungo la farina nella scodella con l'impasto al primo step e termino con un cucchiaio d'olio. Prendo di nuovo il cucchiaio e inizio a mescolare, terminando quando l'impasto raggiunge un'apparenza di omogeneità. Dovremo arrivare a un punto in cui l'impasto lasciato per alcuni secondi fermo tenderà ad aderire alla scodella, ma se lavorato di continuo rimarrà ben separato da quest'ultima.
Poi che cosa fare? Nel corso dei mesi, a questo punto ho provato due strade: o lasciamo lievitare per qualche altra ora nella scodella e poi prepariamo successivamente delle “palle” di pasta, oppure prepariamo subito delle palle di pasta e lasciamo lievitare quelle. In questo post io mostro la seconda strada. Preparo le teglie (nel mio caso di alluminio) versandovi della semola rimacinata (che ha una grana più grossa della farina 0 o 00).

Poi prendo le palline: più tecnicamente, queste palline si chiamano panetti. Adagio il mio panetto sulla semola nella teglia e lo copro con tovaglia o tovagliolo. Ripongo da parte il tutto e attendo. È importante che la pasta così coperta rimanga ad una temperatura non troppo rigida, e, se possibile, in prossimità di una fonte di luce (che permette anche di innalzare la temperatura della scodella quel tanto che basta). Per questa occasione, il riposo è stato di circa 180 minuti.
A questo punto riprendo il mio panetto: nell'immagine sotto puoi vedere il risultato indicato dalla freccia azzurra. Il panetto sarà molto più gonfio del normale: questo significa che la lievitazione ha funzionato. Nel caso lo trovassi come lo hai lasciato prima... ouch! Preparati a una sfoglia di pasta, più che a una focaccia.
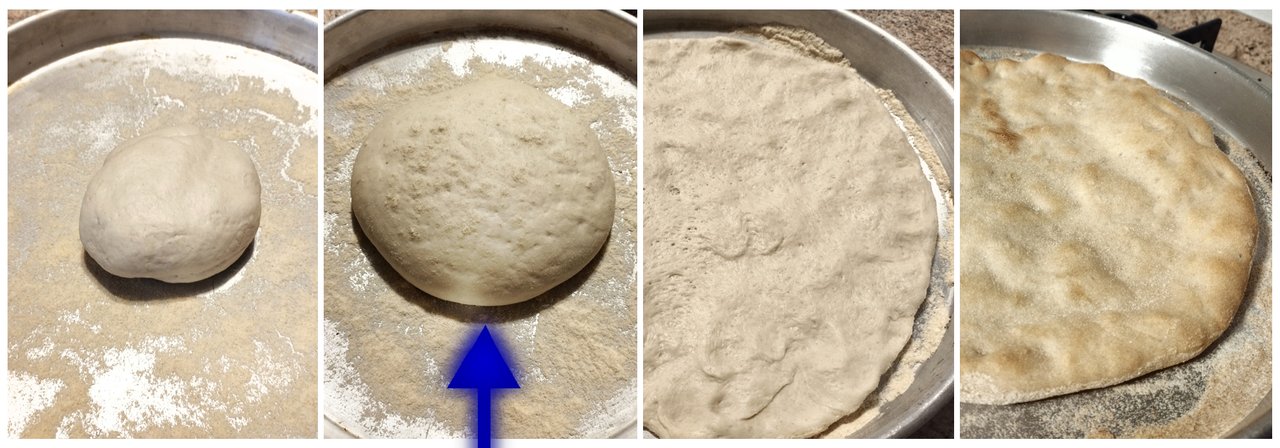
Come puoi avere intuito vedendo l'immagine sopra, il panetto non va lasciato così com'è. Io lo prendo e lo spiano, usando dei movimenti regolari delle dita e dei palmi delle mani. Qui in Italia ci sono veri artisti in questa disciplina su cui io non potrei insegnarti nulla. Cerca però di non bucare mai la pasta e, se succede, prova subito a richiudere il foro. Prima di iniziare a spianare la pasta, ti consiglio di sporcarti le mani con della semola, in modo da evitare che la pasta si appiccichi alle tue dita.
Una volta spianata, la pasta è pronta per essere infornata. Se vuoi potresti lasciarla riposare a forno spento per 30-60 minuti, così da ottenere uno spessore un po' più corposo (adatto se vuoi tagliare la focaccia e farcirla all'interno). A questo punto io accendo il forno, 200°C circa, e lascio tutto fermo per 10 minuti. Quindi spolvero con un filo d'olio la pasta spianata sulla teglia e la metto in forno per circa 10-15 minuti. Nell'ultimo riquadro dell'immagine sopra puoi vedere il risultato.
E ora? E ora il tocco finale: la farcitura. La farcitura che ho adoperato io non è la classica posizionata all'interno, ma è quella che ho imparato definirsi come “farcitura a vista”, cioè una farcitura che viene posizionata invece al di sopra della base di pasta, un po' come avviene nella pizza. In quest'occasione, io ho adoperato degli avanzi che avevo in casa: delle cime di rapa e della salsiccia, del provolone e del formaggio a buchi. Una volta addobbata la mia focaccia, l'ho rimessa in forno per altri 5 minuti.
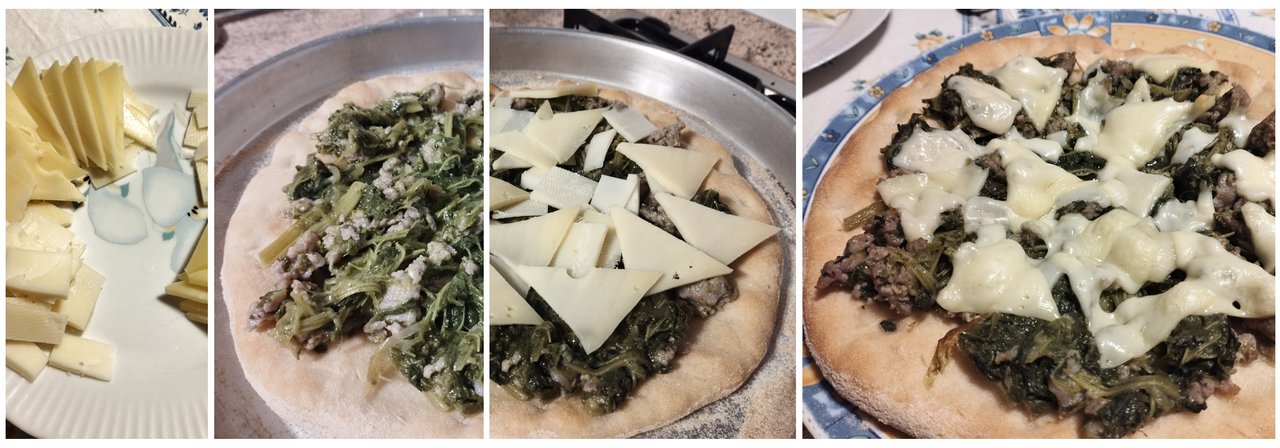
E poi nulla: ho sfornato e mi sono preparato a mangiarla. La farcitura usata è un piatto - mi azzardo a dire - “tipico” nelle zone dove vivo, per quanto non venga di solito usata sulle pizze o nelle focacce. Io ne avevo visto degli esempi su qualche menù, ma non l'avevo mai provata. Responso? E beh, è da provare, se vi piacciono questi ingredienti.
FINITO
Anche per oggi sono arrivato alla fine. Come consiglio, questa volta voglio soffermarmi sulla lievitazione: la temperatura e le condizioni climatiche sono fondamentali per permettere una buona riuscita. In secondo luogo, potrebbe essere necessario alzare (di poco) le dosi del lievito di birra, oppure aumentare le dosi di miele. È capitato qualche volta anche a me che la lievitazione non riuscisse e beh... come ho detto sopra, viene fuori una sottiletta di pasta anziché una pizza o una focaccia. Spero comunque che, se vorrai provare questo metodo, possa riuscirne qualcosa di commestibile.
L'ultimo tasto su cui ti consiglio di lavorare è la cottura: anche in questo caso, molto dipende dalle tue possibilità. Se hai un forno a legna o un forno elettrico, se riesci ad arrivare a temperature elevate oppure ti devi accontentare, eccetera.
Insomma, per tutti questi problemi, ti consiglio di visitare il web, dove video illustrativi di mastri pizzaioli sapranno certamente darti più informazioni utili per rimediare a qualche errore. Io, per il momento, mi accontento di quel che viene fuori dalla mia preparazione.
E nulla, anche per oggi ti saluto e spero di averti lasciato uno spunto utile. Mi raccomando: se il post ti ha soddisfatto, lascia un upvote! ;)
Alla prossima!

Questo post partecipa al progetto sperimentale Penny4thoughts.
Below, the ENGLISH translation I previously published on Blurt..
Every use of the contents herein - and/or each derivative - is prohibited without the explicit consent of the author, except for dissemination without modification trough media and social media channels.
Hello!
Today, I'm back to publish a post focused on food. This time, I take the opportunity to join the contest organized by @italygame in the Italy community: THE BEST FOOD POST. You can click on the bold name to read the official post. Unlike past times, on this occasion, the prepared dish takes a bit in the background, because I wanted to dwell on a more important aspect: the dough in the preparation of a focaccia. Here in Italy, there are many schools of thought about pizza and focaccia dough. I'm not an expert, and I have adopted a recipe that is quite suitable for my habits: a medium-rapid leavening dough with a not-too-high percentage of water.
Of course, I don't want to leave anyone empty-handed, so I stuffed the recipe with some leftovers I had at home, obtaining a truly delicious result. But let's go.
The INGREDIENTs and the EQUIPMENTs
The ingredients are unfortunately very indicative, because - as an example - by varying the quantity of water that the flour retains (and which we cannot see with the naked eye), the quantity of water that we will have to add during preparation changes. Unfortunately, we can find the ideal recipe only after a series of attempts – some with results close to being defined as poor – varying the doses each time as little as possible. Below, you find the recipe I usually use.
For one person, the APPROXIMATIVE DOSEs for the dough are:
- 0 or 00 flour (about 275 g)
- water (170-190ml)
- dry brewer's yeast (2 g)
- honey (half a coffee spoon) or sugar (as a substitute)
- extra virgin olive oil
- salt
- semolina flour
and the EQUIPMENTs are:
- a bowl
- a cup
- a glass or a container for water
- baking tray
- coffee spoons
- dish
- knife and spoon
- clean tablecloth or napkin
- oven
For the next FILLING, I used:
- turnip tops
- sausage
- provolone
- hole cheese
- extra virgin olive oil
The PREPARATION of the dish
As I mentioned, there are a thousand ways to make dough. What I use usually takes about 8-10 hours (from the start of preparation to the final dish).
First, I take a bowl where I pour the flour, but not all: I pour 190g. In a glass, I weigh the water: I recommend it lukewarm, never cold. Furthermore, the initial recipe called for 190 ml of water, but, depending on the flours we find on the market (some with a higher percentage of water, a property often referred to as "higher degree of hydration"), we have to lower it. I, for example, decreased the amount to 170ml of water (1ml of water is 1g about of water, but only in the conversion milliliter-grams of water, not in other elements' conversions) if I use the flour that I currently prefer.
Once this is done, I continue by weighing 2 grams of dry powdered brewer's yeast and putting it in a cup. Immediately afterward, I pour in a little of the previously weighed water and, with a coffee spoon, I start mixing, trying to dissolve the yeast.
I then take a jar of honey and fill it with half a teaspoon. I pour it into the cup and pour back a little of the previously weighed water. I keep mixing until I get an apparently homogeneous solution.
At this point, I pour the yeast contained in the cup into the bowl with the flour. I take a spoon and start stirring, adding all the water left in the glass. A sort of uneven cream will form. At this point, you can add the salt, even if I often leave the dough without it, considering that the subsequent filling will be very savory.
I keep stirring until I see a more homogeneous cream. At this point, I wrap my bowl in a clean tablecloth or napkin. Warning! It's important that the bowl remains "closed" inside the cloth, without leaving our first kneading step directly approachable to the air.
I then put everything aside and let it rise for about 240 minutes. If the leavening takes place, you can see in the photo below how the dough should look when you uncover it.
Completed? Not, of course.
Now I take the flour and weigh 85 round grams, that is what was missing to reach the final 275 grams indicated in the initial doses of the recipe. I add the flour to the bowl with the dough in the first step, and finish with a spoonful of oil. I pick up the spoon again and start stirring, finishing when the dough reaches an appearance of homogeneity. We will have to get to a point where the dough left still for a few seconds will tend to stick to the bowl, but if worked continuously it will remain well separated from the latter.
Then what to do? Over the months, at this point I've tried two ways: either we let it rise for a few more hours in the bowl and then prepare some “balls” of dough, or we immediately prepare some balls of dough and let them rise. In this post, I show the second way. I prepare the trays (in my case, an aluminum tray) by pouring re-milled semolina (which has a coarser grain than 0 or 00 flour).
Then I take the balls: more technically, these balls are called panetto here in Italy. I lay my dough on the semolina in the pan and cover it with a tablecloth or napkin. I put everything aside and wait. It's important that the pasta covered in this way remains at a temperature that is not too rigid, and, if possible, near a source of light (which also allows the temperature of the bowl to be raised just enough). For this occasion, the rest was approximately 180 minutes.
Then I take my "dough ball" again: in the image below, you can see the result indicated by the blue arrow. The dough will be much more swollen than normal: this means that the leavening has worked. In case you find it as you left before... ouch! Be prepared for a sheet of pastry, rather than a focaccia.
As you may have guessed by seeing the image above, the dough ball shouldn't be left as it is. I take it and spy on it, using smooth movements of my fingers and palms. Here in Italy, there are real artists in this discipline about which I couldn't teach you anything. However, try never to pierce the pasta and, if it happens, immediately try to close the hole. Before starting to smooth out the dough, I suggest you get your hands dirty with semolina, in order to prevent the dough from sticking to your fingers.
Once flattened, the dough is ready to be baked. If you want, you could let it rest with the oven off for 30-60 minutes, so as to obtain a slightly more full-bodied thickness (suitable if you want to cut the focaccia and stuff it inside). Now I turn on the oven, about 200°C, and leave everything still for 10 minutes. Then I sprinkle the flattened dough on the pan with a drizzle of oil and put it in the oven for about 10-15 minutes. In the last box of the image above, you can see the result.
And now? And now the final touch: the filling. The filling that I used is not the classic one positioned inside, but it is the one that I have learned to define as "visible filling", i.e. a filling that is positioned above the dough base, a bit like what you see when you watch a pizza. On this occasion, I used some leftovers I had at home: turnip tops and sausage, Provolone, and a holes cheese. Once my focaccia was decorated, I put it back in the oven for another 5 minutes.
And then nothing: I baked it and got ready to eat it. The filling used is a dish - I venture to say - "typical" in the areas where I live, although it isn't usually used on pizza or focaccia. I had seen examples on some menus, but I had never tried them. Response? And well, it's a must-try, if you like these ingredients.
COMPLETED
Even today, I reached the end. As advice, this time I want to focus on the leavening: the temperature and the climatic conditions are essential to allow for a good result. Secondly, it may be necessary to raise (slightly) the doses of brewer's yeast, or increase the doses of honey. Sometimes it also happened to me that the leavening failed and well... as I said above, you'll obtain a thin flat of dough, instead of a pizza or focaccia. However, I hope that if you want to try this method, something edible can come out of it.
The last key I suggest you work on is the cooking specifications: again, a lot depends on your possibilities. If you have a wood oven or an electric oven, if you can get to high temperatures or if you have to settle, etc.
In short, for all these problems, I suggest you visit the web, where illustrative videos of master pizza makers will certainly be able to give you more useful information to remedy some mistakes. For the moment, I enjoy what comes out of my preparation.
And nothing, even for today, I greet you and I hope I left you useful starting points. I recommend: if you liked the post, leave an upvote! ;)
Bye to the next!
This post join the Penny4thoughts experimental project.