How to make and use seed bombs to ensure food sources
History of Seed Bombs
Seed bombs were an idea that originated in Ancient Japan. They were called Tsuchi Dango which means Earth Dumpling. In 1938, a Japanese microbiologist/ farmer named Masanobu Fukuoka reintroduced the world to seed bomb in his journey to spread natural sustainable agriculture.
In 1973, Liz Christy started Green Guerillas. They called their bombs Seed Grenades. In the early stages, they used condoms filled with a mixture of tomato seeds and fertilizer. They would toss them over the fence around empty lots in New York city to improve the neighborhood. They morphed from there to become what we now call seed bombs.
Today there are seed bombs made by hundreds of different recipes. They can contain almost any type of seed and can be tailor made for the area you live in and can make spreading foraging crops across large areas much easier than attempting to sow through standard growing practices.
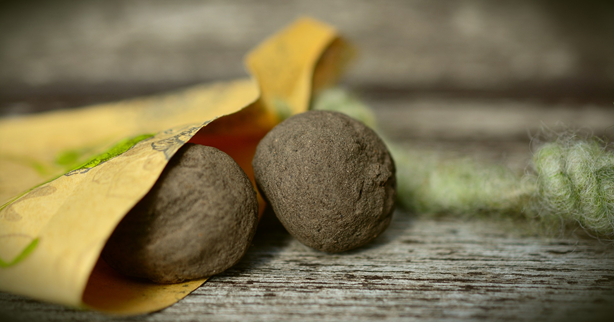
Image Source: Pixabay
Basic Ingredients List
1 – Seeds: Choose your seed according to where you live, where you will toss your bombs and your goal in placing them. I always your seeds that will grow vegetables or some other wild edible plant. If you are going to bomb a forested area, make sure you choose shade loving plants. For fields and empty lots, sun loving plants.
2 – Clay: You want a natural clay. No polymer clays. It doesn’t matter if you use a powdered or moist clay, but most people find powdered clay easiest to work with. Some suggested types would include Kaolin, Bentonite, or French Green Clay. You could gather clay natural to your area, however, it could have weeds or other seeds in it. If money it a problem, by all means gather natural clay. But if you can afford a powdered variety, by all means use it.
3 – Compost: You want a natural, well-rotted compost. If you have your own compost pile, that is fine if it is finely composted or you can purchase it by the bag and almost any home improvement store. It should not have any recognizable pieces in it and nothing larger than ¼ to ½ inch in size.
4 – Water
5 – A large bowl for mixing
Amounts to use
This is where every recipe differs. There are two main differences. The measure of clay to compost and the number of seeds to add.
Recipes I have seen vary between a 1:1 ratio of compost to clay up to a 7:1 ration. I think a ratio of about 3-4:1 compost to clay works best but you can play around with it until you get a consistency you like that dries well in your climate.
For seeds, some people suggest adding a large portion of seed into the mixture. Others suggest adding only a few seeds to each ball after it is formed. The line of thought here is if you add a lot of seeds it is more apt to have a lot take root. The other line of thought is if you add too many seeds they will compete for resources, become stressed and die out before having a chance to take hold.
I use the later, adding only a few seeds after the ball is made. With large seeds such as sunflower, I would only use 1 or 2 seeds per ball and push them deep into the ball. With tiny seeds I might as 8 to 10 seeds, but don’t insert them deeply and the seedling could have a hard time breaking through the clay.
Mixing it up
If you use moist clay, you will need to cut it into tiny pieces before mixing with the compost. This is why the powder works better in my opinion. You can mix both the powdered clay and the compost together in the bowl and then add a little water at a time while mixing.
You want a consistency that will easily hold together in a ball. Too dry and it will not hold together. Just add a little more water and mix longer. Too wet and you will need to add a little more clay or compost. It is easiest to simply add water in small amounts and mix it in completely before adding more.
Adding Seeds
If you choose to add a larger amount of seeds, they can be added to the mixture as you are mixing it so the seeds will be spread evenly throughout the entire batch.
If you choose to add only a few seeds after the basic ball is made, use a pointy object, such as a chop stick, screwdriver, toothpick or nail to poke a hole large enough and at the correct depth for your seeds.
If you are adding multiple small seeds, be sure to space them out around the seed bomb so they stand a better chance of physically growing, no matter what side of the bomb lands up or down.
Size of your bombs
This is another area where people disagree. I think there is no perfect size. You need to take the size of your seed into consideration in determining the size of the bomb.
Most recipes suggest about the size of a quarter, but when using a tiny seed, I suggest something close to dime size. Keep in mind, when the bomb has received enough water and the temperature is correct, the seed will start to sprout and begin to push its way out of the bomb, causing the bomb to break up.
Tiny little seeds (such as clover seeds) would have a hard time pushing their way through and breaking up a large bomb. Keeping them smaller ensures their success.
When to Toss your Bombs
Toss them at the time that is best for the seeds you are using. Some seeds should be sown in fall to sprout in spring. Some should be sown in Spring. Know the needs of you seeds and toss them then.
Last but not least
If you need some extra cash, making seed bombs and selling them on Ebay, via Facebook groups and any of the people to people sales apps, can be a source for you. You will be helping the environment while pocketing a little cash. There are a lot of people that want to spread the love who don’t have the time (or patience) to make them.
Sources:
seedbomb.ie
Wikipedia Seed Ball
seed-balls.com
growtherainbow.com