One of the things I have fun messing with is my signature. Since I started posting here on Steemit I have used a variety of different signatures. I really like coming up with new designs. In this post I want to share what I have learned so far.
To sign or not to sign
Adding a signature has a number of benefits. It adds something extra to your post, some use it to for information about themselves, others use it to remind the reader that they can upvote, resteem and/or follow the author if they like the post.
The signature makes the post look more professional and it can be fun coming up with different signatures.
For me it feels good as an author to sign my work and give it that personal touch.
Tools
There a lot of tools around for creating your own blog signature. I find that the easiest way to make one is to use Canva.com and Lunapic.com , Canva is great for the simple designs and Lunapic for the more complex designs. You can upload images and or gifs and have a wide variety of fonts available to play around with.
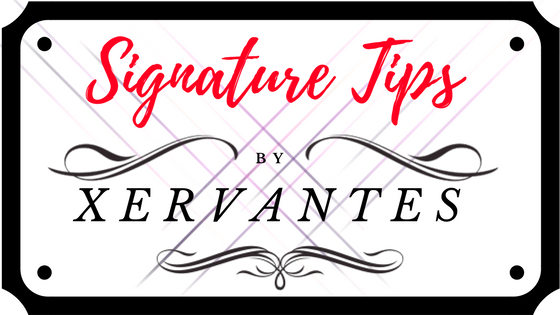
My signatures are nothing more than pictures, hosted on https://postimg.org and embedded into my posts like any other picture.
How
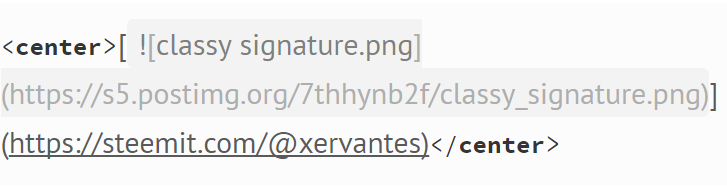
When you have created a signature/picture, select the share option on postimg, then select the markdown link and paste the link into your editor.

Center the image by selecting the center option from the editor you are using or manually by putting "< center>" (minus the space before the letter "c") at the beginning of the link and "< /center>" at the end (again, minus the space).
You will see two URL's (https) in your markdown link. If you replace the second URL with @yourusername the signature will become clickable. The person who clicks on the image will be directed to your homepage making it easy for them to follow you.
The final link should look something like this (one single line):
You can test the follow-me redirect on my signature below :)
If you don't want a clickable signature (or picture) then remove the second https url and the "[ ]" brackets
Bragging rights
As you can see underneath my signature I have added the Steemitboard awards. Adding these is quite simple, just hop over to http://steemitboard.com and type in your username.
To add an award to your post simply right click on the reward and copy the link. Then paste the link into your editor.
Type "![nameimage.png]" in front of the link and change "nameimage" to the name of the reward you want to add. So if you want to show off your upvote reward, the text should be "![vote.png]".
The next thing to do is add the address for steemitimages and the desired size of the images and put brackets around the URL.
Here is the how your final link should look like:

Replace "username" with your real username and you are good to go.
If you want your reward images next to each other, just add the other links behind the first one, without hitting the "enter" button (placing them on one line).
The great thing about Steemitboard is that when you reach a new level and awarded a new award then the old image will be replaced by the new one, so there is no need for you to change your link.
I hope you found this post helpful. Let me know in the comment section if you have any questions.


Highly Recommended!-Earn Free Coins!
After The Split: BCC and BCH
The Poplularity of Retro Gaming Explained
Social Media Sites Similar to Steemit
The Story Behind Limbo