PART 7: Marching rays
Whitted raytracing (and why we're not doing it)
Last episode, we learnt how to calculate a ray direction, and set up a simple camera system so that we're able to generate rays for each pixel and shoot them off into our scene.
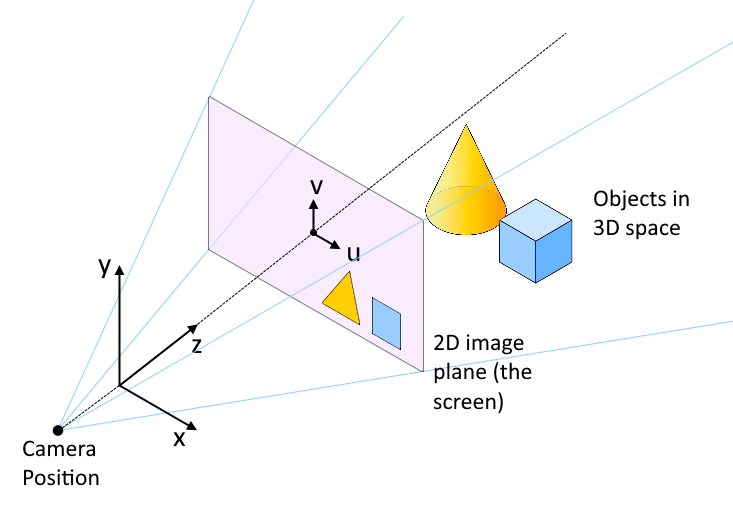
As you'll remember, our next task is to work out whether a given ray hits an object in our scene.
To do this in the classical way, as introduced by Turner Whitted in 1979, involves some tricky and (to me) rather unintuitive maths. Within Whitted's technique, one needs an intersection test function between a line (the ray) and the object.
While it may be easy enough to figure out (or look up) a function to test intersection between a 3D line and a sphere, for example, it quickly becomes complex when you want any more complex scene geometry.
But don't despair, we're not going to do Whitted's method :)
Raymarching
More recently, an alternative technique has become popular: Raymarching.
We describe our scene not with functions which must calculate an intersection, but rather with a function which gives the distance from any arbitrary 3D point to the closest part of the scene.
Let me show you how this looks.

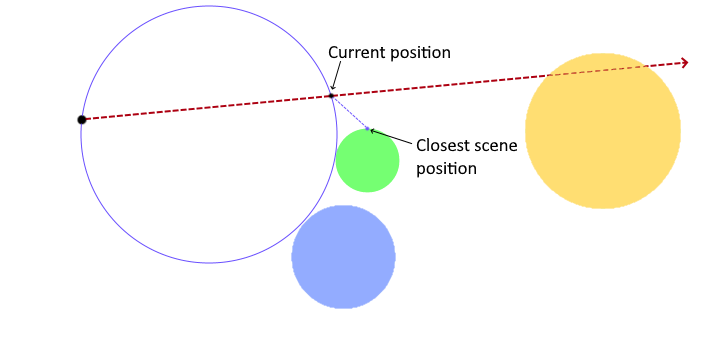
In the example scene above, which consists of a few spheres in 3D space, the dashed red line represents the ray we are tracing for the current pixel.
We start at the camera position, and ask -- what's the closest part of the scene to this point?
It's indicated by the blue dot on the edge of the green sphere. OK, if we know that's the closest point to where we are, we should be safe to step along the ray by at least that much, right? We know that there can be nothing for the ray to intersect before at least that distance.
Let's step forward along the ray by that distance.
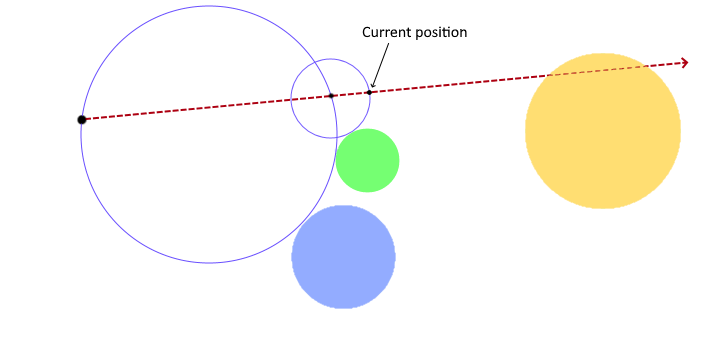
From our new position, we again ask how far are we from a point in the scene now. The blue dot shows the answer, so we know it's safe to step that distance along the ray again because there can't possibly be anything in the way.
We repeat this until the distance from our current point to the nearest geometry drops below some small value, and declare that we have indeed hit something in the scene.
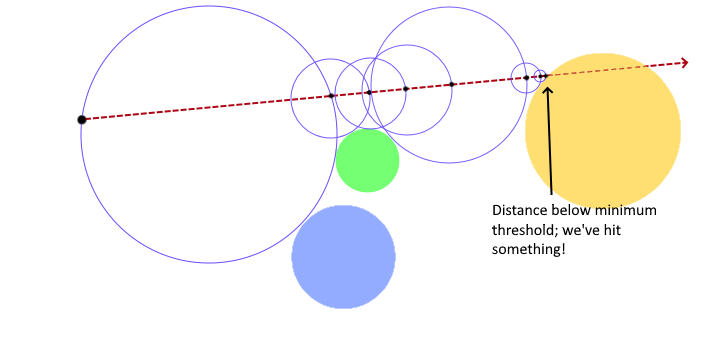
In this example, it took 7 "hops" from the camera position to reach an object surface. And that's how our intersection tests will work!
Note that the distance don't necessarily get smaller every step. You can see that after we've taken decreasing steps as the ray passes close to the green sphere but misses it, we're able to expand to larger steps again before decreasing towards the actual intersection.
Let's code it up! Here's our core raymarching loop, heavily commented:
    // Set col to background colour (grey)
    vec3 col = vec3(.5);

    // Start at cam position
    vec3 currentPos = camPos;

    // Repeat for max 128 steps
    // (If we run out of steps, we haven't hit anything)
    for (int i = 0; i < 128; i++) {
        // Check distance to nearest point in scene
        float distance = GetSceneDistance(currentPos);

        // Check if we just hit something
        if (distance < 0.01) {
            // Set object colour
            col = vec3(1,0,0);

            // Break out of the for loop
            break;
        }

        // Haven't hit anything. Step currentPos along
        // the ray direction by distance to closest point
        currentPos += distance * rayDir;
    }
We're only missing one more piece of the puzzle, and then we can render something.
The missing piece is the GetSceneDistance() function referenced in the code snippet above. How do we calculate the distance to the scene geometry from an arbitrary point?
Distance functions
The whole point of doing raymarching rather than classical Whitted-style raytracing is because it makes it much easier to produce interesting scenes. Coming up with a function that can tell you the surface distance of an object from a given point is far simpler than coming up with a function to intersect that object with a 3D line.
Let's take a sphere as an example.
GLSL gives us a handy util, distance(point1, point2), which will tell us the distance between any two points. With that in mind, consider a beachball, in a large empty room.
If I give you the 3D coordinates of the center of the beachball (ballPos), and the 3D coordinates of another point somewhere in the room (testPos), and ask you to tell me how far away the surface of the ball is from that point, I'm sure it won't take long for you to come up with a formula:
In order to find the distance to the surface of the ball, we simply subtract its radius from the distance between the test position and the ball's center position.
Alright, that will do as our first 3D primitive -- let's see how DistanceToScene() looks in code, with our scene being just a sphere.
// Return distance to closest object in scene from point p
float DistanceField(vec3 p) {
    // Define sphere position and radius
    vec3 ballPos = vec3(0,0,1);
    float ballRadius = 1.;

    // Return distance from p to the surface of the sphere
    return distance(p, ballPos) - ballRadius;
}
The raymarcher is born
Now we're finally ready to put it all together and see our first raymarched image. Combining the camera code from last episode with our raymarching loop and distance function from today results in this shader:
// Return distance to closest object in scene from point p
float GetSceneDistance(vec3 p) {
    // Define sphere position and radius
    vec3 ballPos = vec3(0,0,1);
    float ballRadius = 1.;

    // Return distance from p to the surface of the sphere
    return distance(p, ballPos) - ballRadius;
}

void mainImage(out vec4 fragColor, in vec2 fragCoord)
{
    // Calculate uv in range {-1..1}
    vec2 uv = (fragCoord / iResolution.xy - .5) * 2.;

    // Correct for aspect ratio
    uv.x *= iResolution.x / iResolution.y;

    // Set camera position
    vec3 camPos = vec3(0,0,-1);

    // Calculate ray direction for current pixel
    vec3 rayDir = vec3(uv, 1.0);
    rayDir = normalize(rayDir);

    // Set col to background colour (grey)
    vec3 col = vec3(.5);

    // Start at cam position
    vec3 currentPos = camPos;

    // Repeat for max 128 steps
    // (If we run out of steps, we haven't hit anything)
    for (int i = 0; i < 128; i++) {
        // Check distance to nearest point in scene
        float distance = GetSceneDistance(currentPos);

        // Check if we just hit something
        if (distance < 0.01) {
            // Set object colour
            col = vec3(1,0,0);

            // Break out of the for loop
            break;
        }

        // Haven't hit anything. Step currentPos along
        // the ray direction by distance to closest point
        currentPos += distance * rayDir;
    }

    // Output colour
    fragColor = vec4(col,1);
}
You can see it running live at the link in the shader gallery below.
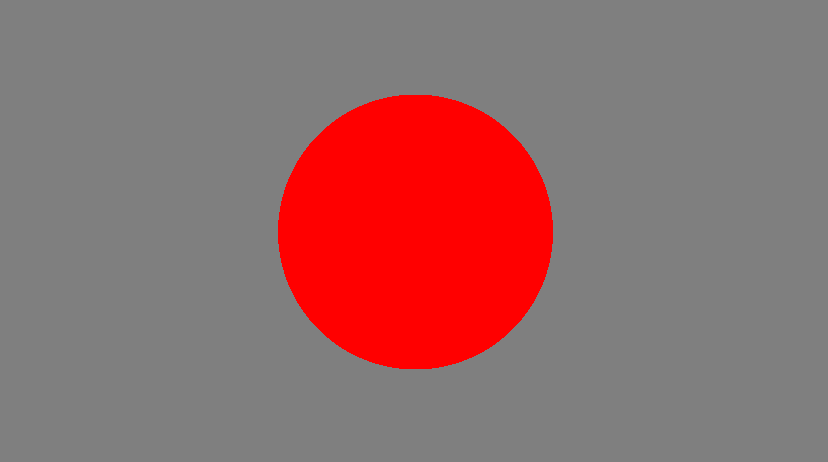
Now I'll grant you that this may seem a little underwhelming! However, in just ~20 lines of code we have created a realtime raymarcher running on the GPU. The places we can go with this little technique are practically limitless.
Raymarching will be the basis for many of the episodes to follow, so it's important you understand it. As usual, if you have any queries or feedback, drop a note below!
Shader gallery
The cool things we've made so far in the series.
Episode 7: First raymarcher
Episode 5: Rotozoomer
Episode 4: Plasma