Repository
- https://github.com/vuejs/vue
- https://github.com/rust-lang-nursery/rust-wasm
- https://github.com/dflemstr/rust-native-wasm-loader
What Will I Learn?
- Mix Vue project with Rust code
- How WebAssembly works
Requirements
- Basic understanding of Rust
- Basic understanding of HTML and Typescript
- Basic understanding of Vuejs and Class-Style Vue Components
- Some knowledge about webpack and/or
vue.config.js - Install vue-cli and yarn
- Install rustup
- Install some code-editor/IDE (strongly suggest to use VSCode + Vetur)
Difficulty
- Intermediate
Tutorial Contents
WebAssembly (abbreviated Wasm) is a binary instruction format for a stack-based virtual machine. Wasm is designed as a portable target for compilation of high-level languages like C/C++/Rust, enabling deployment on the web for client and server applications
WebAssembly is the new current web standard that we can use as an intermediate for us to write a web-based app in a different programming language. There is also says that part of the code that runs on WebAssembly has better performance while mostly this is not true. If you are coming from the .NET stack you can think WebAssembly as CIL. With WebAssembly developers can swap out parts of their JavaScript code with another code that written in another language. Currently WebAssembly support all major desktop browser but at the current state it only support numeric data type i32, i64, f32, f64 (no string, boolean, or even tuple). Some people says that WebAssembly is Stack Machine Language1.
how stack works1
One programming language that currently has huge support for compiling into WebAssembly is Rust. Rust by default has a great toolchain that you almost not need to set up a thing in a weird way. Currently Rust toolchain ship wasm compiler in their beta and nightly channel. Rust community envisions the pipeline that fits Rust into JavaScript package management and bundler ecosystem to look something like this2:
In this tutorials, we will try mixing Rust code with Javascript by compiling Rust code as .wasm then use it in Vue Component.
You can click
#nin subtitle/step liketo see the diff code which
#nrepresent the commit number.
#2Preparation
First, let's create vue project with name example-vue-component-rust
vue create example-vue-component-rust
It will ask you step-by-step how would you like to configure your project. For this tutorials fill it with
Vue CLI v3.0.0-beta.11
? Please pick a preset: Manually select features
? Check the features needed for your project: Babel, TS, Linter
? Use class-style component syntax? Yes
? Use Babel alongside TypeScript for auto-detected polyfills? Yes
? Pick a linter / formatter config: TSLint
? Pick additional lint features: Lint on save, Lint and fix on commit
? Where do you prefer placing config for Babel, PostCSS, ESLint, etc.? In dedicated config files
Next, we will install toolchain for compiling Rust code into .wasm.
Currently, at the time I write this, rust to wasm compiler not shipped in beta or even stable channel, so you need to set your default toolchain into nightly channel by executing
rustup default nightly
rustup default nightly
rustup target add wasm32-unknown-unknown
If you live in APAC region like me, beware that the download latency is usually really slow.
While waiting for the installation to be completed (it take ~80MB to download), we can dive into our project and install webpack loader for generating interoperable WebAssembly code from Rust.
cd example-vue-component-rust
cargo init --lib
yarn add rust-native-wasm-loader wasm-loader -D
Importing Rust code in JS/TS codebase works by utilizing webpack loader
rust-native-wasm-loader and wasm-loader. Here is how it works:
under the hood, rust-native-wasm-loader will invoke cargo build --target wasm32-unknown-unknown to compile your Rust code into Wasm code.
If you want to try wasm-bindgen, be careful as by the time I write this,
wasm-bindgensupport is still experimental and last time I try it I can't getstringtype work correctly.
In Cargo.toml, don't forget to tell rust to compile it as C dynamic library (cdylib) before compiling as wasm
[lib]
crate-type = ["cdylib"]
path = "src/libs/calculator.rs" # optional but I prefer to keep my Rust code in libs folder
And the last step, register webpack loader that responsible for Rust that can be used in JS/TS code (rust-native-wasm-loader and wasm-loader). Create a vue.config.js file and fill it with this config:
module.exports = {
  configureWebpack: {
    module: {
      rules: [{
        test: /\.rs$/,
        use: [{
          loader: 'wasm-loader'
        }, {
          loader: 'rust-native-wasm-loader'
        }]
      }]
    }
  }
}
More or less your project structure will become like this:
example-vue-component-rust
├── public/
├── src/
│   ├── App.vue
│   ├── main.ts
│   ├── shims-tsx.d.ts
│   ├── shims-vue.d.ts
│   │
│   ├── shims-rust.d.ts
│   ├── components
│   │   └── Calculator.vue
│   └── libs
│       └── calculator.rs
│
├── package.json
.
.
├── Cargo.lock
├── Cargo.toml
├── vue.config.js
└── yarn.lock
Finally, let's run and keep it open
yarn serve --open
any change in your code (including your Rust code calculator.rs) is immediately compiled so you can see the change by just saving the file.
#3Define the usage
Let's define the usage of our component to be:
<Calculator :a="3" :b="5">+</Calculator>
Create src/components/Calculator.vue and write the script to be:
<script lang="ts">
import { Component, Prop, Vue } from 'vue-property-decorator'

@Component
export default class Led extends Vue {
  @Prop() a!: number
  @Prop() b!: number

  private calculate = (a: number, b: number) => Number()

  get result() {
    return this.calculate(this.a, this.b)
  }
}
</script>
with the template
<template>
  <div>{{a}} <slot/> {{b}} = {{result}}</div>
</template>
#4Add Rust code
At current state WebAssembly only support numeric data type i32, i64, f32, f64. We can add the Rust code that should be available in the WebAssembly module to src/libs/calculator.rs. We are going to add really simple function called add.
// src/libs/calculator.rs
#[no_mangle]
pub fn add(a: i32, b: i32) -> i32 {
    a + b
}
All functions that should be reachable from WebAssembly should be marked with #[no_mangle].
Next, we will register/bind add function into JS code. Because we can't use add directly (it will block the main thread) and need register it asynchronously using wrapper function generated by wasm-loader (in here we named it loadWasm()), then we need to register it as early as possible in our component lifecycle. In Vue, the earliest hook call is beforeCreate so we need to register it at beforeCreate().

where to load WebAssembly in Vue Lifecycle 5
In src/components/Calculator.vue, import wasm loader
import loadWasm from '@/libs/calculator.rs'
then register it at beforeCreate hooks
  beforeCreate() {
    loadWasm().then(result => {
      this.calculate = result.instance.exports.add
    })
  }
If you are wondering why we can't directly use add and need to load it using some promise function like loadWasm(), here is why:
But we don’t want to do this on the main thread. I’ve talked before about how the main thread is like a full stack developer because it handles JavaScript, the DOM, and layout. We don’t want to block the main thread while we compile the module. So what
WebAssembly.instantiatereturns is a promise.
Now let's test it out
Notice that there is the time delay before the component can show the immediate result. This is because to use a function written as WebAssembly, you need to load it in an asynchronous fashion and waiting for it to finish loading.
#4Going further
It' not fun to write a component that only doing addition on numbers. Let's write a proper complete basic Calculator component. This section will be a quick explanation how to implement it.
In src/libs/calculator.rs, add additional math operation
#[no_mangle]
pub fn substract(a: i32, b: i32) -> i32 {
    a - b
}

#[no_mangle]
pub fn multiply(a: i32, b: i32) -> i32 {
    a * b
}

#[no_mangle]
pub fn divide(a: i32, b: i32) -> i32 {
    a / b
}

#[no_mangle]
pub fn power(a: i32, b: i32) -> i32 {
    a ^ b
}

#[no_mangle]
pub fn remainder(a: i32, b: i32) -> i32 {
    a % b
}
Then in src/components/Calculator.vue, create props operation for defining the operation. Also, we need to make this.calculator bind to different function when the props operation change.
  @Prop() operation!: string

  @Watch('operation')
  changeOperation(op: string) {
    loadWasm().then(result => {
      this.calculate = result.instance.exports[op]
    })
  }
Now let's test our component and represent our calculator in a barely fashionable way.
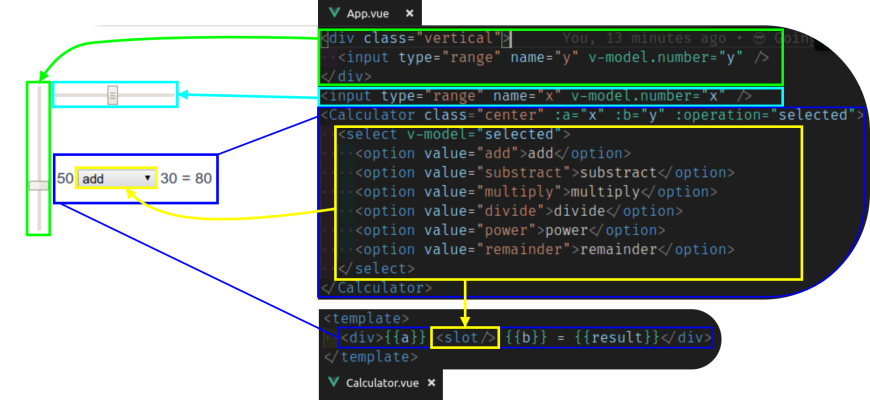
In src/App.vue
<template>
  <div id="app">
    <div class="vertical">
      <input type="range" name="y" v-model.number="y" />
    </div>
    <input type="range" name="x" v-model.number="x" />
    <Calculator class="center" :a="x" :b="y" :operation="selected">
      <select v-model="selected">
        <option value="add">add</option>
        <option value="substract">substract</option>
        <option value="multiply">multiply</option>
        <option value="divide">divide</option>
        <option value="power">power</option>
        <option value="remainder">remainder</option>
      </select>
    </Calculator>
  </div>
</template>

<style scoped>
.center {
  margin-top: -15%;
  margin-left: 15%;
}
.vertical {
  display: inline-block;
  width: 20px;
  height: 150px;
  padding: 0;
}
.vertical input {
  width: 150px;
  height: 20px;
  margin: 0;
  transform-origin: 75px 75px;
  transform: rotate(-90deg);
}
</style>
Let's test the code
Beware that if you try to divide by zero, your browser can hang.
Here is an illustration of how the App being rendered:
#5Build and release
This final step we will bundle our application and see if our application becomes oversized or not.
run yarn build and the result
  File                               Size                Gzipped

  dist/js/app.b621fb74.js            1962.12 kb          256.52 kb
  dist/js/vendors~app.adca5b54.js    96.45 kb            34.05 kb
  dist/css/app.bfcbdbac.css          0.48 kb             0.28 kb
our app takes about ~2.01 MiB which in some case is not acceptable. Luckily there is a project called wasm-gc which can reduce the bundle size of generated .wasm code. To install it execute:
cargo install wasm-gc
then we need to enable wasm-gc in rust-native-wasm-loader config options
          loader: 'rust-native-wasm-loader',
          options: {
            release: process.env.NODE_ENV === 'production',
            gc: process.env.NODE_ENV === 'production'
          }
now run yarn build
  File                               Size                Gzipped

  dist/js/app.b475f333.js            578.85 kb           91.54 kb
  dist/js/vendors~app.adca5b54.js    96.45 kb            34.05 kb
  dist/css/app.bfcbdbac.css          0.48 kb             0.28 kb
Here we got much smaller bundle size (total ~676 KiB).
By the time I write this, I do some experiment with the options and get results thatreleaseoptions don't much reduce the bundle size (only significantly affect Gzipped when usinggc).
Bundle size ofdist/js/app.*.js
options Size Gzipped none 1962.12 kb 256.52 kb release1958.73 kb 256.00 kb gc581.94 kb 256.00 kb gc+release578.85 kb 91.54 kb
References

- https://github.com/rust-lang-nursery/rust-wasm#vision
- https://hacks.mozilla.org/2017/07/creating-a-webassembly-module-instance-with-javascript/
- https://developer.mozilla.org/en-US/docs/Web/HTML/Element/input/range#Change-the-orientation
- https://vuejs.org/v2/guide/instance.html#Lifecycle-Diagram
Proof of Work Done
https://github.com/DrSensor/example-vue-component-rust/commits/master