Hay Steemers,
at first: Sorry that I am so late with a new part, but as you know, Christmas is coming and I had to visit the family instead of spending time on steemit.com. But now, here it is, so let‘s go!
So far, we‘ve added our first REST-Service to our example application in part 1 and added an embedded Tomcat in part 2, which allows us an easy start of our application.
Today we will complete this small tutorial series, by
- adding one additional REST-Service
- creating a Docker Image for our example application
- launching two instances of our Image
- add a load balancer in front of them
As you see, we’ve planed a lot of stuff for today, so let’s go! And don't forget, you can find the complete source code and configuration files on github.

Add an additional REST-Service to our application
To show you the benefits of a REST-Service in combination with Docker, we have to put a load balancer in front of our instances. At the moment, our application only provides a kind of a greeting Service, that only says “Hello $NAME”. With this Service, we are not able to identify an instance and I can’t show the magic to you. To solve this, we will add a new method that displays the Container IP.
Just add the following code to our “HelloWorldEndpoint.java”.
    @GET
    public String giveIP(@PathParam("name") String name) {
        try {
            return InetAddress.getLocalHost().toString();
        } catch (UnknownHostException e) {
            return e.getMessage();
        }
    }
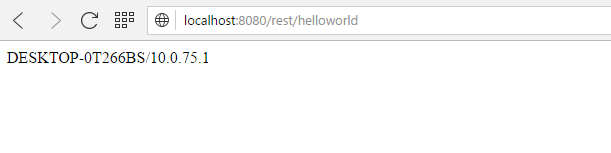
If you now build and start the application, the URL „localhost:8080/rest/helloworld“ should return your hostname and the IP address of your first network interface.
Docker Image
Now we will build the Docker Image to launch our application in a Container. Due to our preparations, the implementation of the image is quite easy. We basically have to copy the “/target/dez1337Example” folder into the image.
The resulting Dockerfile will look like this:
FROM ubuntu:16.04


RUN apt-get update && apt-get install -y openjdk-9-jre
RUN mkdir /data && mkdir /data/steemit

ADD target/dez1337Example/ /data/steemit/

EXPOSE 8080

CMD /data/steemit/bin/dez1337Example
We start from an “ubuntu:16.04” image, that already supports all the things we need except of one: Java. So as genius as we are, we install Java to complete the tool stack that our application needs. Then we create a new folder “/data/stemmit” that will store our application and add the target folder to it.
The last thing we define is the port of our application and the command, that shall be executed when the image is getting launched. If you need some more docker basics you might want to have a look at this part.
To build the image, launch a powershell at the location of your Dockerfile and run the following command:
docker build -t steemitexample .
Launch the image multiple times
Steps one and two are done, so the next step is to start the application multiple times. Just launch the docker image with the following command:
docker run -p 8081:8080 steemitexample
Go to the URL “http://localhost:8081/rest/helloworld” and check if it returns something like this:

Pretty cool, heh? To show you the benefits of the combination of those techniques, we will need more instances, so just start some more and don’t forget to change the port!
docker run -p 8082:8080 steemitexample
docker run -p 8083:8080 steemitexample
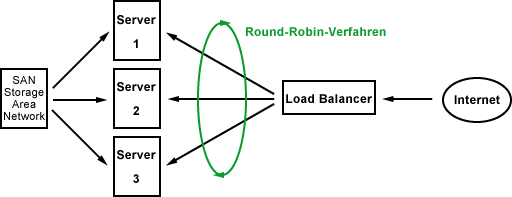
Launch a load balancer
Nice! We are almost done. Let’s step to the coolest part of this series: The load balancer.
We will use the a very common load balancer whose configuration is pretty easy. It is called “haproxy” and thanks god, there is already a Docker image for this proxy. According to the documentation on Docker Hub we will build a custom Docker image based on the existing one to inject the configuration.
FROM haproxy:1.5.18
COPY haproxy.cfg /usr/local/etc/haproxy/haproxy.cfg
The haproxy.cfg file looks like this:
global
    log 127.0.0.1 local0 notice
    maxconn 2000

defaults
    log     global
    mode    http
    option  httplog
    option  dontlognull
    retries 3
    option redispatch
    timeout connect  5000
    timeout client  10000
    timeout server  10000

listen steemitExample 0.0.0.0:80
    mode http
    stats enable
   stats uri /stats
    balance roundrobin
    server web01 172.17.0.3:8080
    server web02 172.17.0.4:8080
    server web03 172.17.0.5:8080
    timeout connect  5000
    timeout client  10000
    timeout server  10000
These are just some basic configs, which you can ignore. The only interesting part for now are the three instances of our application that we’ve defined. We also configured the haproxy to use the “round robin” algorithm for load balancing, which will lead each request to the next server.
Build and start the load balancer with the following commands:
docker build -t haproxyexample .
docker run -itp 80:80 haproxyexample
You should now see at least 4 running Containers on your host.

If you now call “http://localhost/rest/helloworld” in your browser and press F5, you should hit another Container for each request.
First Request:
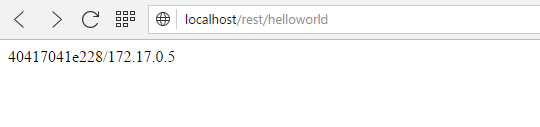
Full Size
Second Request:
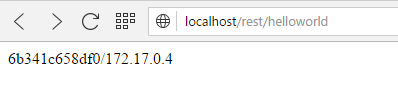
Full Size
Pretty cool, heh?
Summary
In this small tutorial, we learned how to create a REST-Service in Java using common frameworks and tools. We also learned how to embed the application into a Docker Image and saw how easy it is so launch multiple instances now. Your application runs out of resources? No problem – Just start another instance of your service – How cool is that?
If you appreciate my work or you just want to make sure that you’ll never miss new parts, you can follow me by pressing the button below.
Thank you and best regards!