Introducing Vessel - a desktop wallet for Steem
One thing I've always wanted was some sort of wallet to store my private keys in for Steem. Nearly every other blockchain project I'm interested has them, so I decided to take a some time and build one. I'm calling it Vessel, which can be a play on words for either "a vessel powered by steam" or "a vessel containing steam".
This project - like everything in Steem - is experimental by nature, so please be diligent with your personal security and the safe backups of your keys in multiple locations. As beta software, there may be rare situations data is corrupted or wiped, so please use at your own risk and backup backup backup.
With the advisories out of the way - please just be cautious. It's very likely that many bugs will need to be worked out.
v0.0.5 - Pre-release Alpha
This is the very first public pre-release of Vessel, which can be found here:
- Releases: https://github.com/aaroncox/vessel/releases
- Bug Reports:
https://github.com/aaroncox/vessel/issues - Source Code: https://github.com/aaroncox/vessel
The newest releases will always be published via github, so please do not trust it from anywhere else. You can also compile it yourself from the source code, but I do not have instructions available yet. I will make them available as we get closer to a stable release.
The initial features include...
- A light wallet to manage your funds, your private keys never leave the wallet. Keys are stored within the application (with or without encryption, your choice), and only used to sign transactions. The transactions are then broadcast to the blockchain with your keys never being communicated outwards.
- Importing of Private Keys. You can import an account by either using the login you'd use here on Steemit.com and specifying the permission level, or you can import WIF private keys using the account name and WIF.
- Password locked accounts. Each account imported can be stored with AES encryption based on a password you provide. When used, each use of that key will require that password and your keys will never be stored locally unencrypted.
- An updating overview of all accounts. The main panel of the wallet displays the total balance of all accounts within the wallet, as well as an individual breakdown of each account's balances. Hovering over a number will reveal it's true amount (if it's an extremely large number).
- Claiming Rewards from your wallet. When your account has a pending reward, a section will appear at the top of the overview screen showing you how much and giving you the option to claim it.
- Sending STEEM or SBD to any account or an exchange. The send screen lets you specify any account name to send to, or you can use the prefilled exchanges drop the dropdown to avoid mispellings and autocorrect. The available balance for the selected account will display for each currency, and when clicked on, will populate the field with the maximum amount.
- Configurable Exchange Memos Enter your Bittrex or Poloniex memo keys for each currency and never have to go look those damn things up again. When you select an exchange during the send process, the memo will automatically fill with the appropriate memo for that exchange/currency combo.
- Vesting - Managing Power Downs and Routing. The vesting screen shows the status of all active Power Down operations, allowing you to power down specific amounts, change the withdraw route, view the status of pending operations, and cancel any existing power downs.
- Support for an unlimited number of accounts. Within the accounts section, you can add as many accounts as you'd like, each with their own set of permissions and password.
- Setting Witness Proxies for each account. The second portion of the account page lets you set the Witness Proxy for your account, which is useful for those with many accounts or those who wish to delegate their vote.
This post is long enough as it is, so I won't ramble on forever. There's plenty more posts to do that ;)
A Vessel walkthrough - v0.0.5
Upon launching Vessel, you need to setup a Wallet.
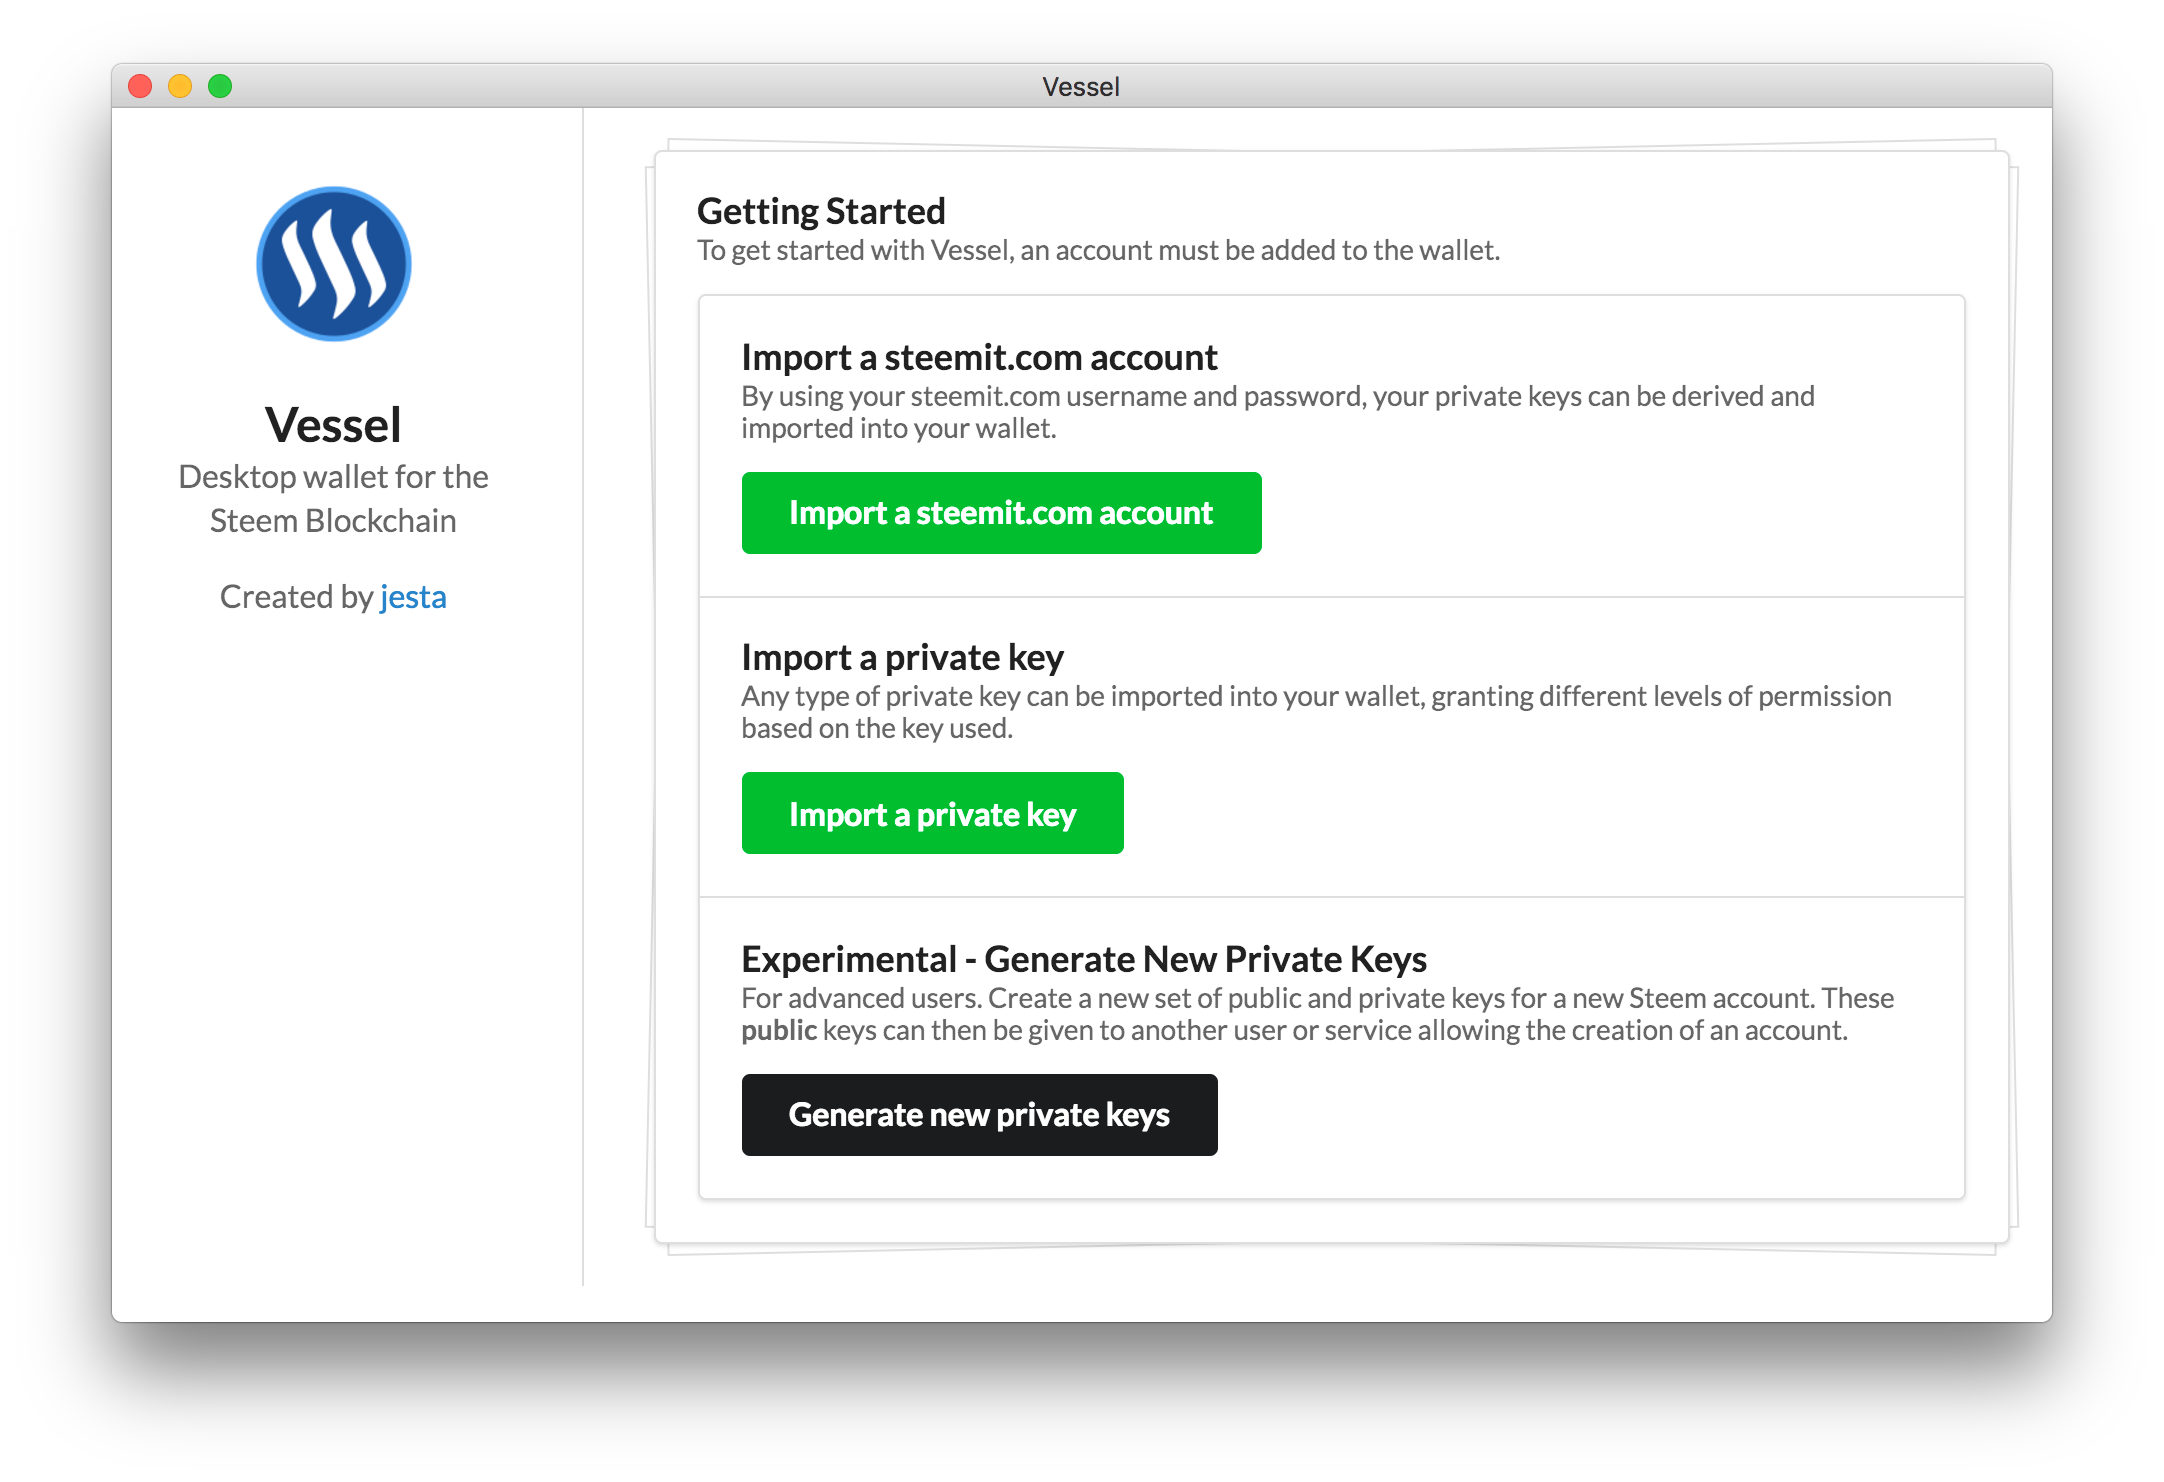
You can choose to import via a Steemit.com password (which is never saved) or import a WIF Private Key (of any type).
The 3rd option is an experimental system to generate private keys, which you're free to explore, but is largely useless unless you have someone to create an account for you.
Logging in with a Steemit.com Account
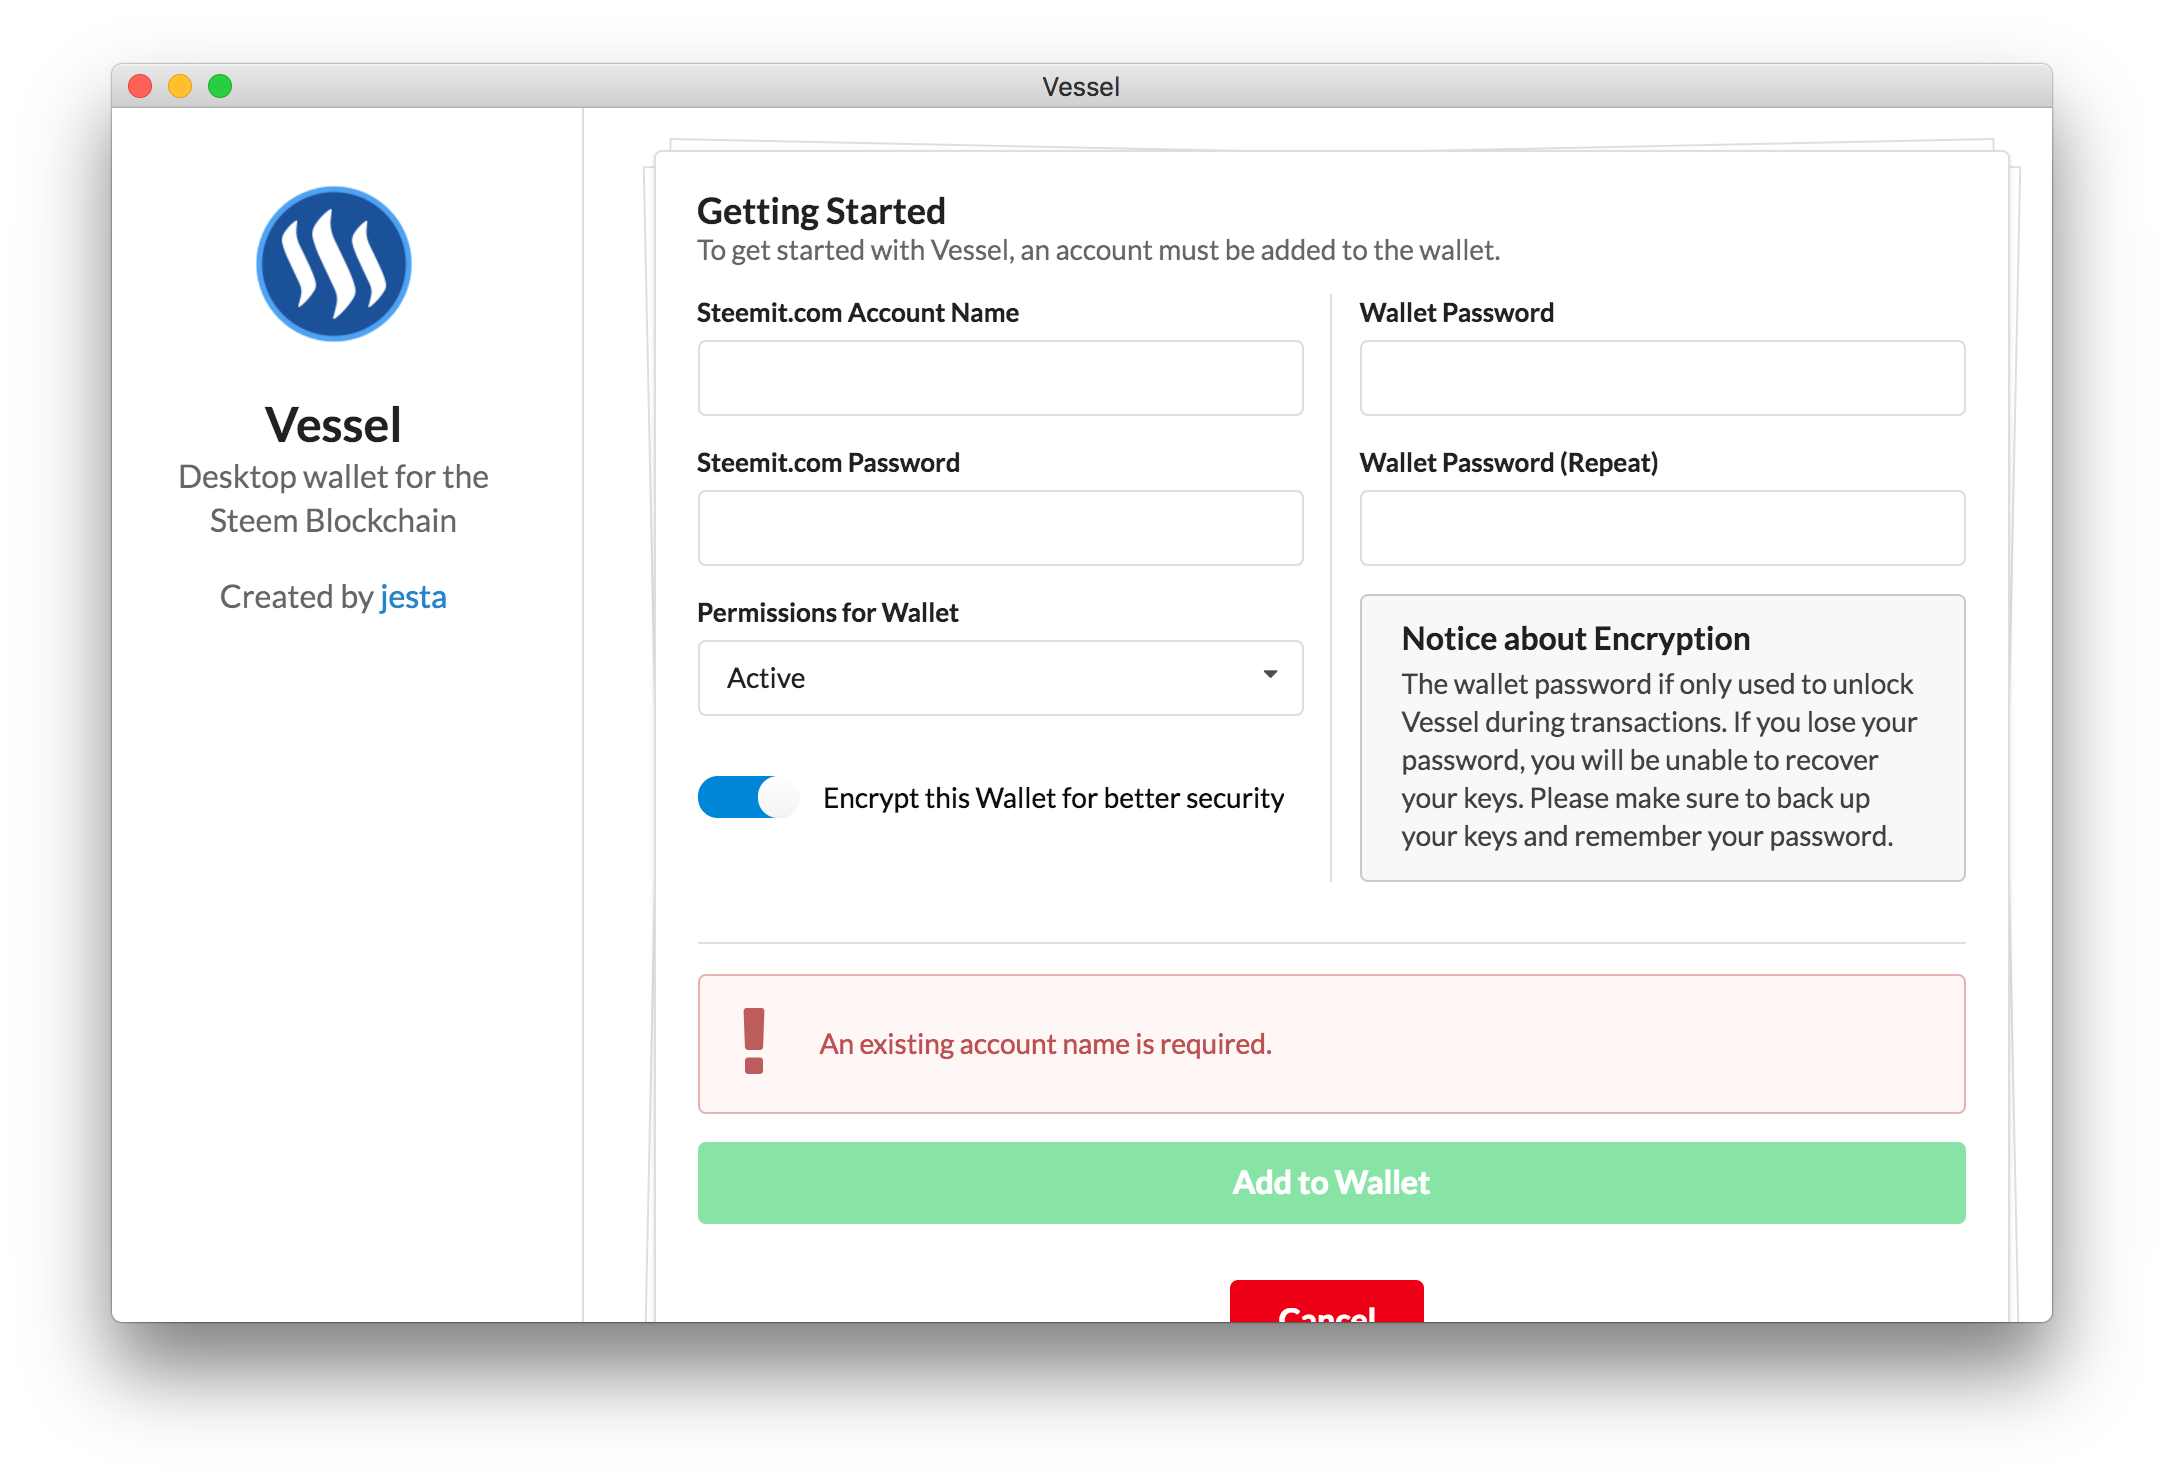
Using the first option on the welcome screen, you will be able to enter a Steemit.com username and password (usually long and starts with a p), the permissions to grant the wallet, and then a password to encrypt the wallet locally.
The permission level itself is as follows:
- Posting: The wallet will only have permission to keep track of your account and claim pending rewards. Vesting and Sending will not function.
- Active: The wallet will be able to manage your Vesting (Power Downs) as well as Send STEEM or SBD. It will also have all permissions a posting key would give.
- Owner: The wallet has all permissions of both Active and Posting. At some point, the owner key will also let you change the Posting and Active key. It is recommended that you don't use your owner key, and keep it someplace safe.
Importing a WIF Private Key

Using the second option on the welcome screen, you can import an account using the WIF private key (key starting with the number 5). The WIF key itself determines what kind of permissions the wallet will receive, as you have 4 WIF keys, one for each permission level.
Using either method, it will prompt a Save Confirmation
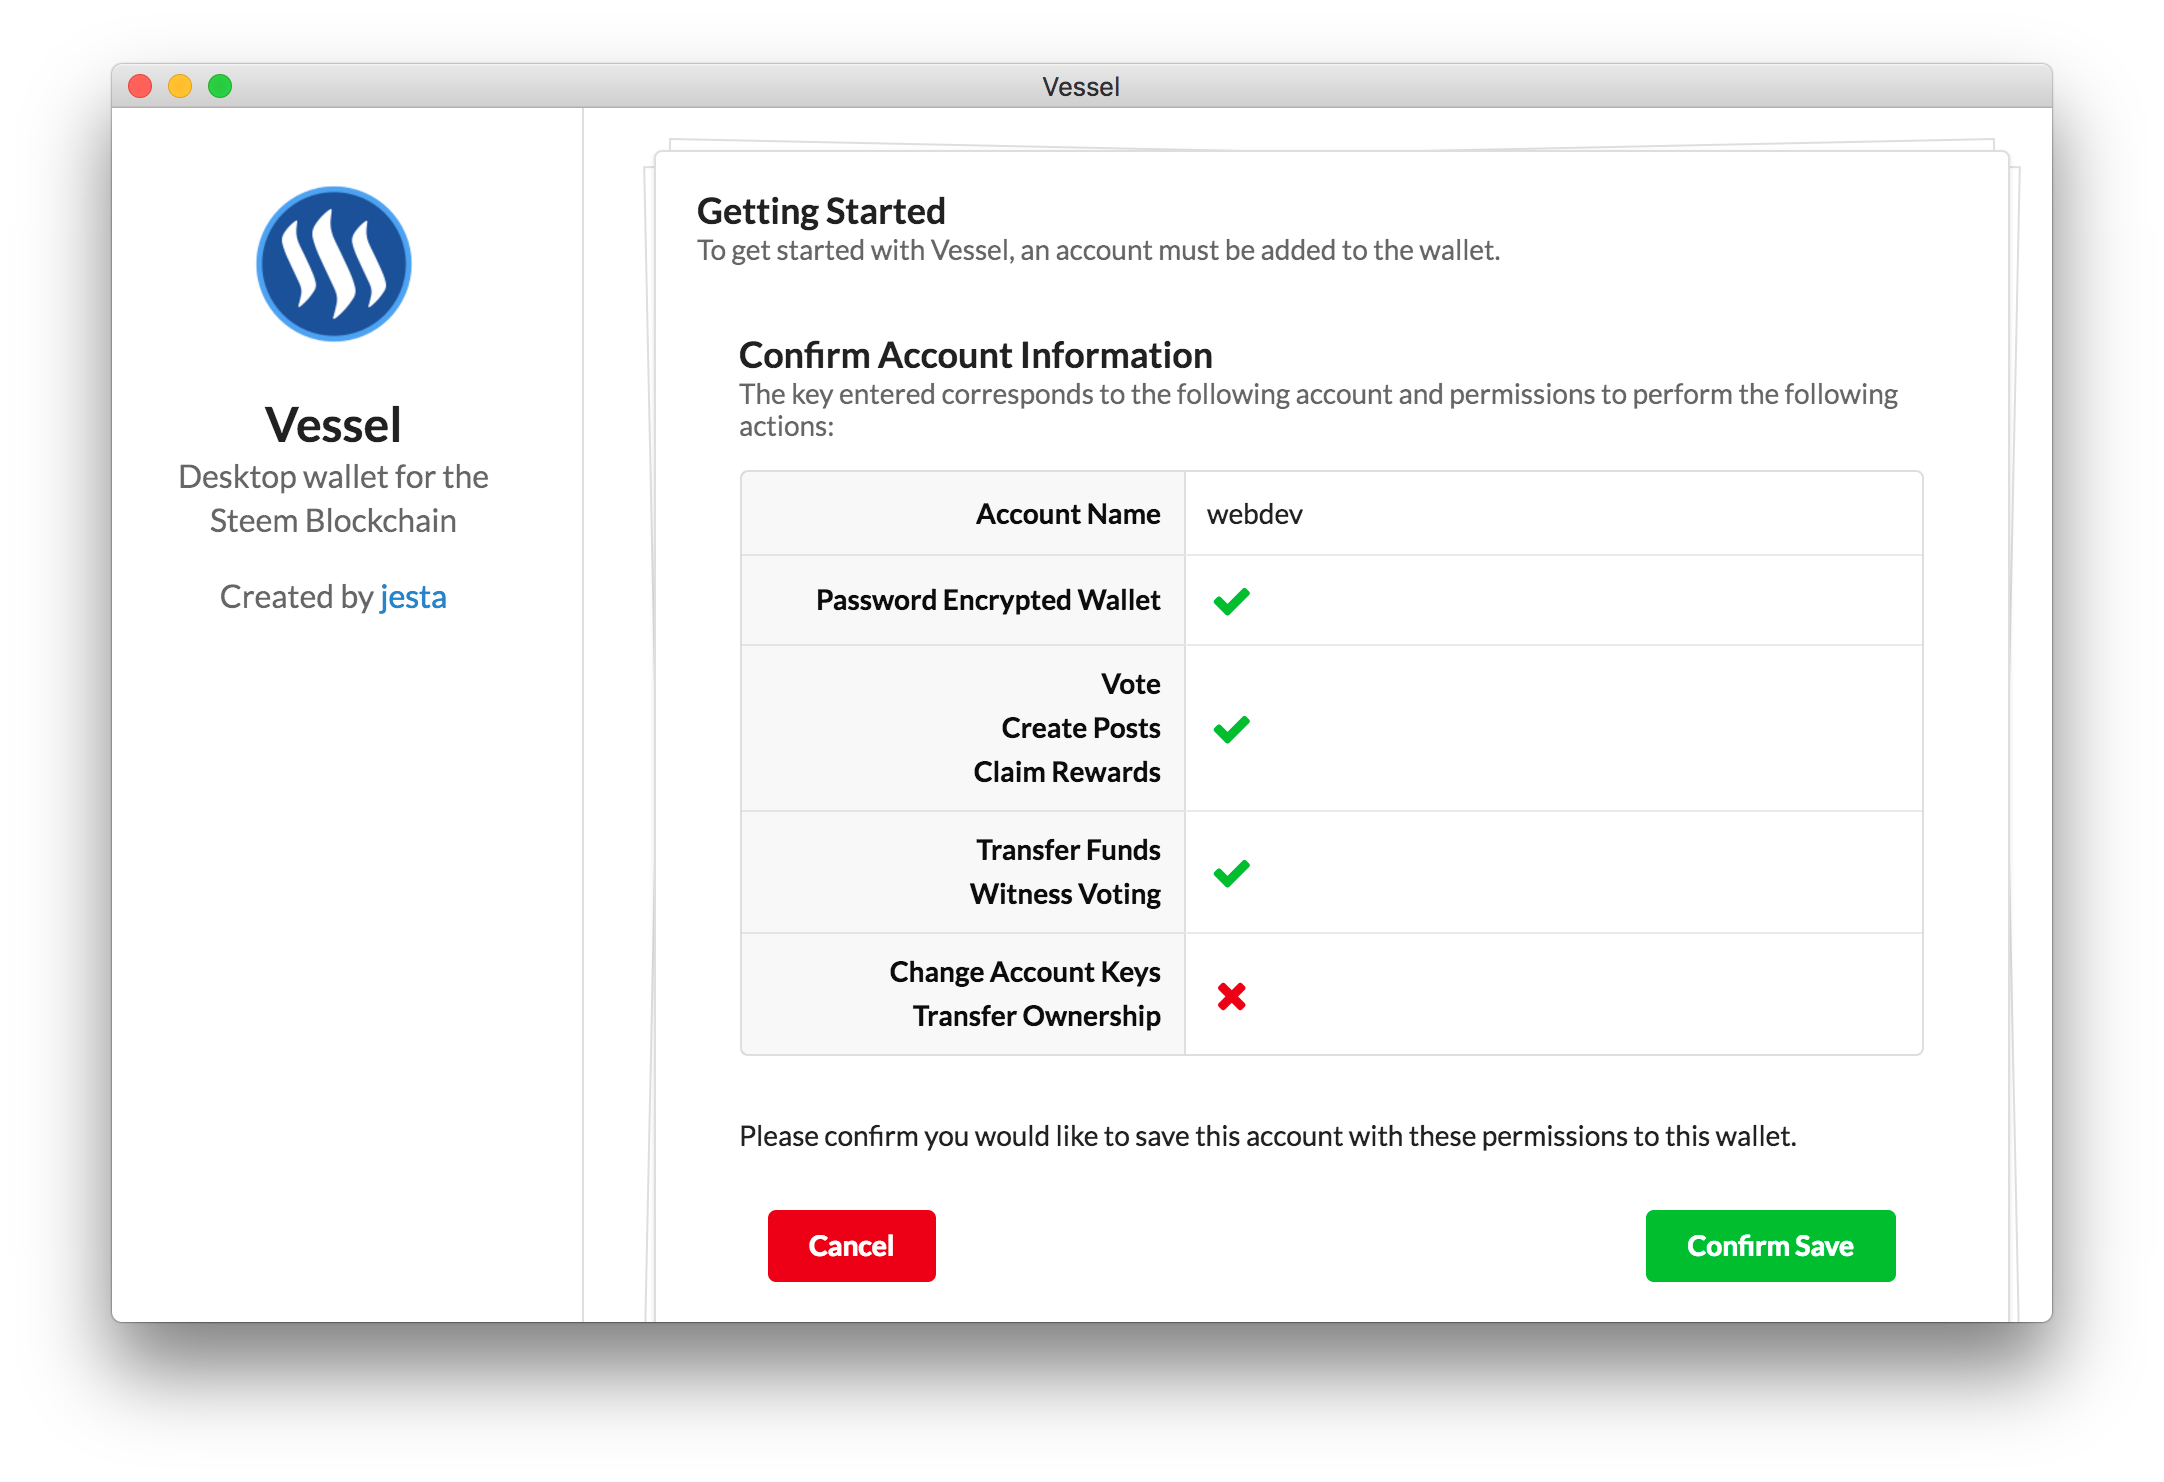
Both methods above once completed will display a confirmation letting you know what you're about to save to the wallet.
At this point, Cancel will abort the import and return you to the main screen, while Confirm will encrypt and save the key, sending you onto the Overview screen.
The Overview
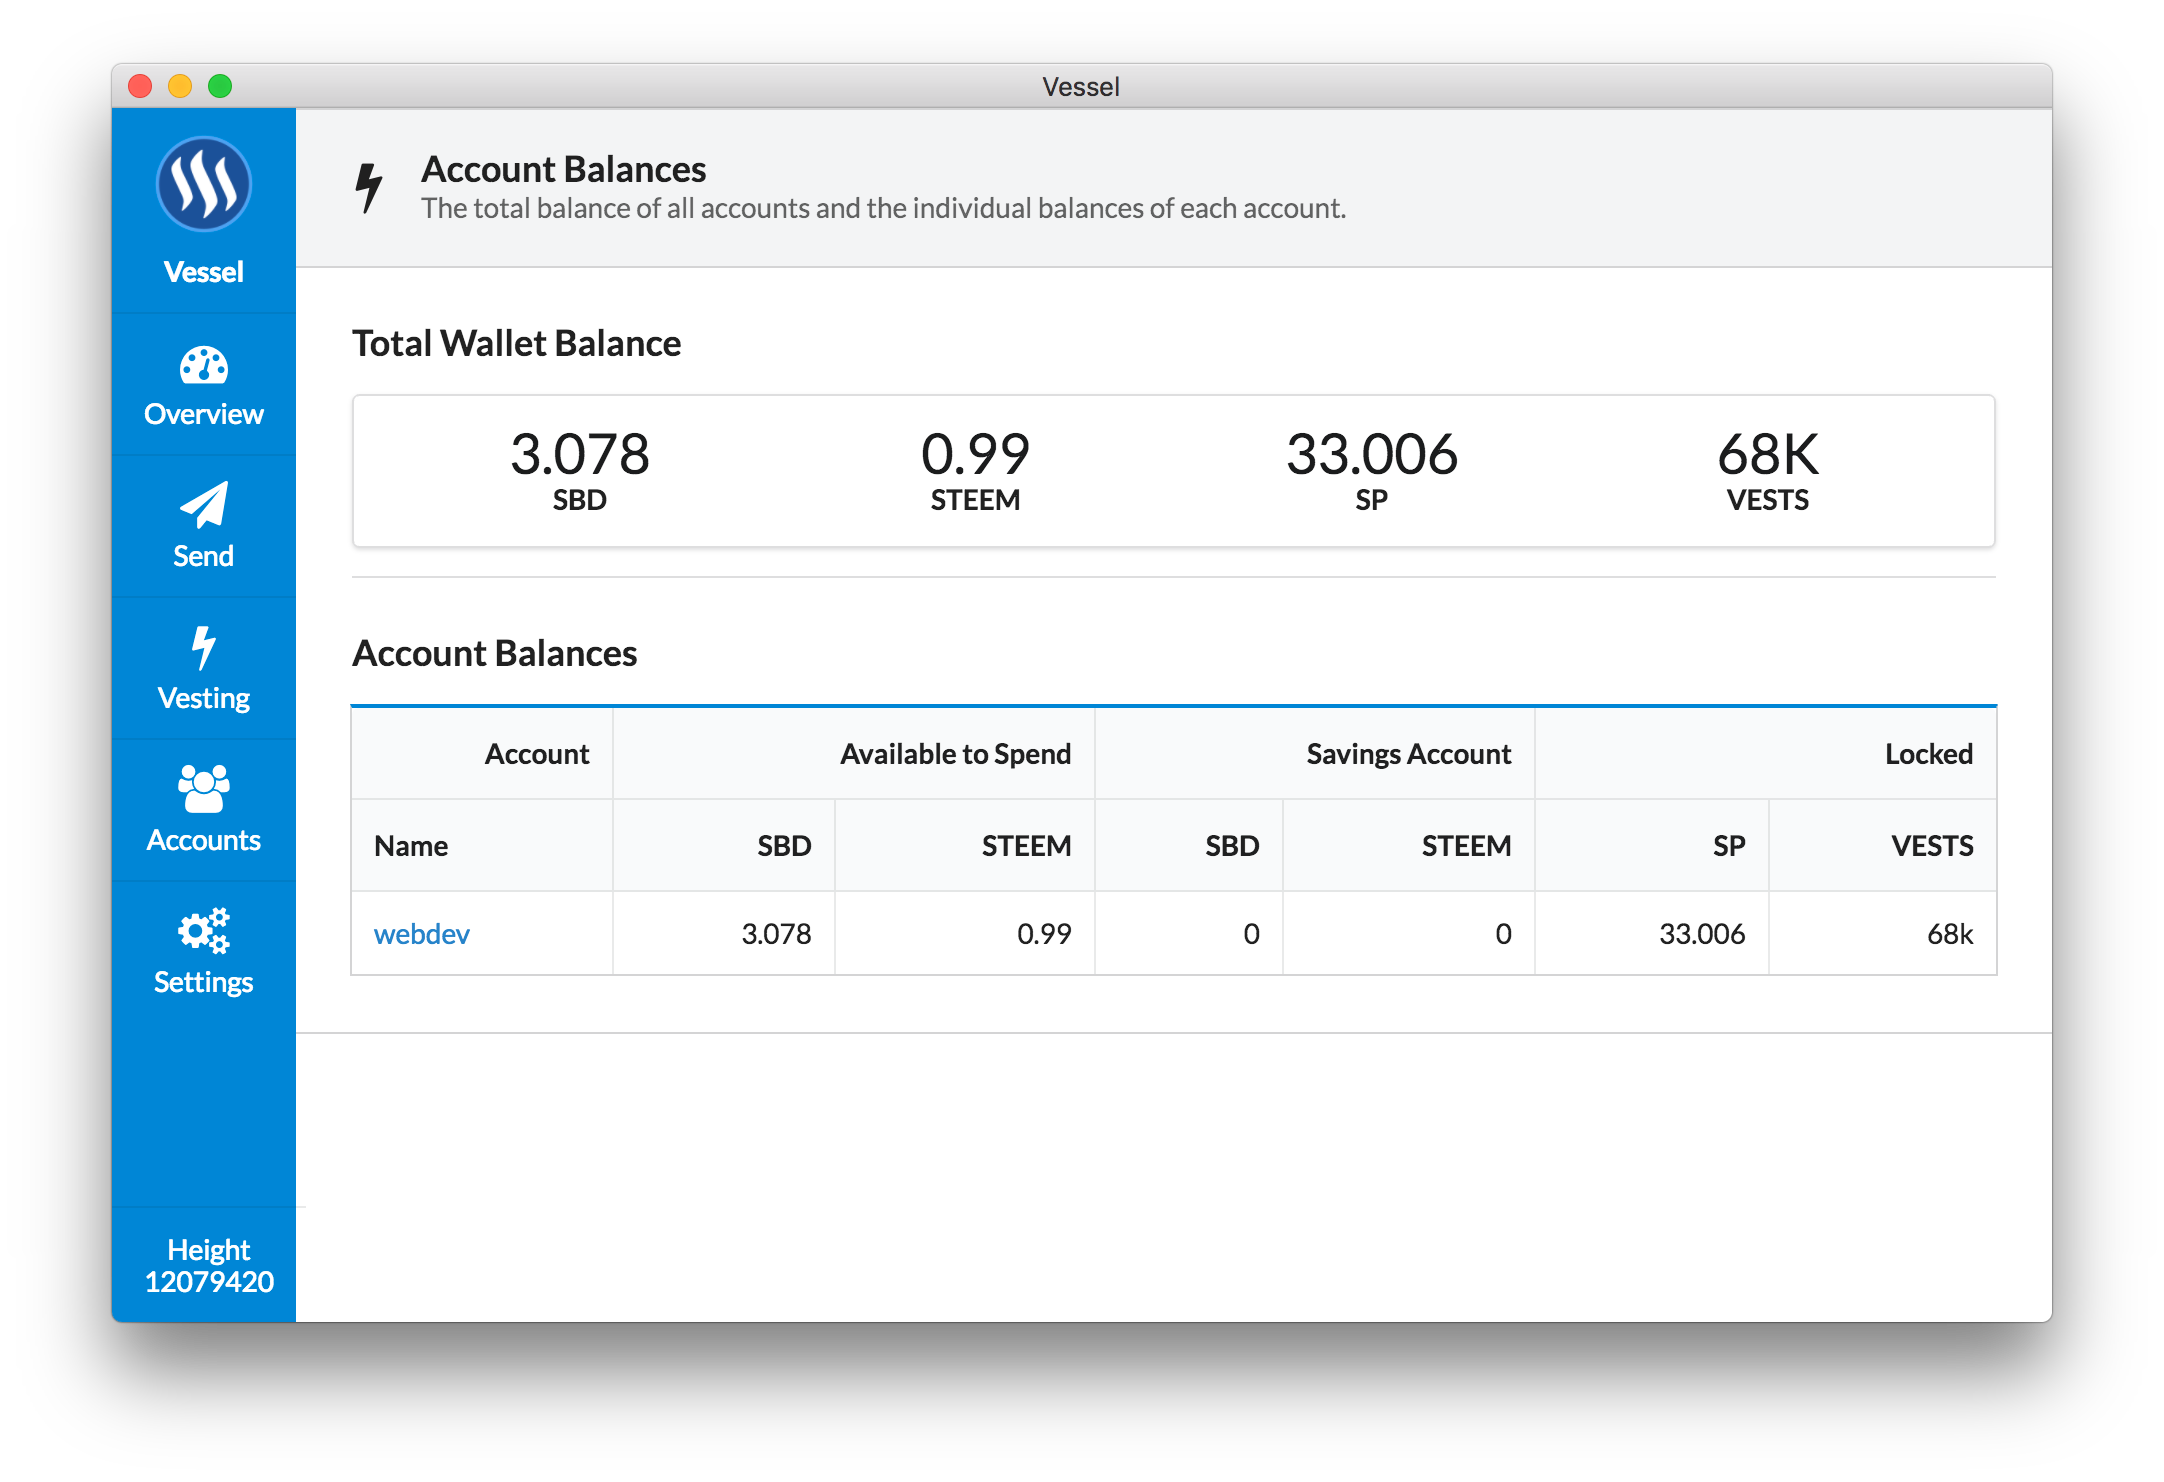
An overview of all accounts loaded within the wallet and their balances. Each account name is clickable and will open a browser window to steemit.com to view the account.
Pending rewards, when available, will display at the top of this screen as a notification. The notification will display the total rewards pending as well as a button to claim those rewards.
The larger numbers are abbreviated, and hovering over them will reveal the complete number.
Sending Funds
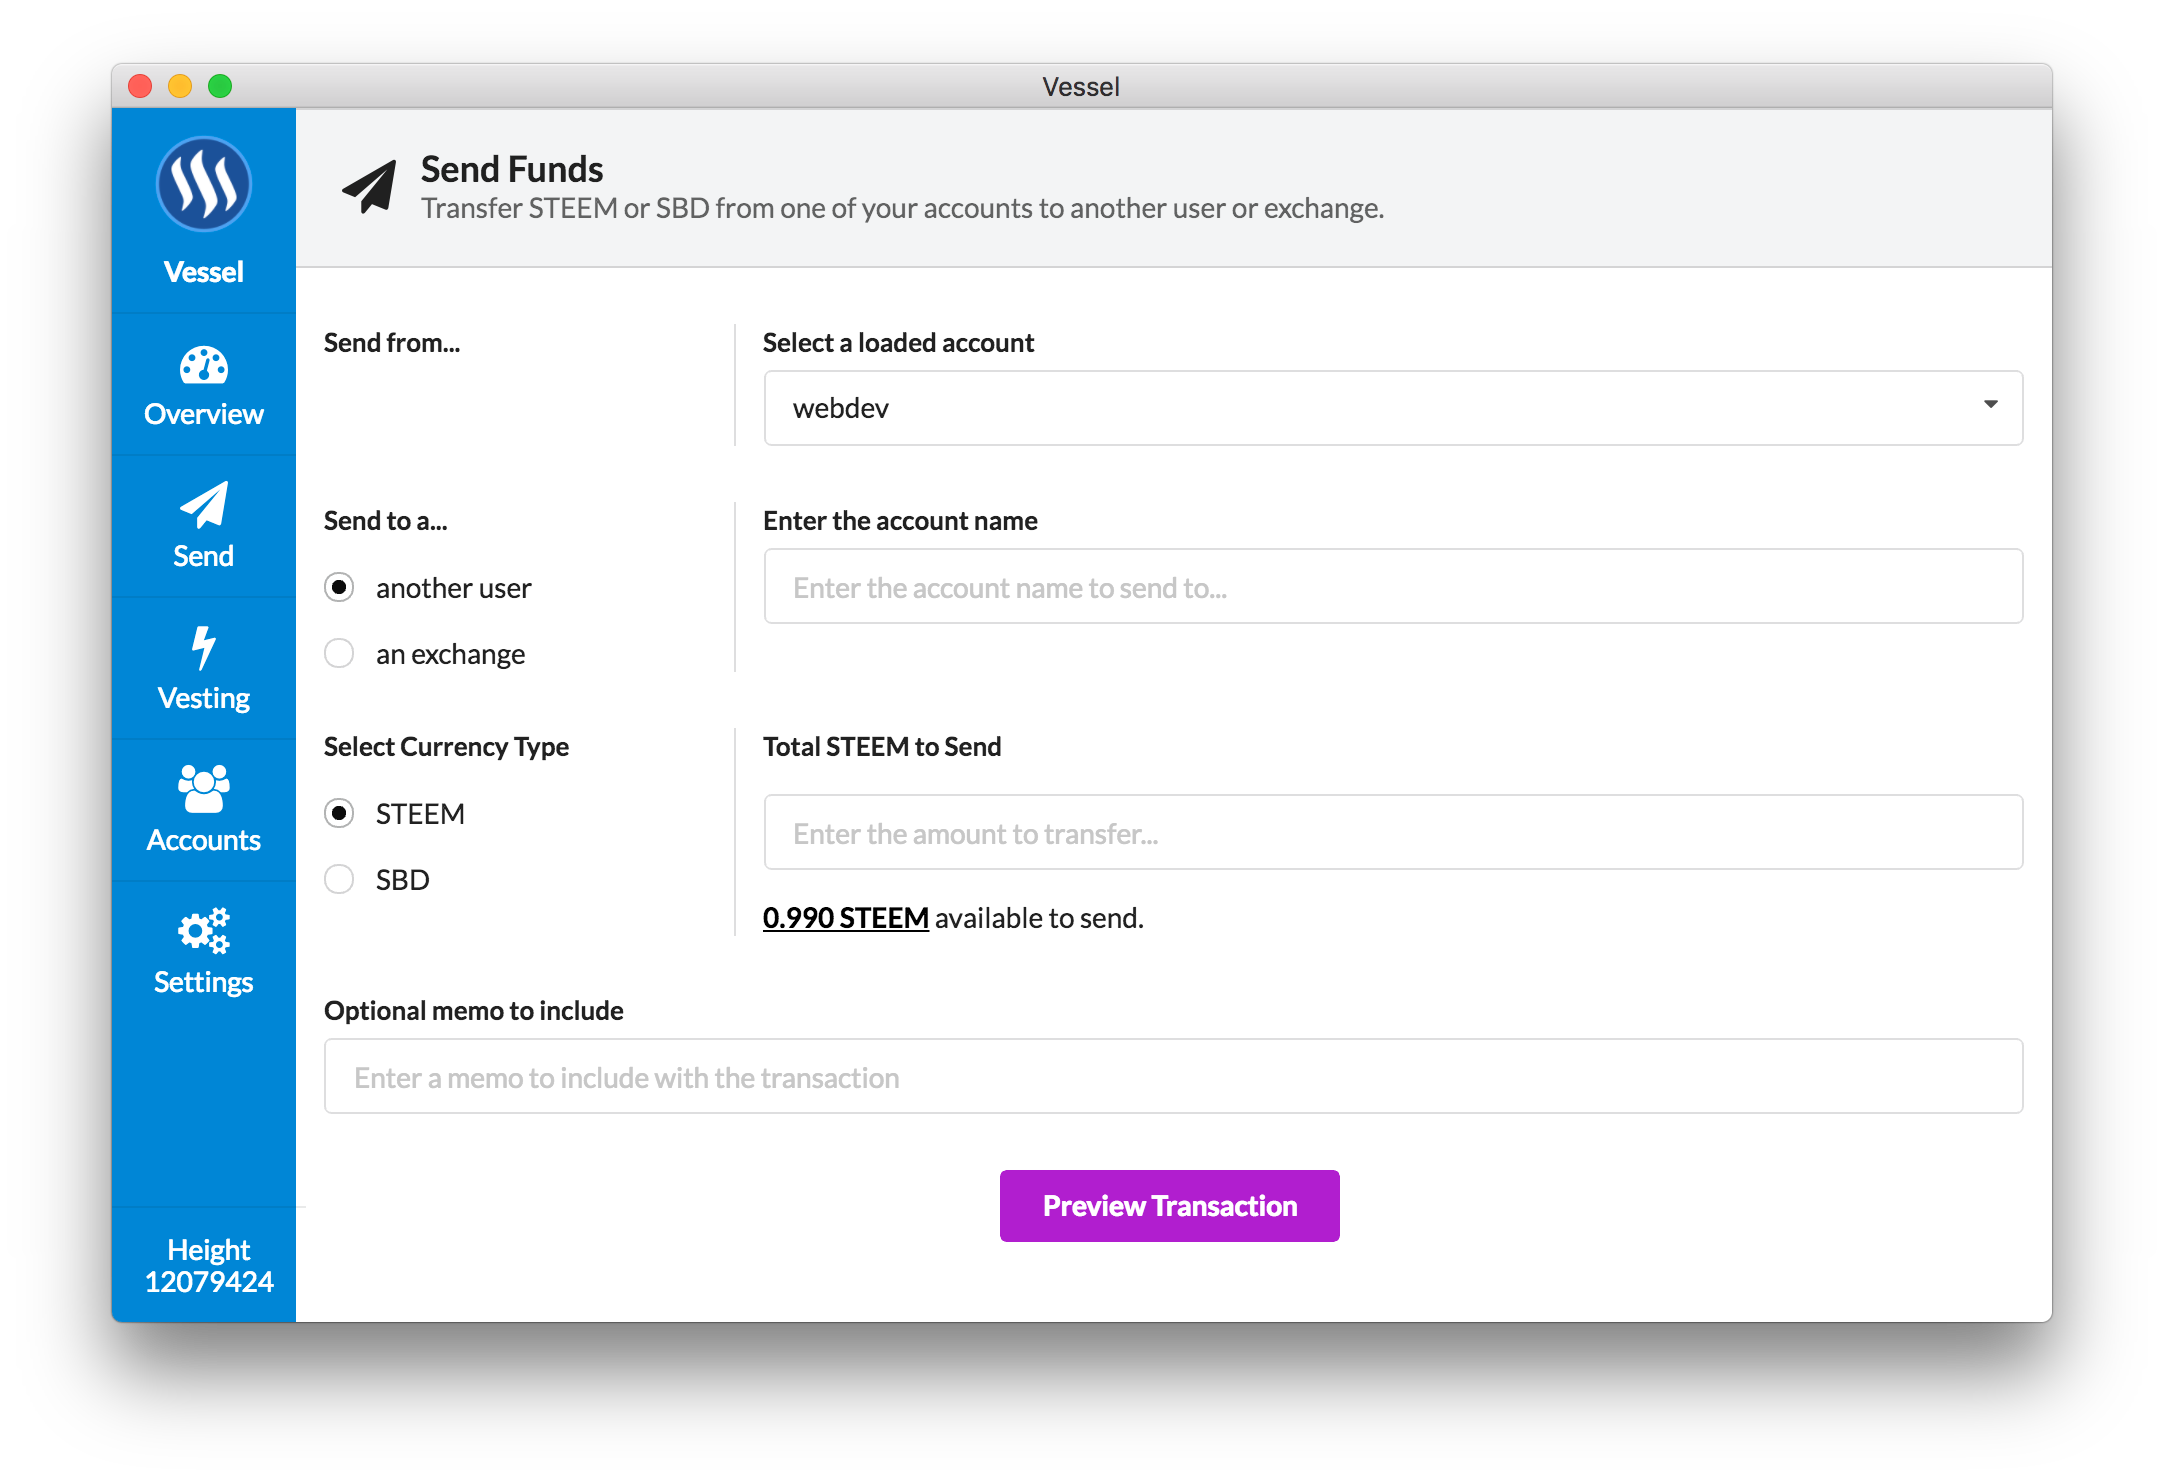
The send interface allows you to easily send STEEM or SBD to any account or to an exchange.
Every account loaded within the wallet is available in the "From" dropdown field, as well as providing a search if you've got a ton of accounts. Only accounts with an Active or Owner key imported will be able to send, and accounts with Posting keys will be disabled.
The "To" field can be swapped between an account name or a list of predefined exchanges.
The "Amount" field can be toggled between SBD and STEEM, showing the balance of the selected currency below the input. Clicking on the balance will populate the input with the maximum amount available.
The optional memo field is available for various uses.
Predefined exchanges
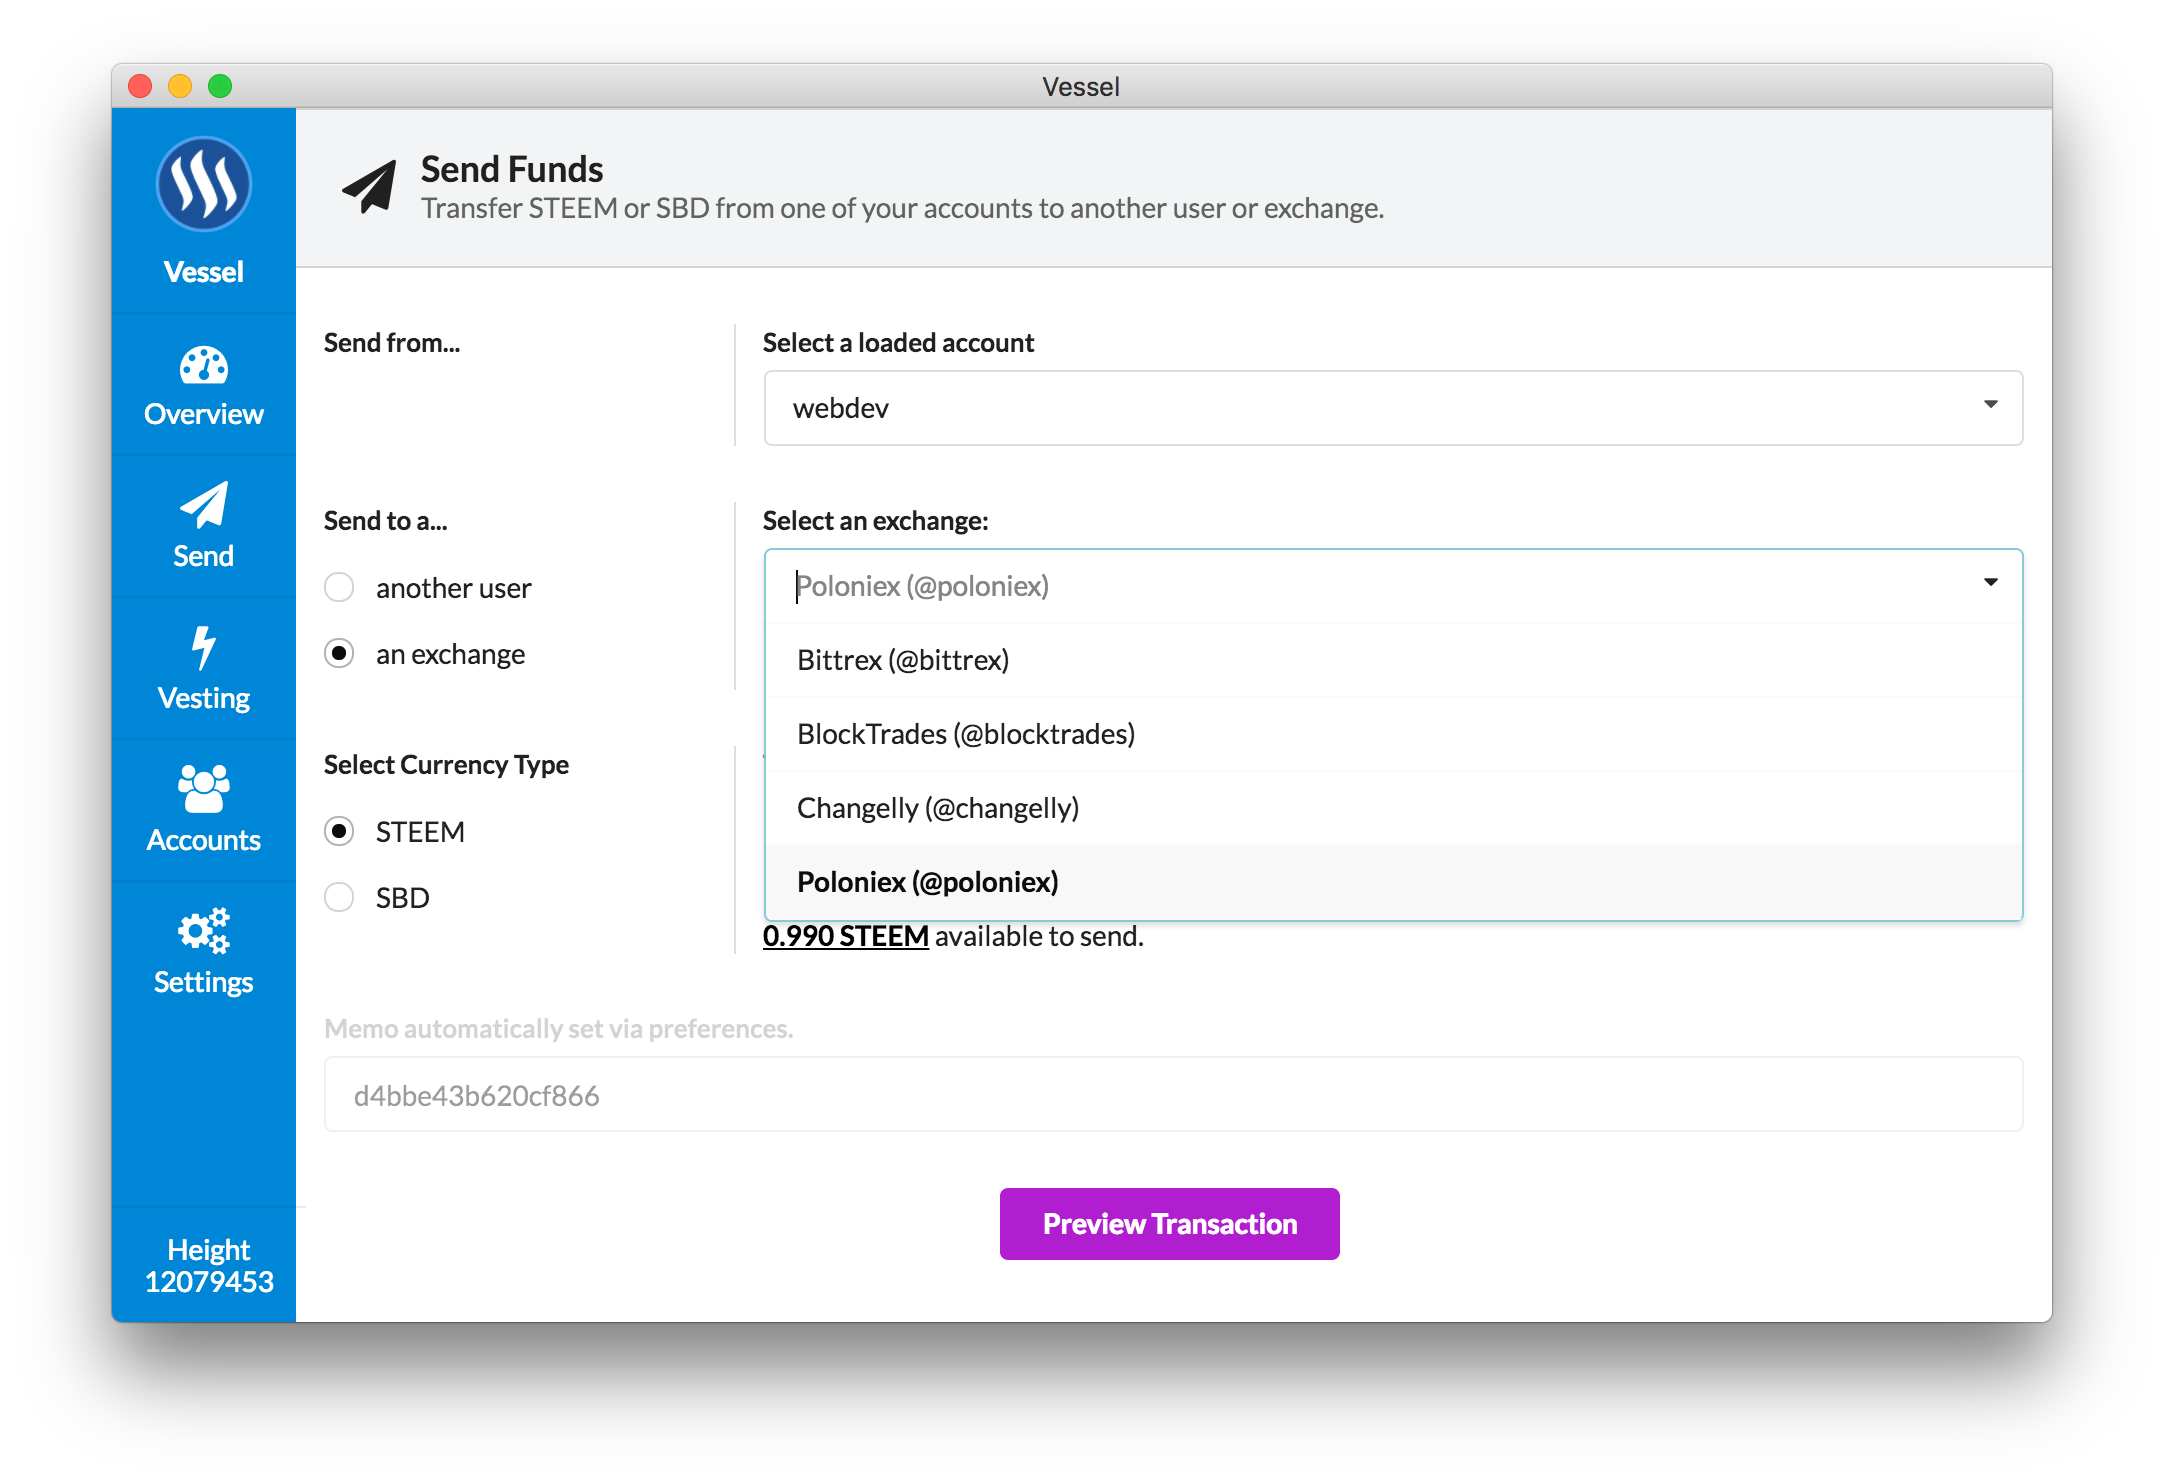
When sending to an exchange, you don't have to worry about typo's anymore. The exchanges are fixed strings within a dropdown.
Predefined Memo Fields
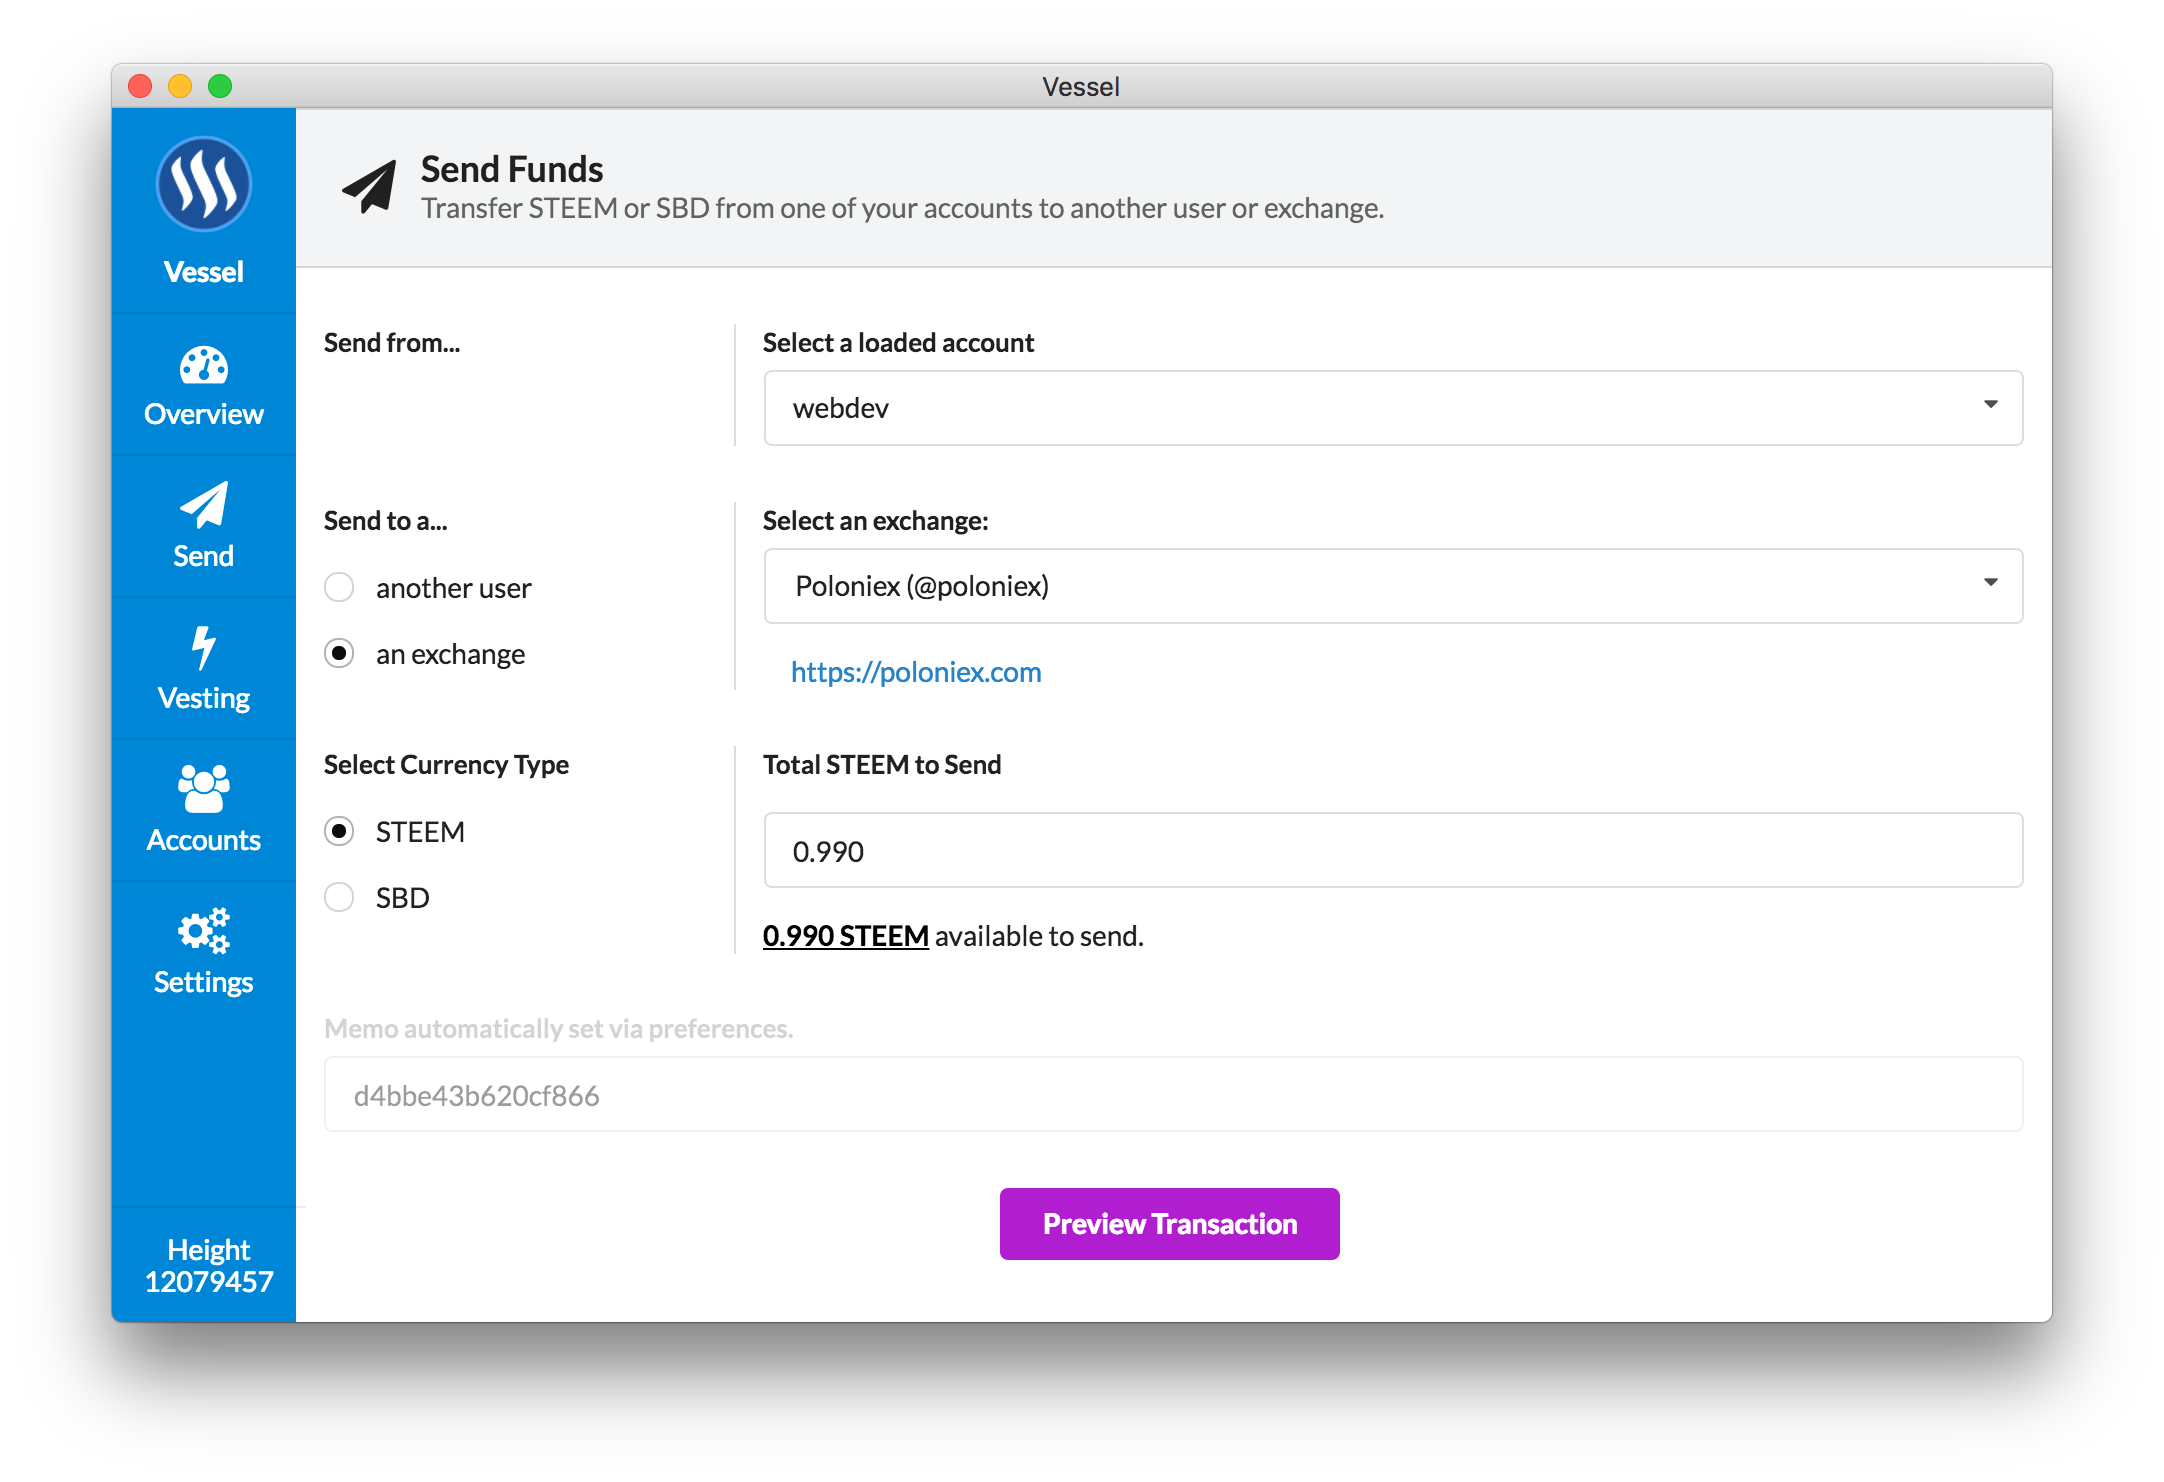
If you have configured the Exchange from the Settings screen, the memo will automatically populate based on the currency + exchange combo.
Confirming Transactions
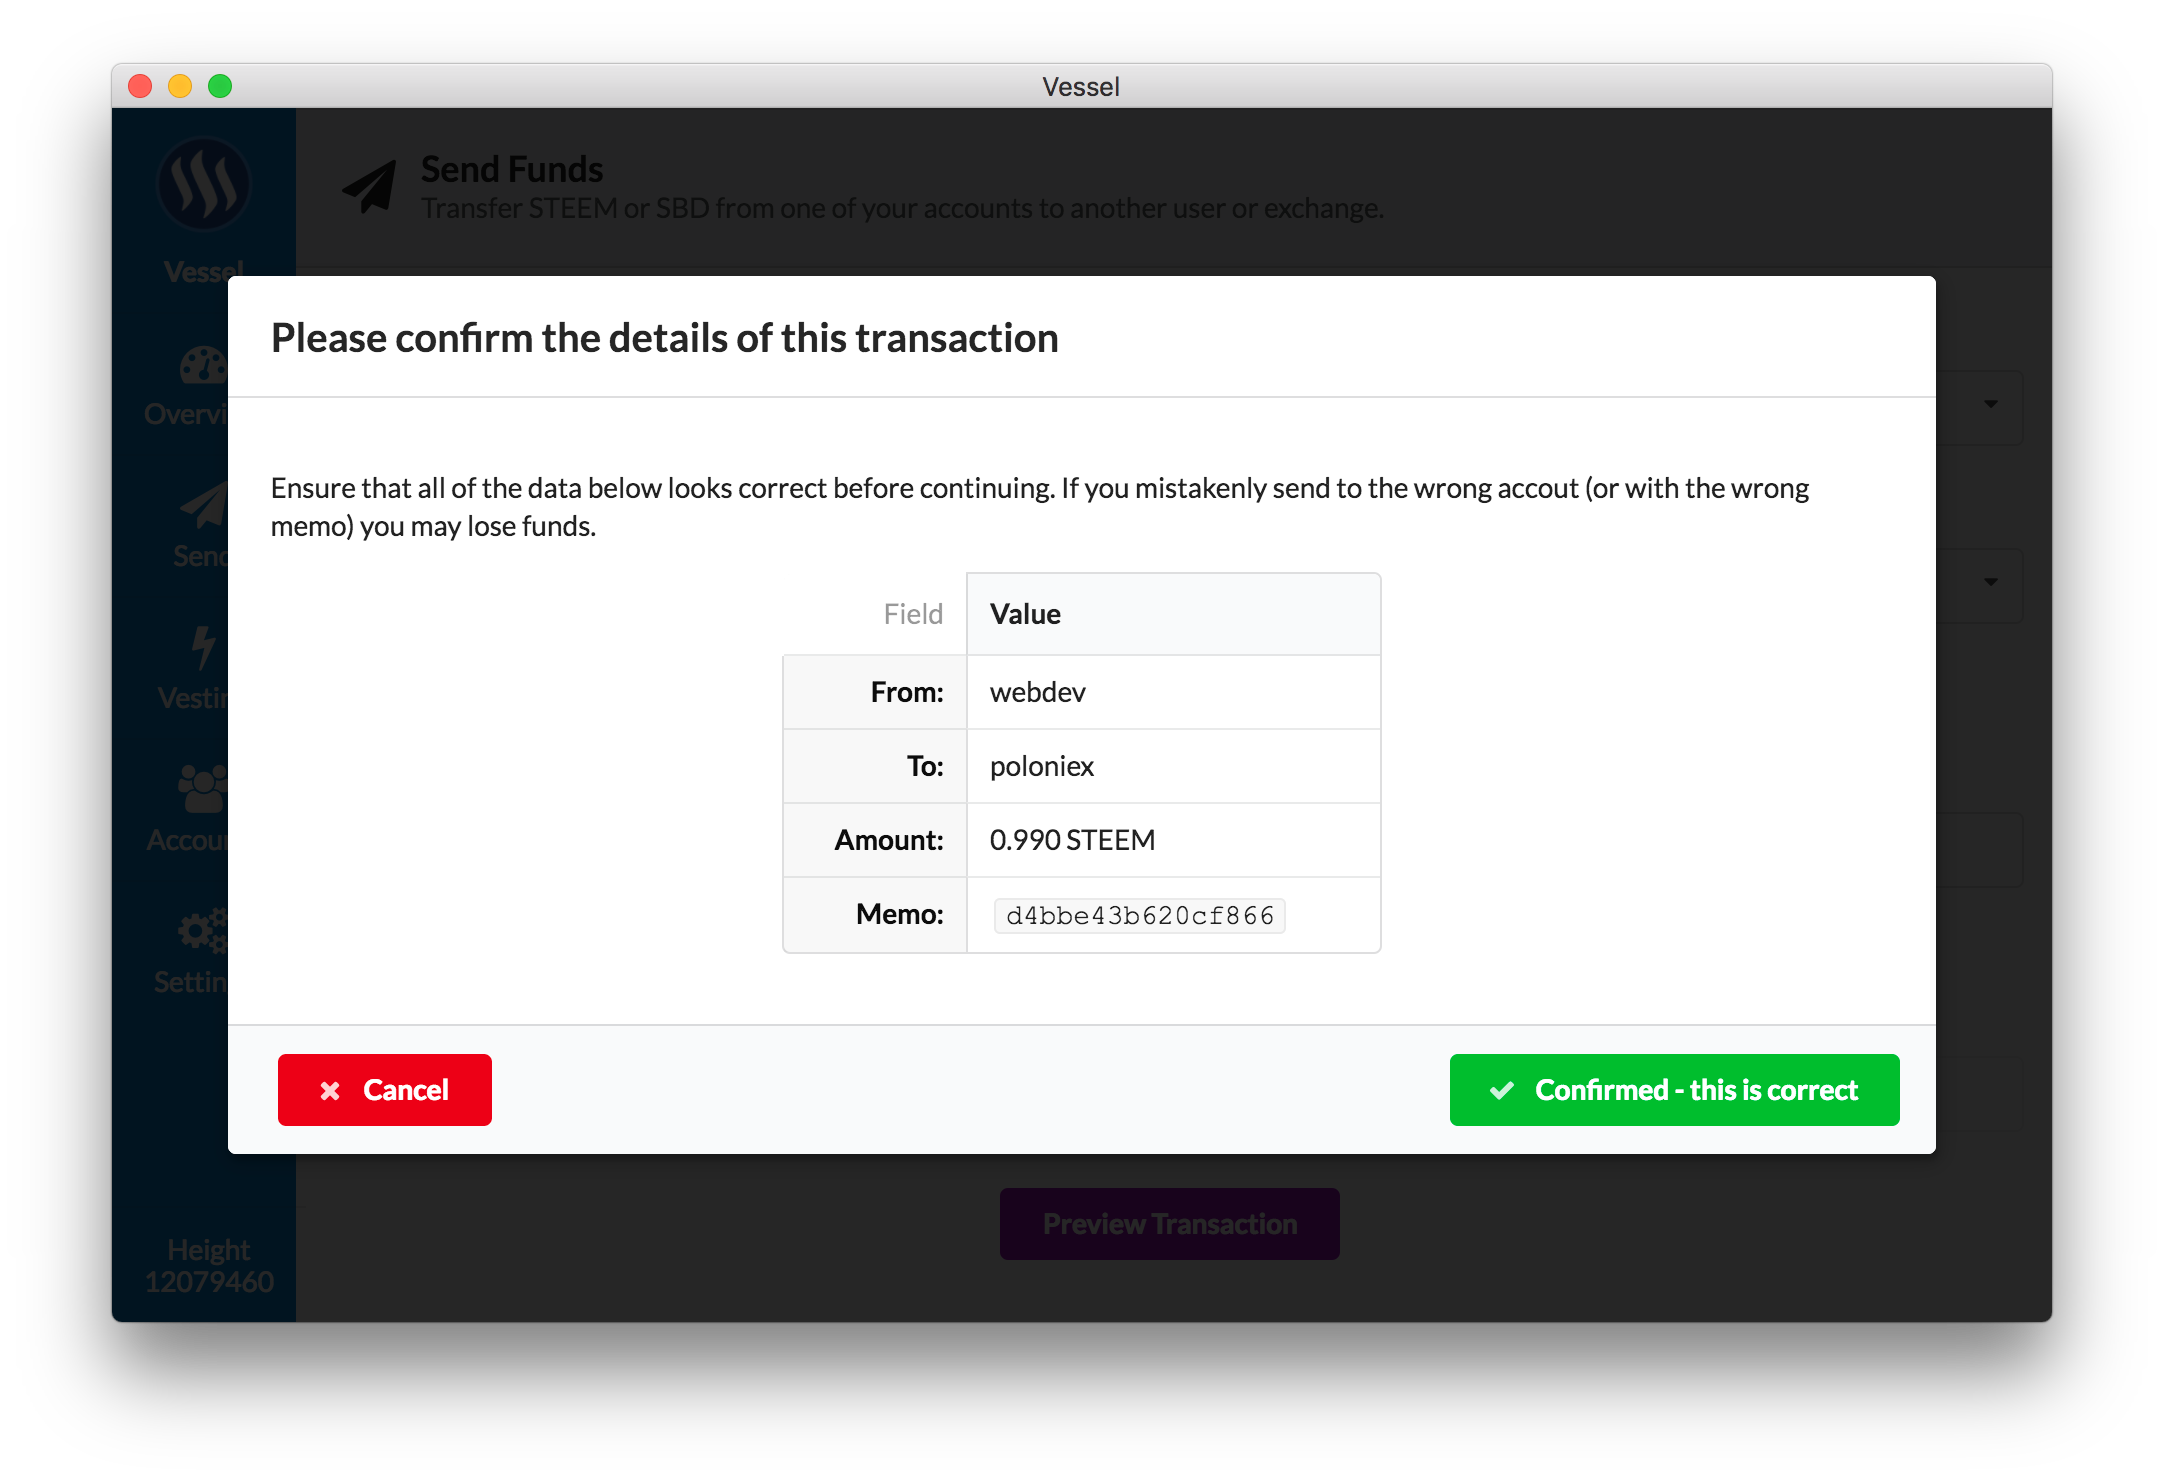
Clicking "Preview Transaction" from the send page will prompt you to review the information provided. This gives you an opportunity to review and ensure everything is correct before signing the transaction.
Decrypting the Wallet
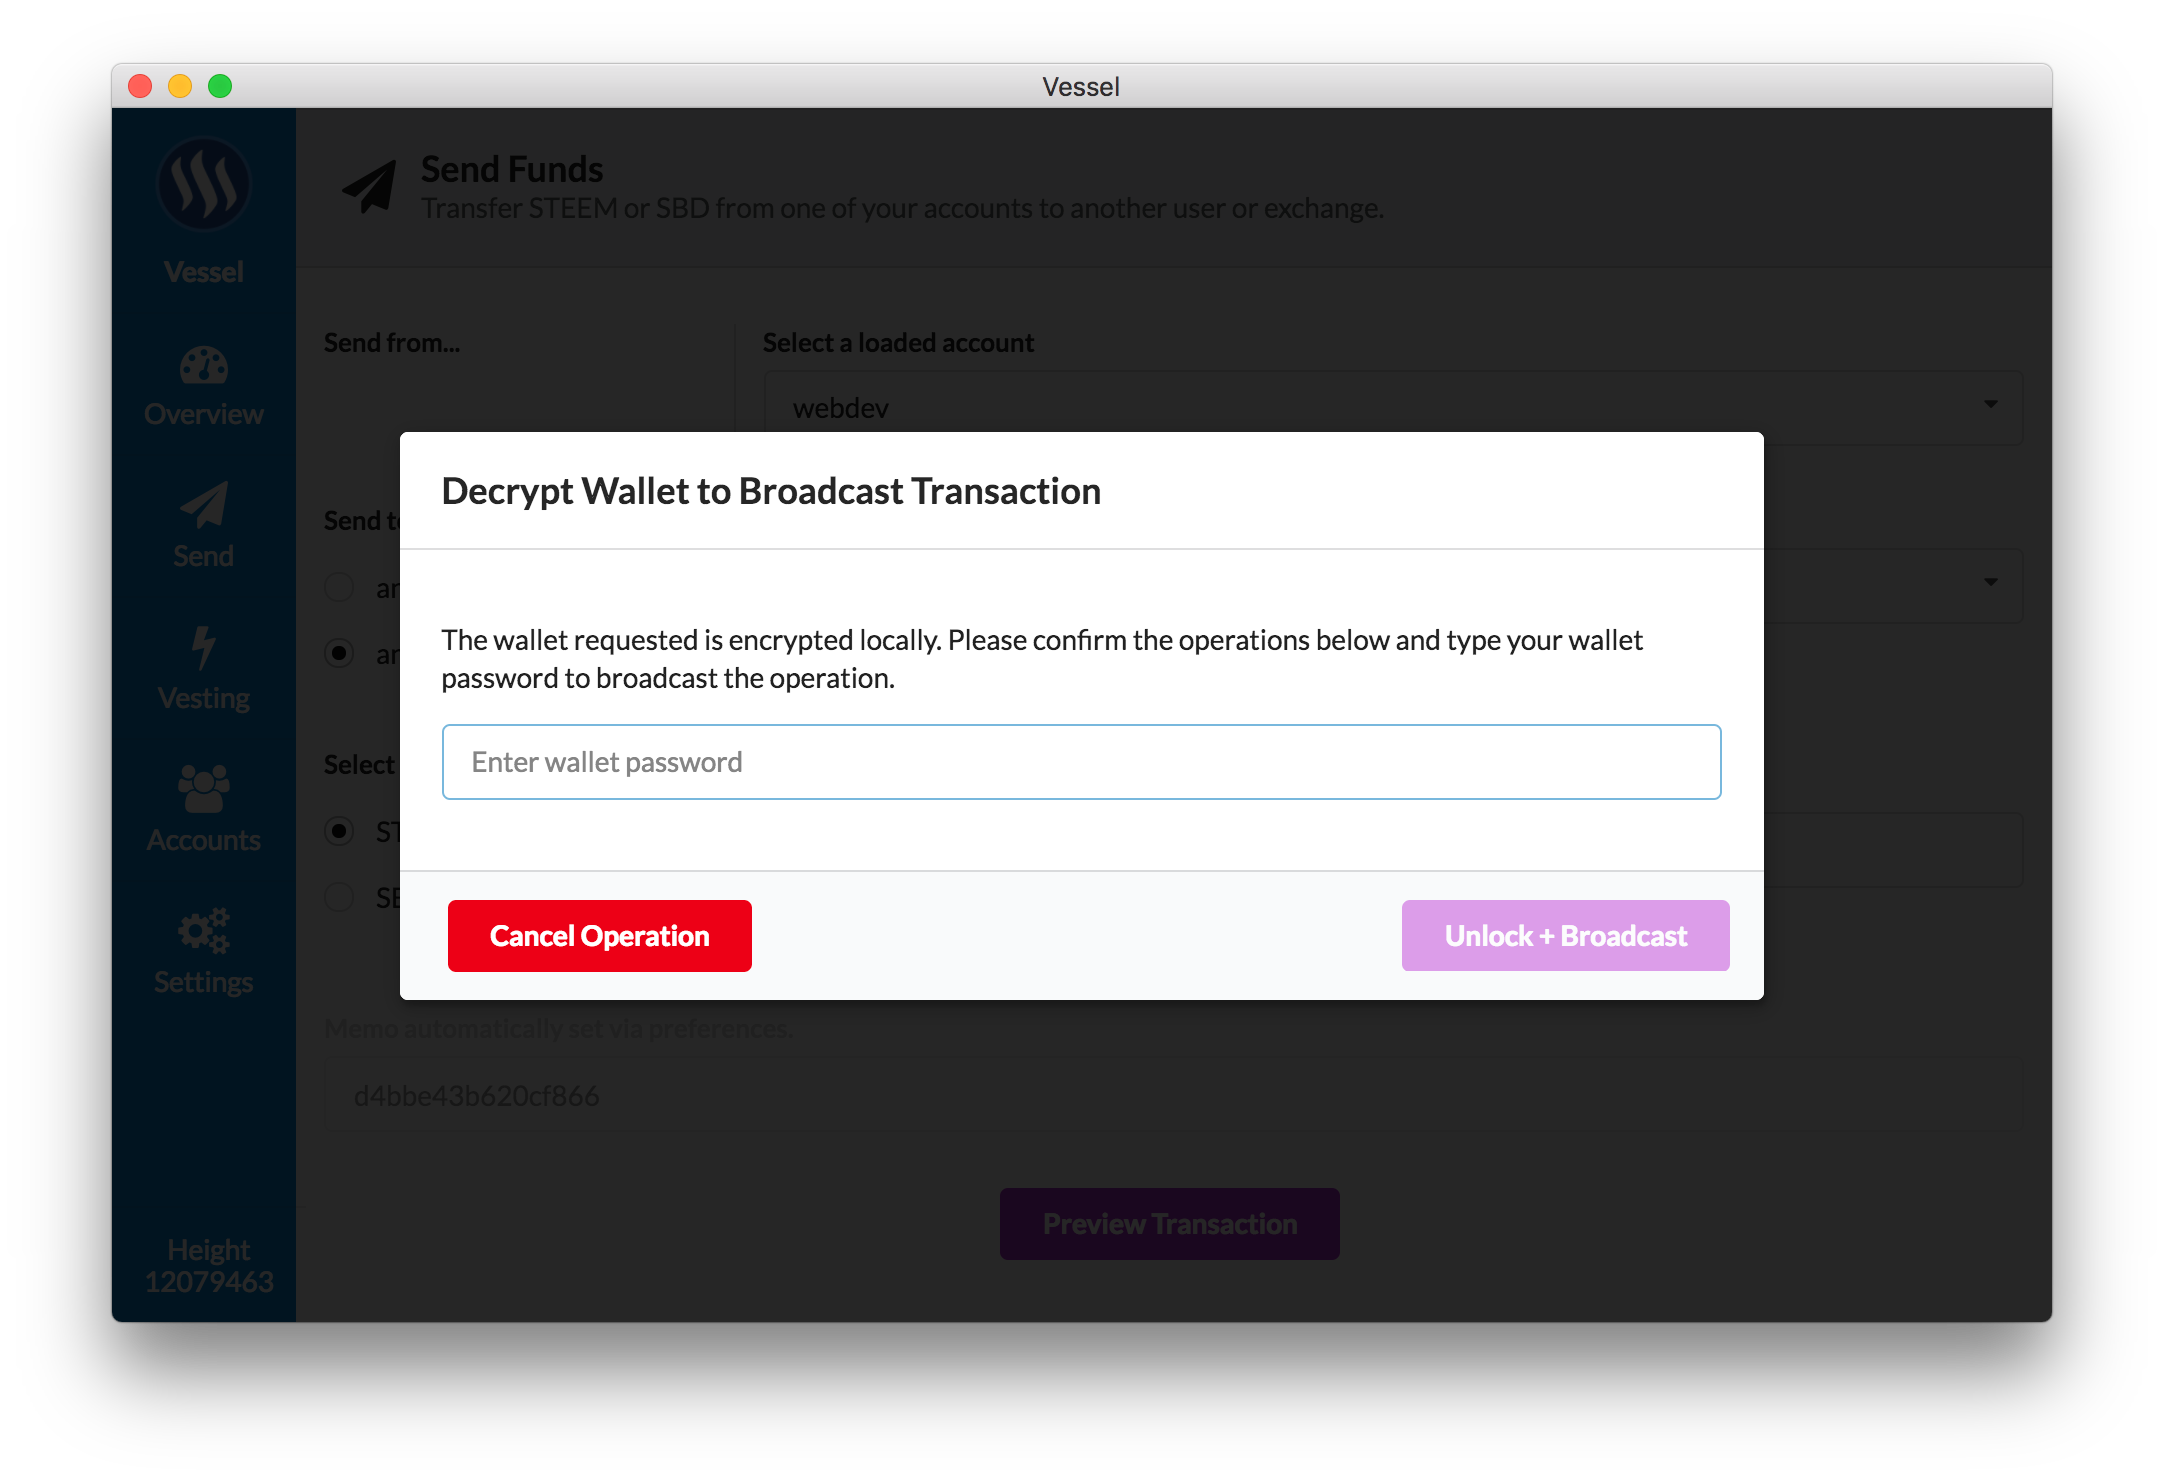
If the wallet is encrypted (which it should be), after you confirm the transaction, you will have to decrypt your wallet to broadcast it.
Only when you enter the correct password will it let you proceed.
Vesting - Managing Power Downs
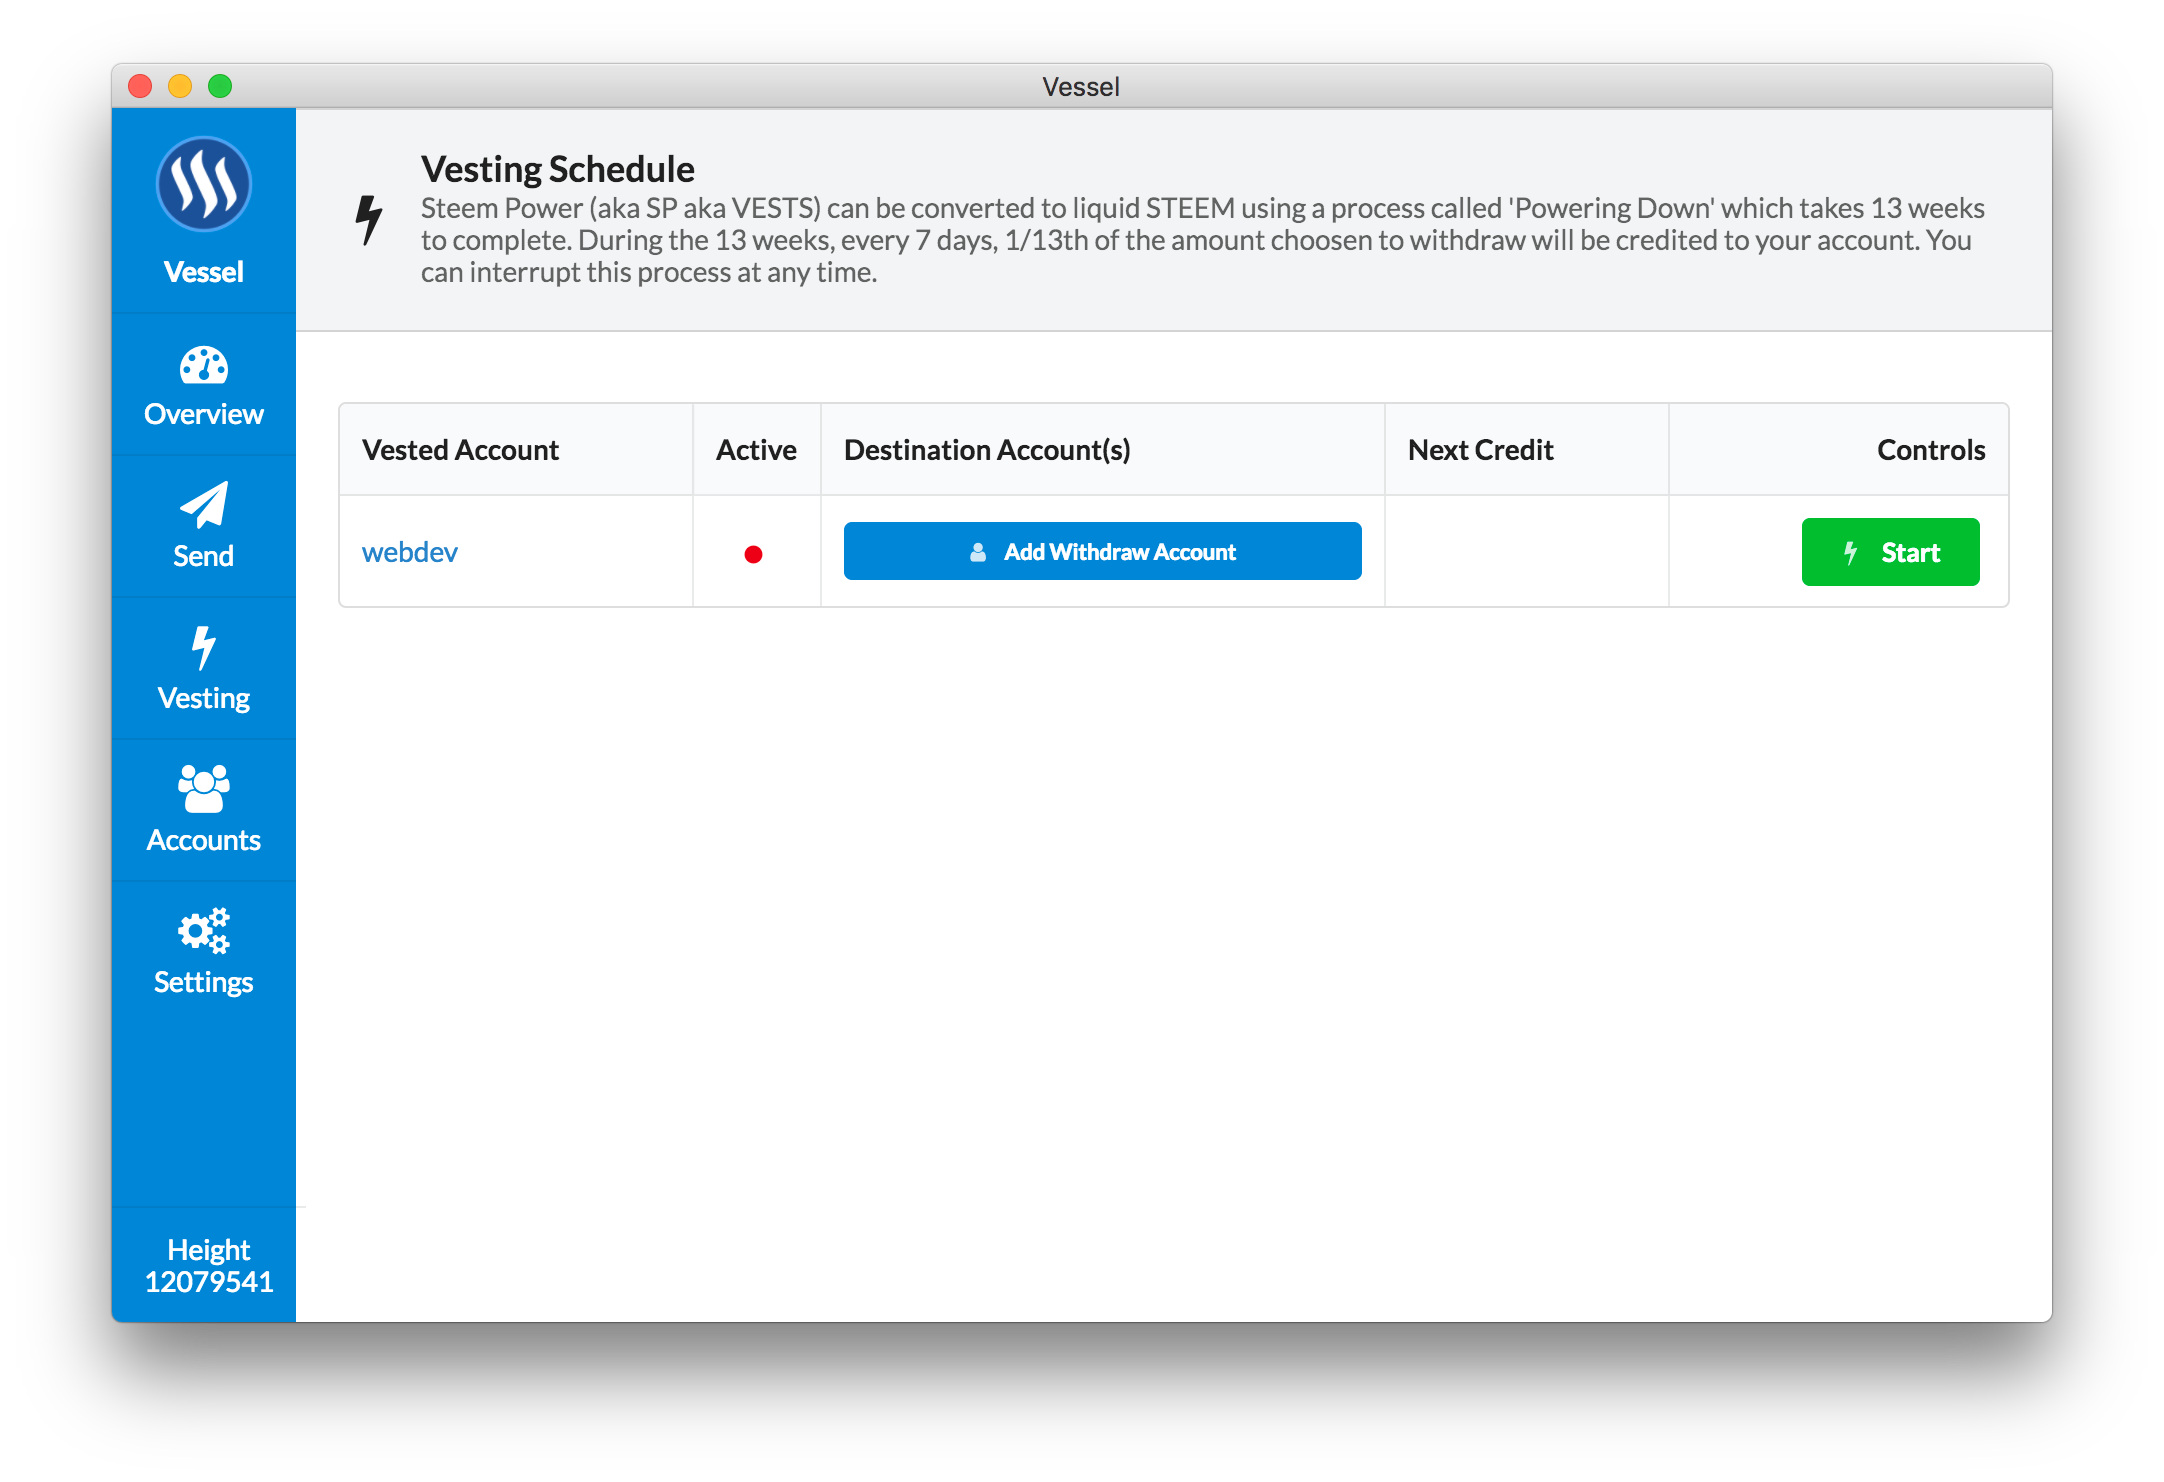
The Vesting screen gives you a brief overview of the status of your Power Down cycles. When an account is idle (not powering down), it is shown as displayed above.
From here, you can start:
- Click "Start" to bebin a new Power Down cycle
- Click "Add Withdraw Account" to set which account(s) this account will power down into.
Starting a new Power Down cycle

Clicking "Start" on the Vesting screen will prompt you to specify the amount to power down. You can drag the slider from left to right to alter the amount.
The 3 pieces of information on this screen include:
- The account to power down and for how long.
- The total amount of SP/VESTS that will be powered down.
- How much STEEM per week will be withdrawn.
An active Power Down cycle
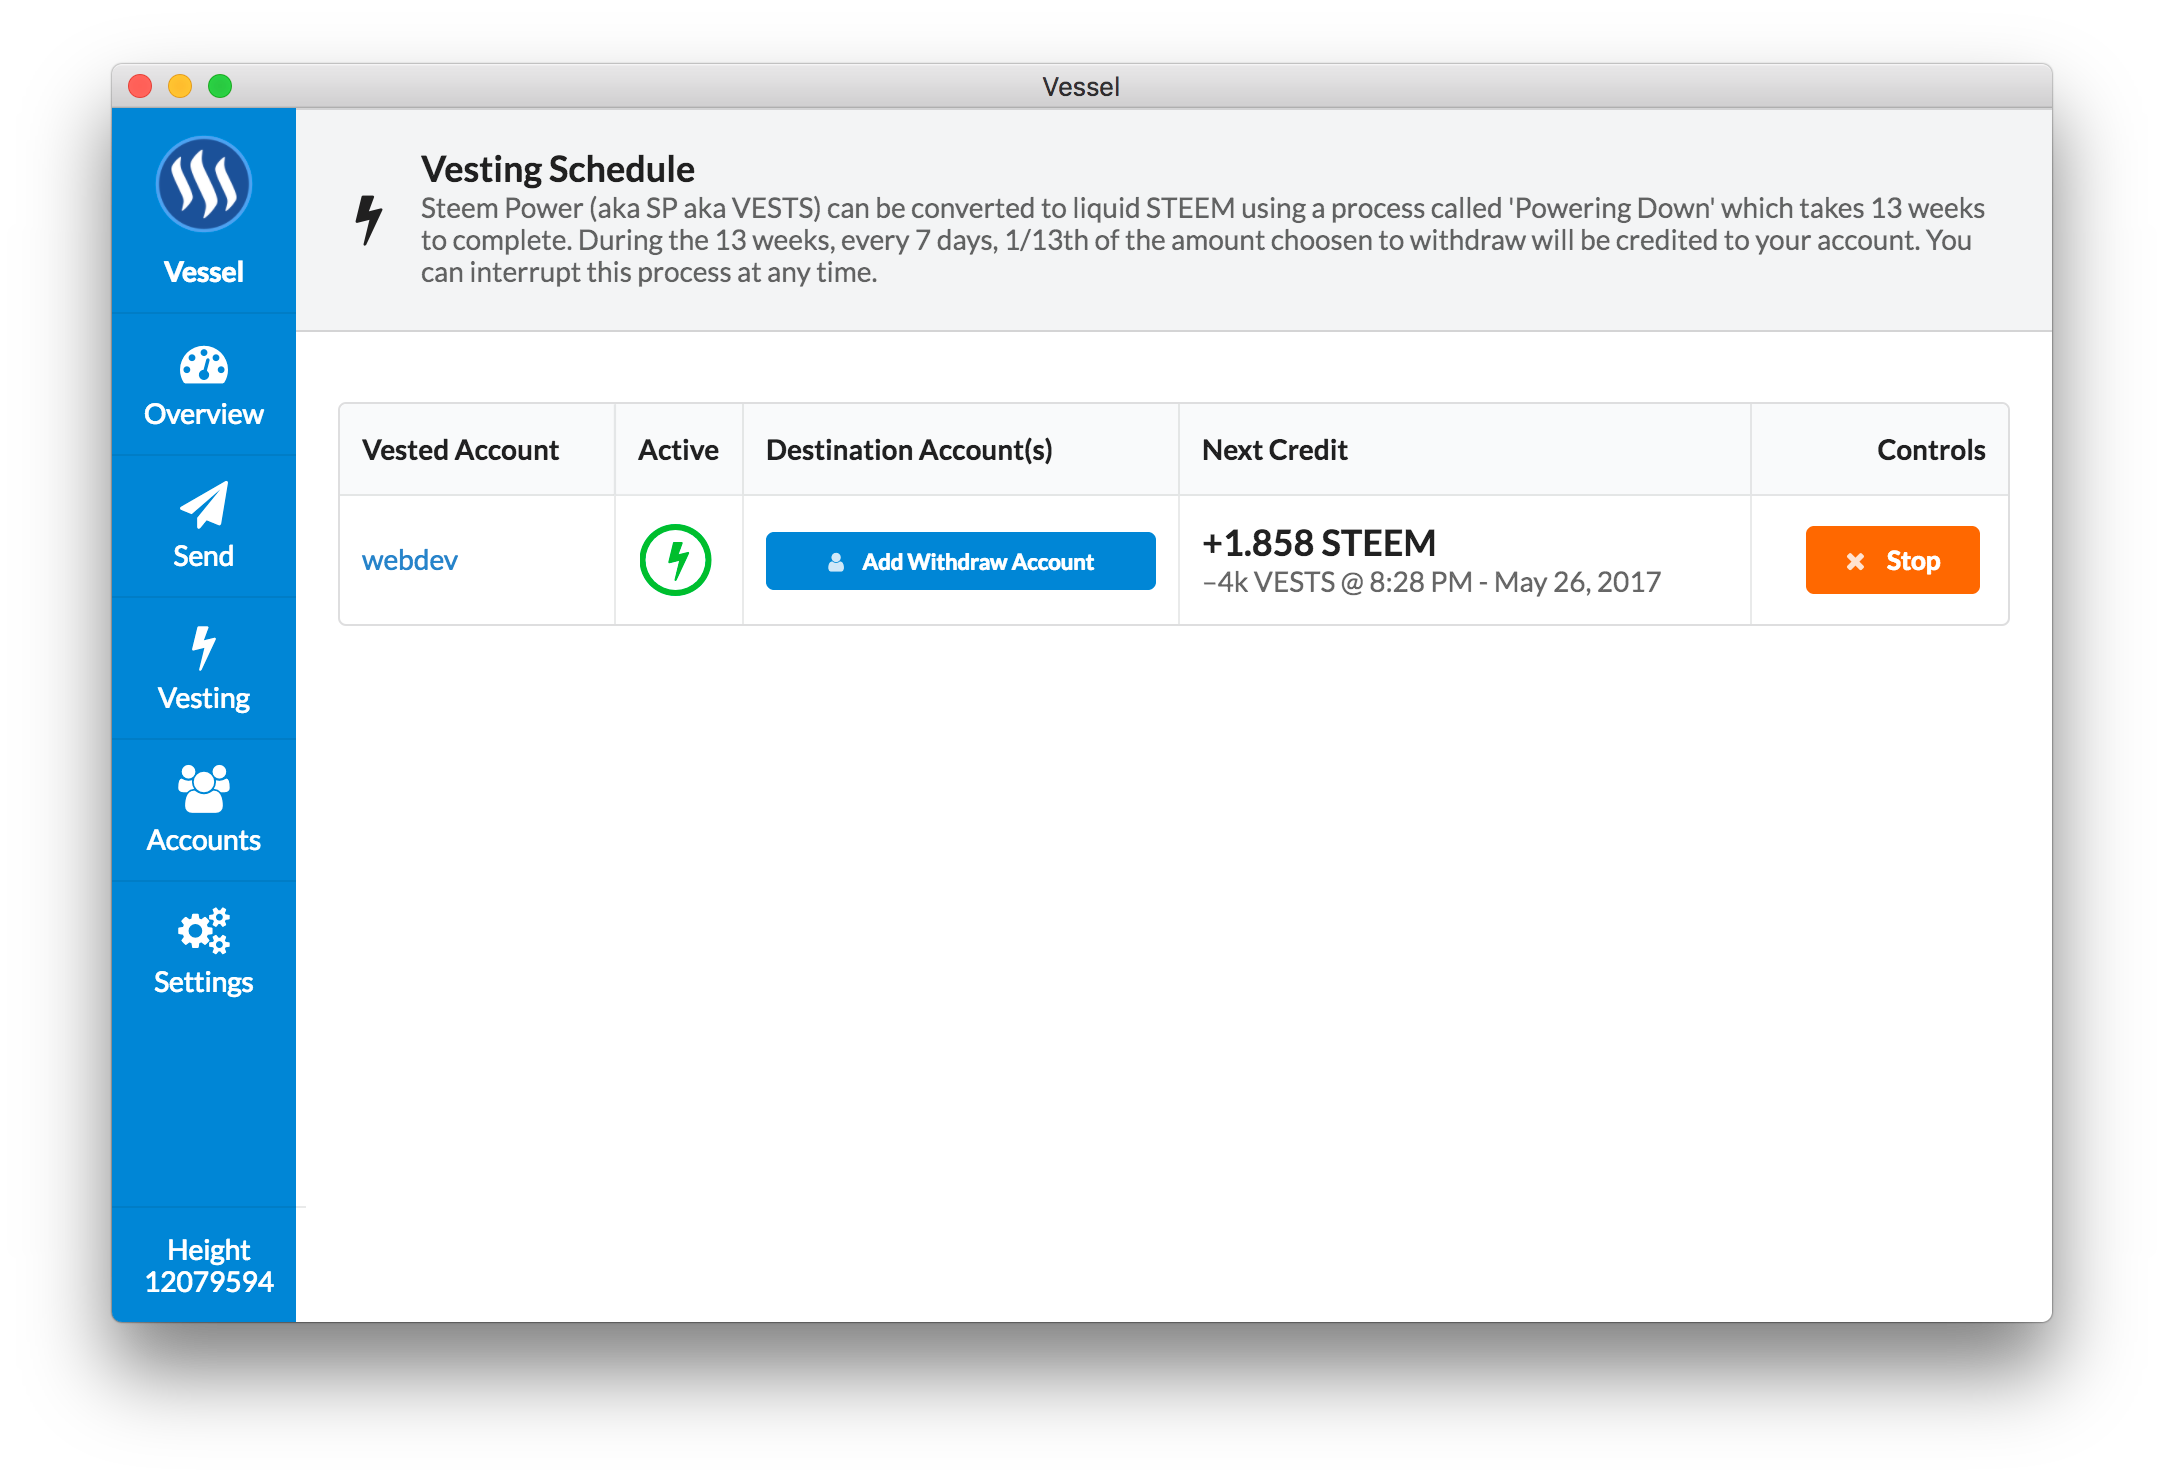
Once active, the red dot turns into a much larger green lightning bolt to indicate the power down is active. The "Next Credit" column displays the amount of the next power down and when it will occur.
The "Start" button is now replaced with a "Stop" button, allowing you to cancel the power down cycle.
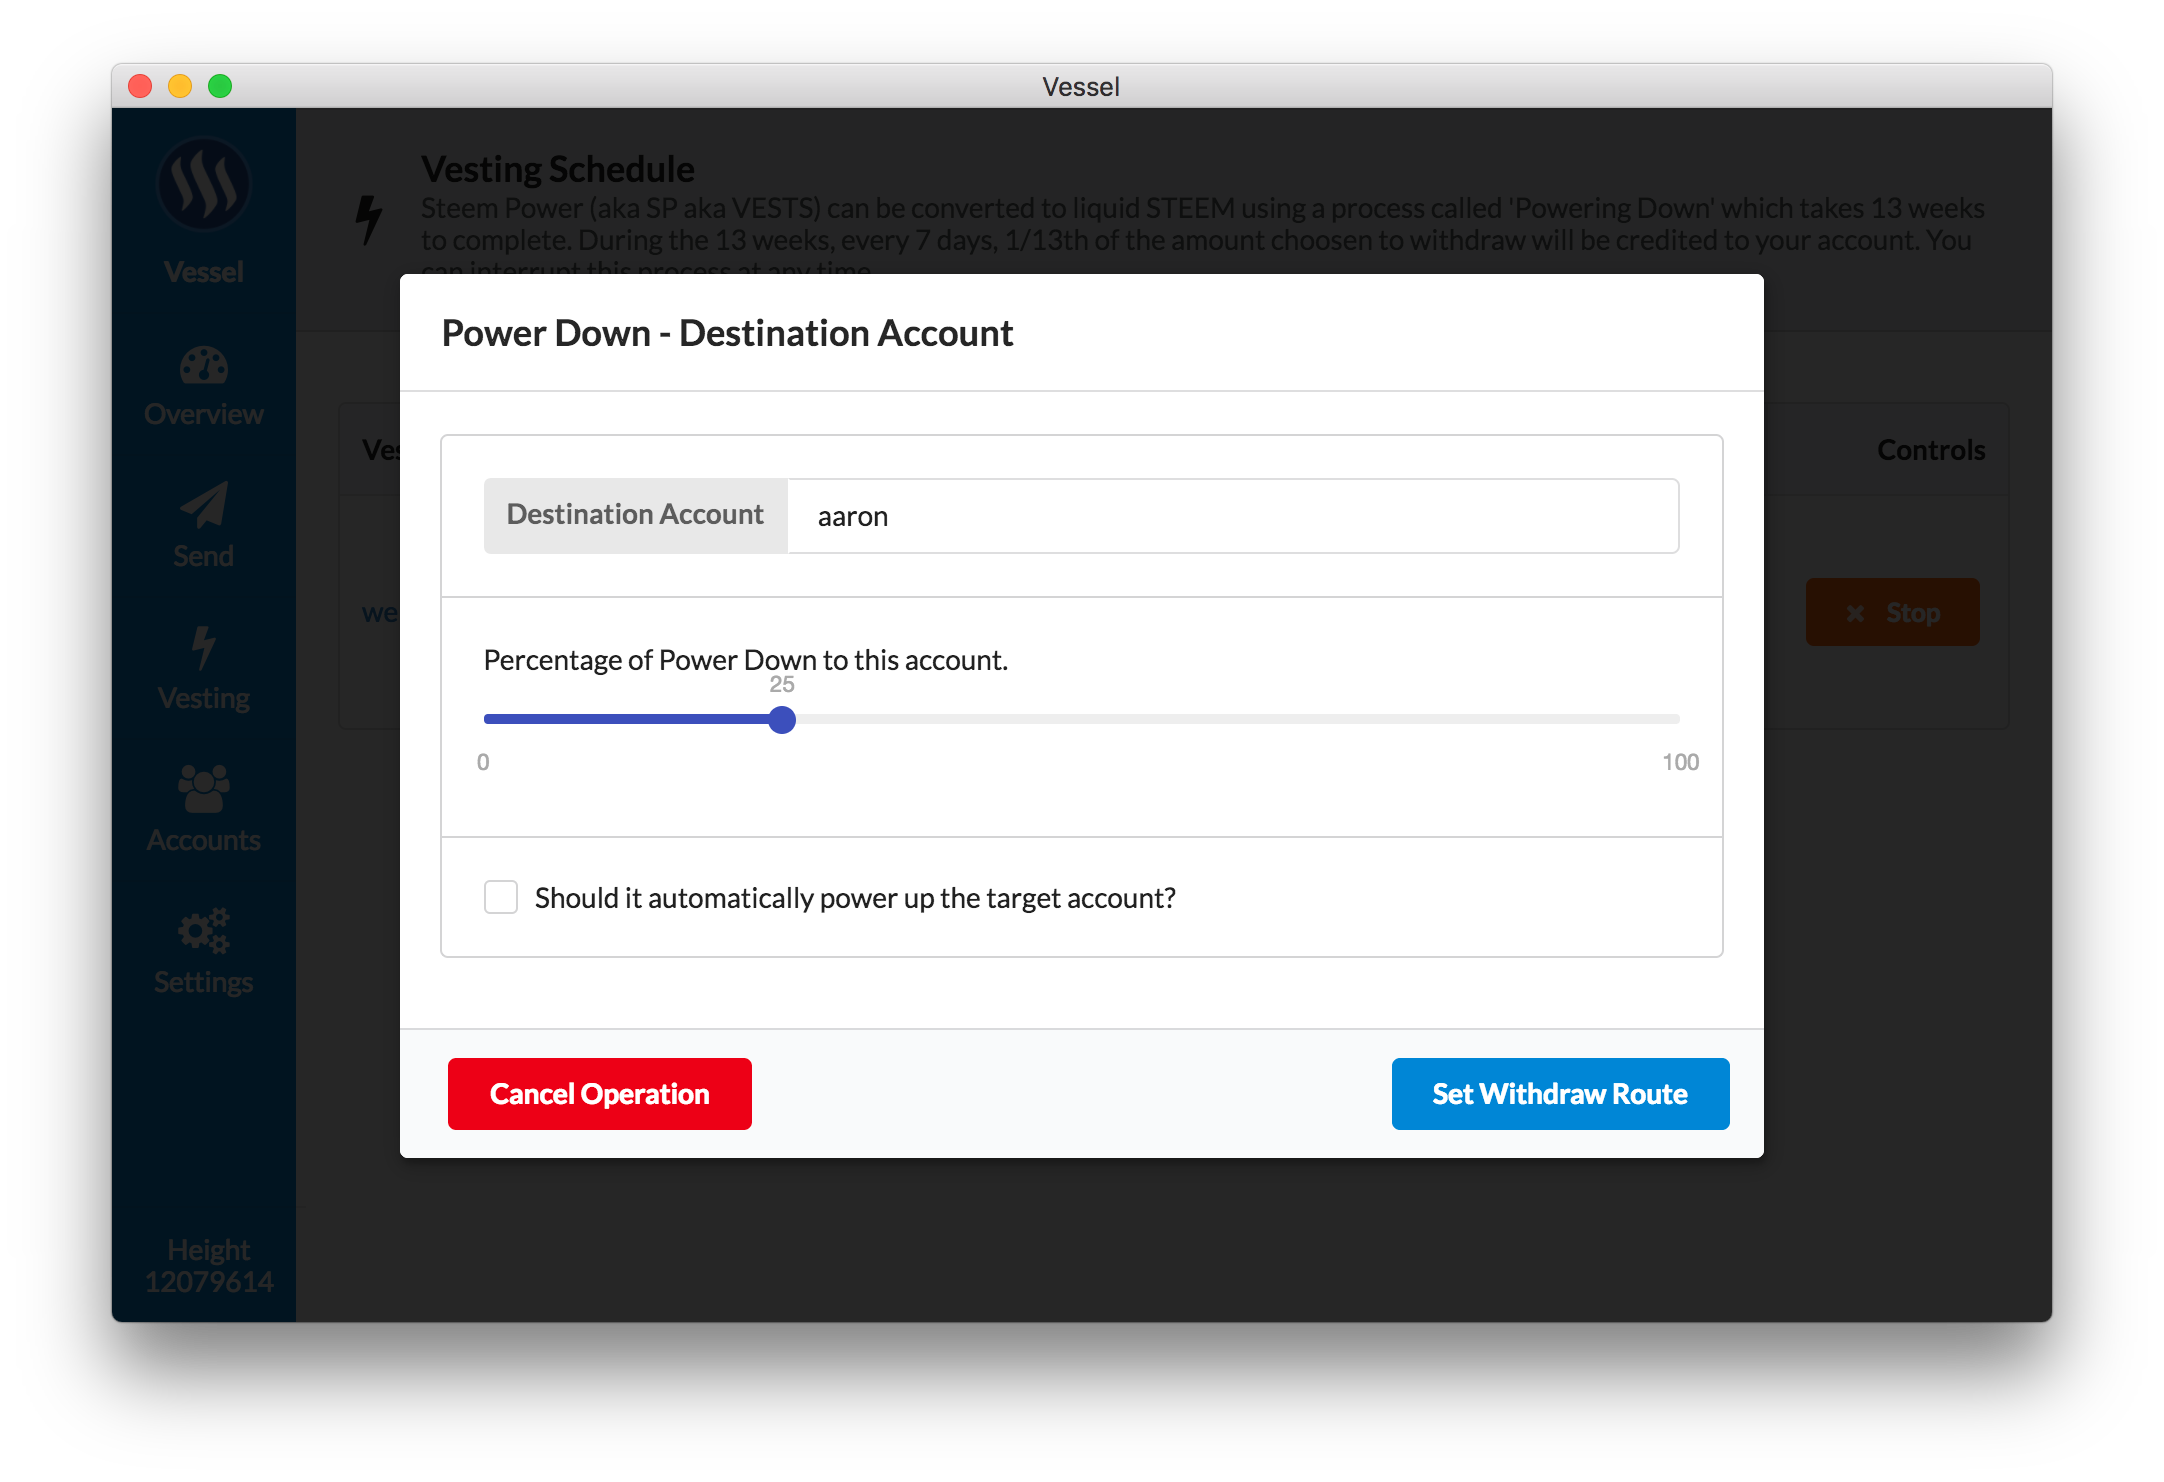
Selecting an Withdraw Route
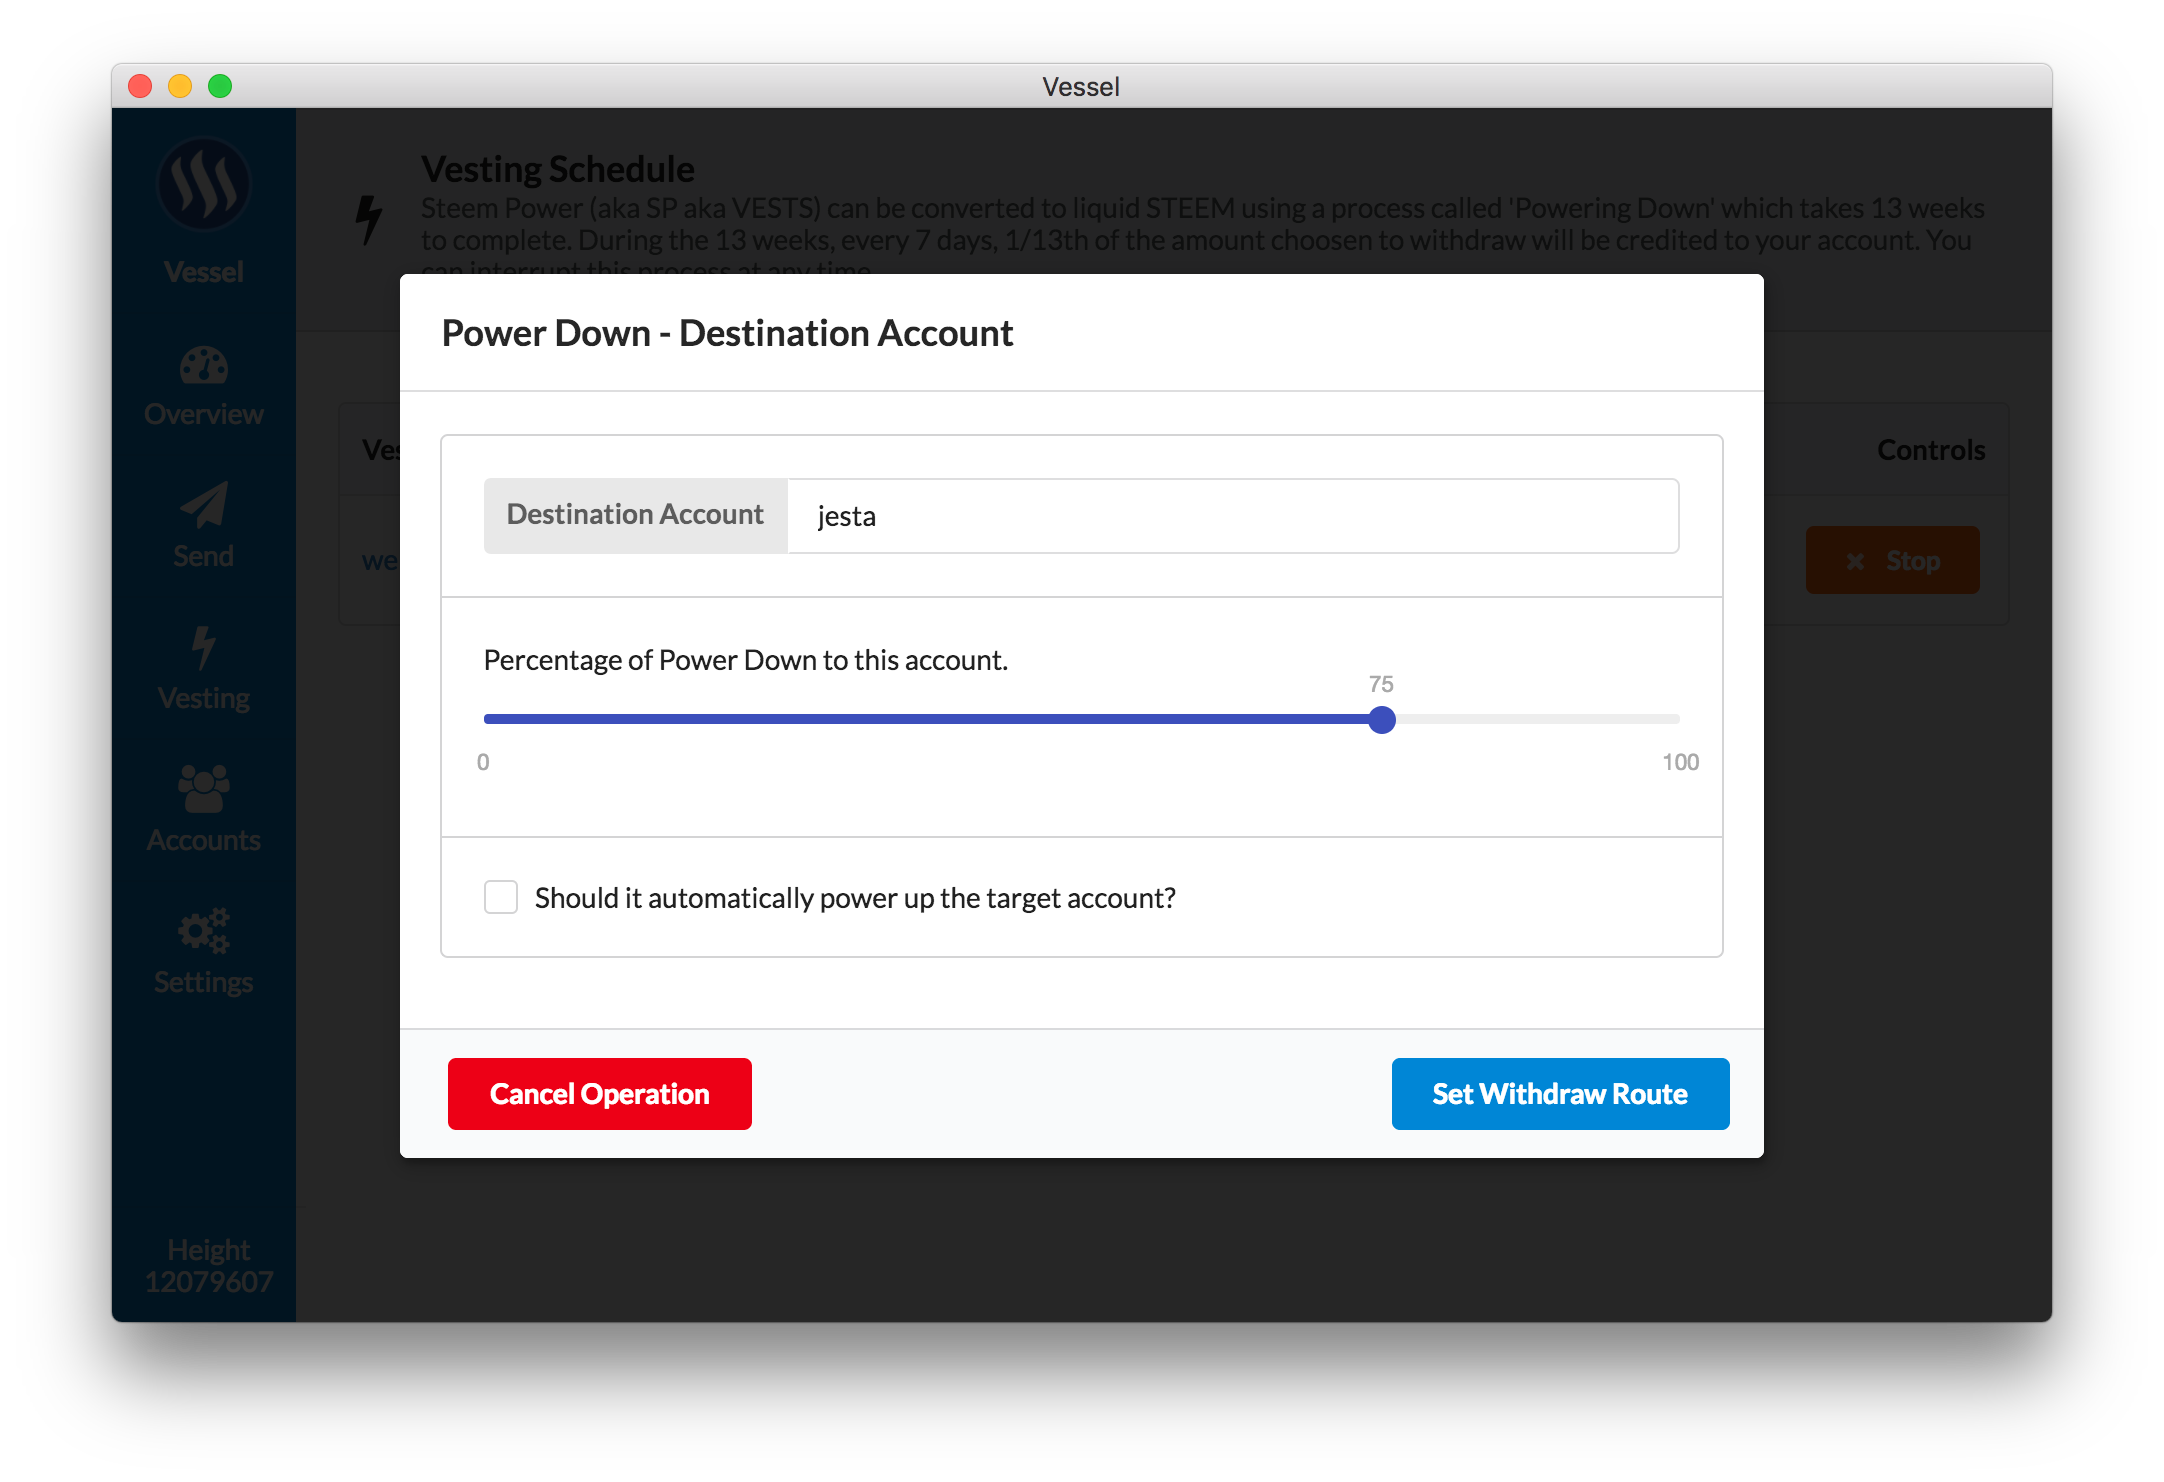
The Withdraw Route for each account can be changed by hitting the "Add Withdraw Route" button.
You will be prompted to specify:
- an account name
- a percentage of the Power Down to go to this account
- a checkbox as to whether it should be powered down into STEEM or powered up as SP on the target account.
For this example, I'm setting jesta as the withdraw route with 75% of what will be powered down. I choose to leave the checkbox unchecked, because I wanted it deposited as STEEM.
Adding another Withdraw Route
Clicking the "Add Withdraw Route" again will prompt the same message, allowing you to specify multiple accounts.
To continue the example, I'm setting aaron as the withdraw route with 25% of what will be powered down.
A Power Down overview with 2 Routes
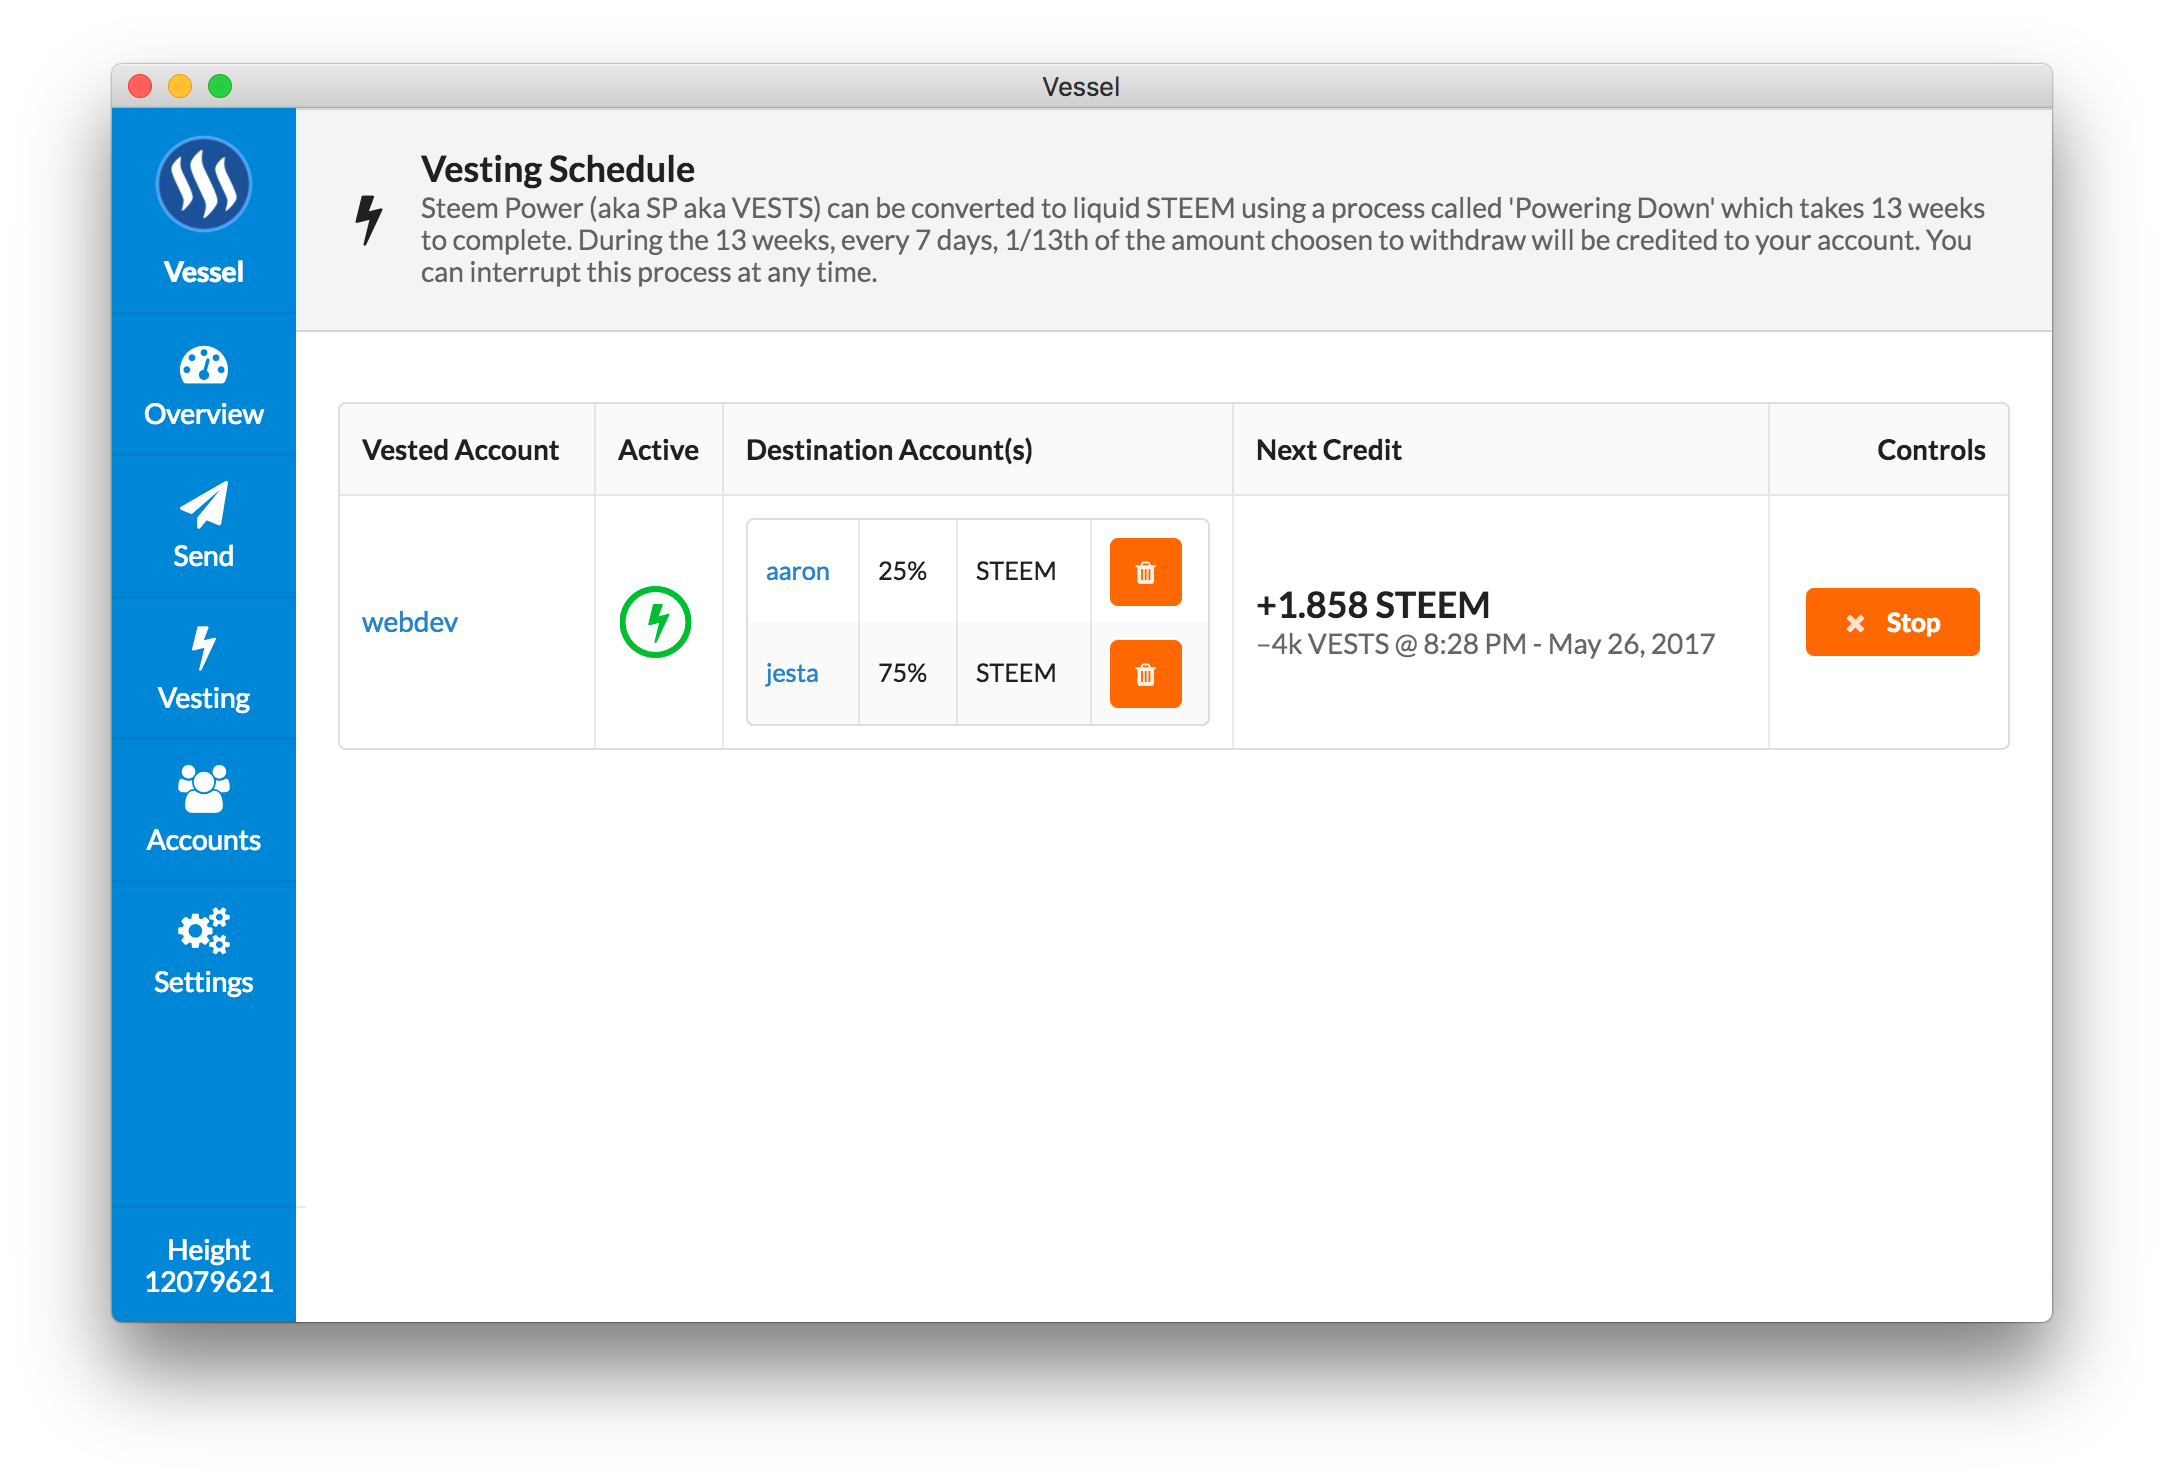
With the two actions I performed above, it has now changed my overview to show an active Power Down, that's being routed to 2 accounts:
25%toaaronas STEEM75%tojestaas STEEM
The little trash icon next to each one will allow you to remove that route.
Note - Any amount not specified to a destination account just powers down into the original account. So in this example, if I removed the 25% - aaron route, 25% of the powerdown would go directly into the webdev account.
Account(s) Management
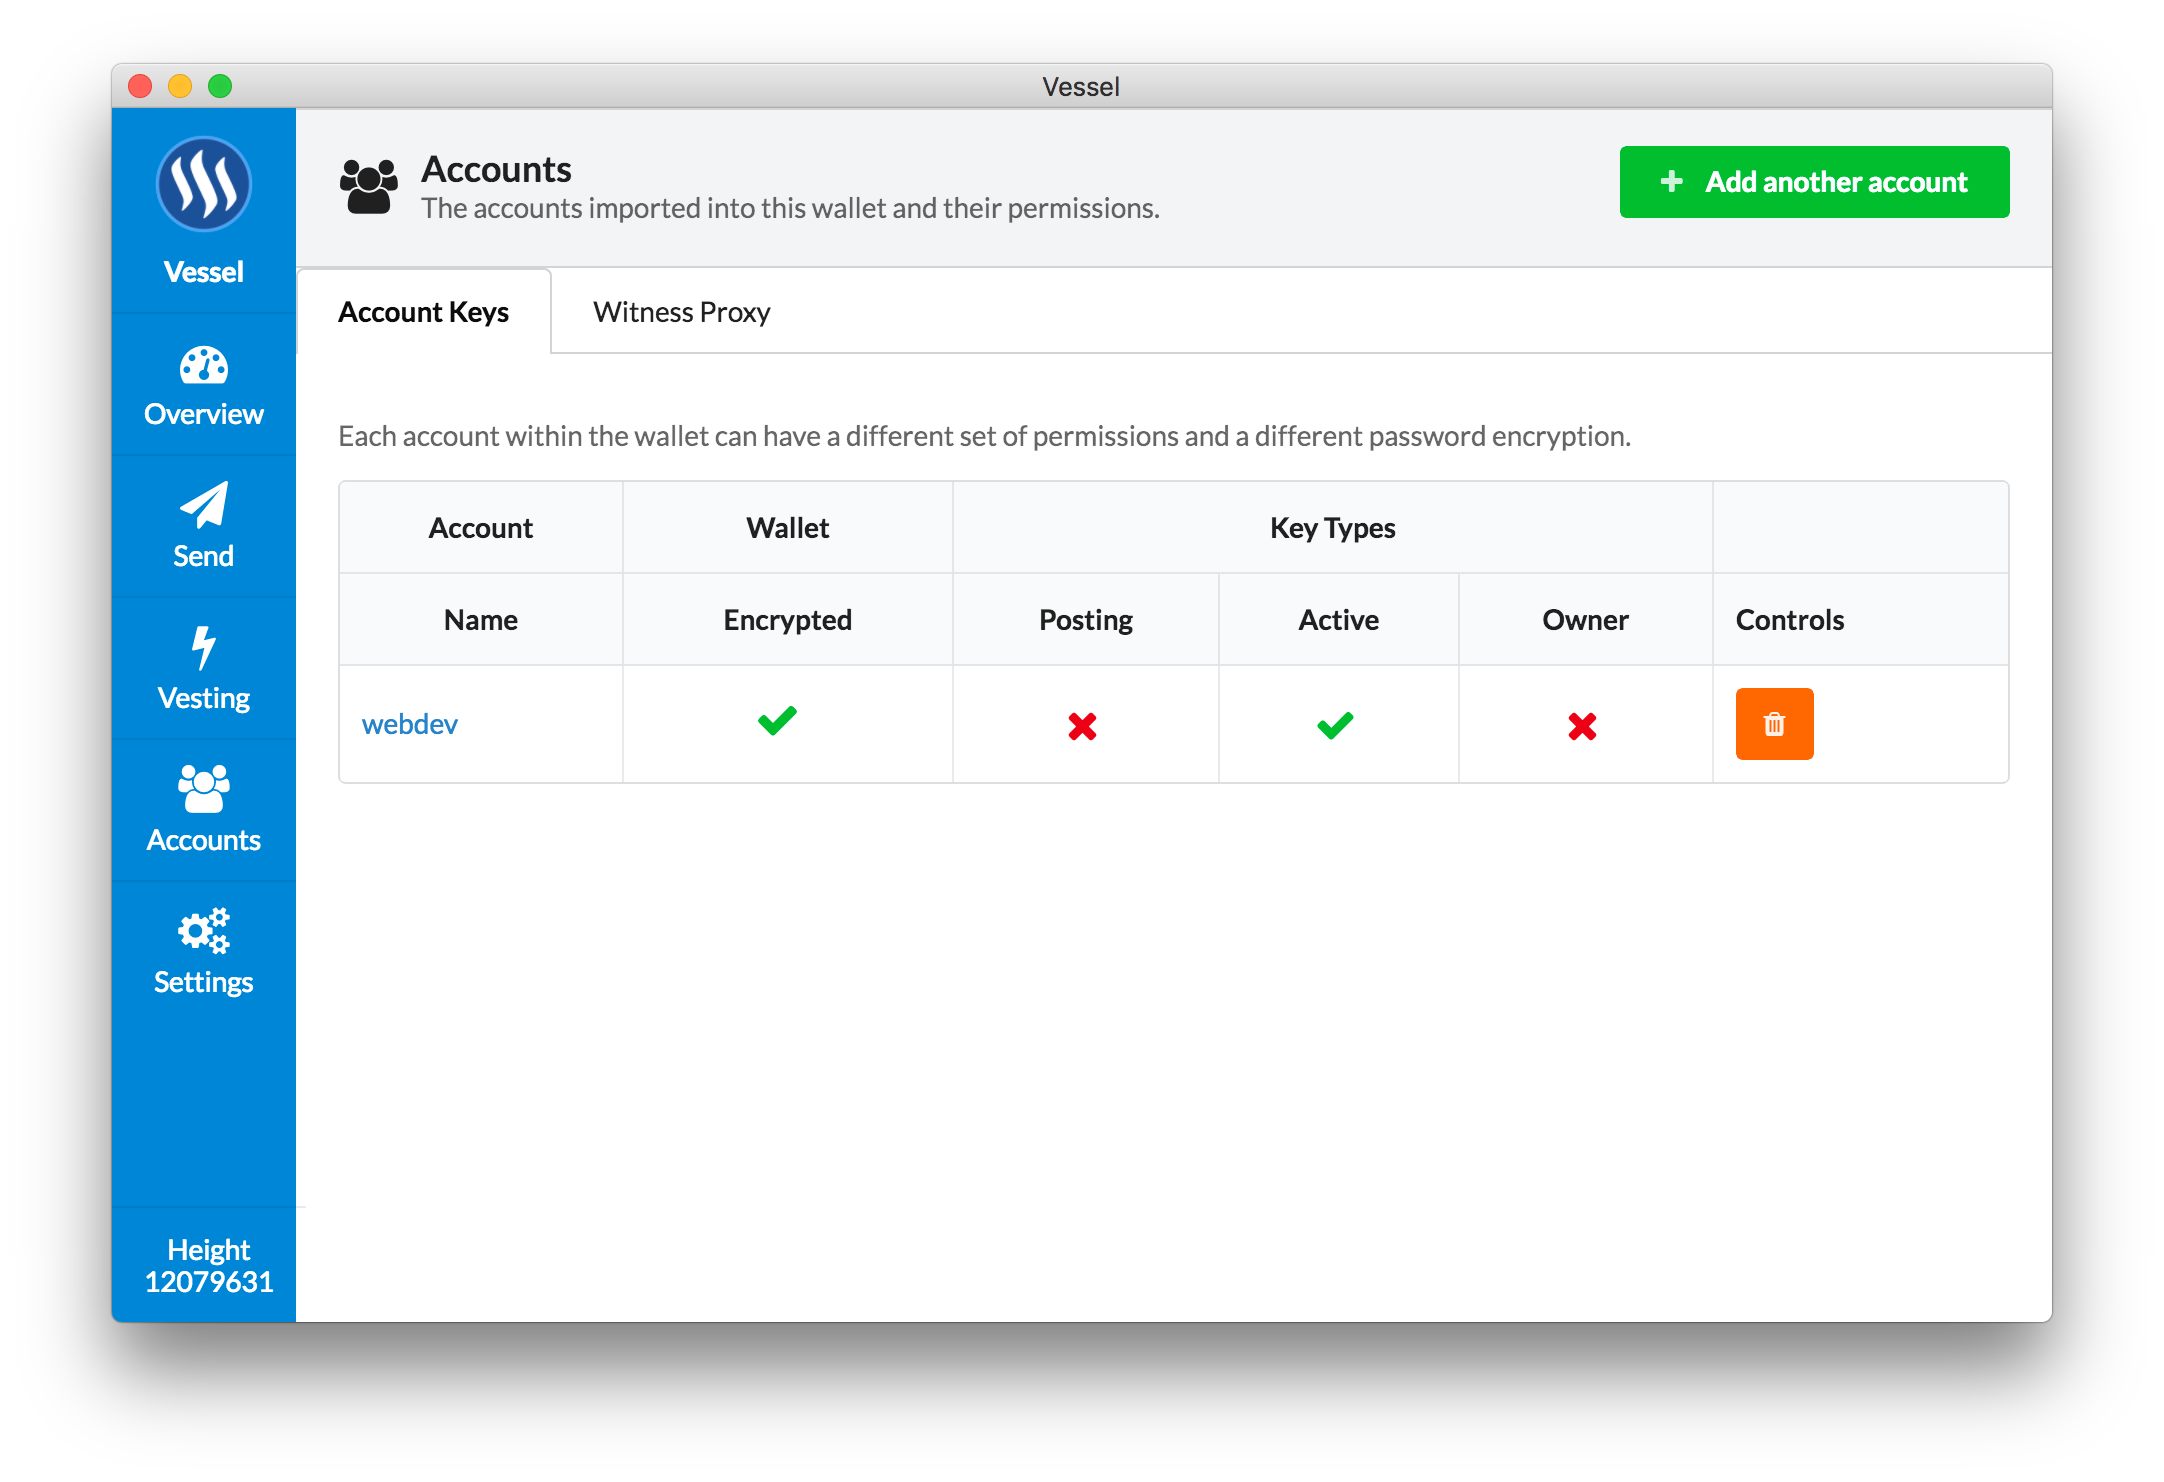
The Accounts screen will show every account loaded in this wallet, whether it's encrypted, and what key type it is.
From this screen you can also add or remove accounts from the wallet.
Adding a new account
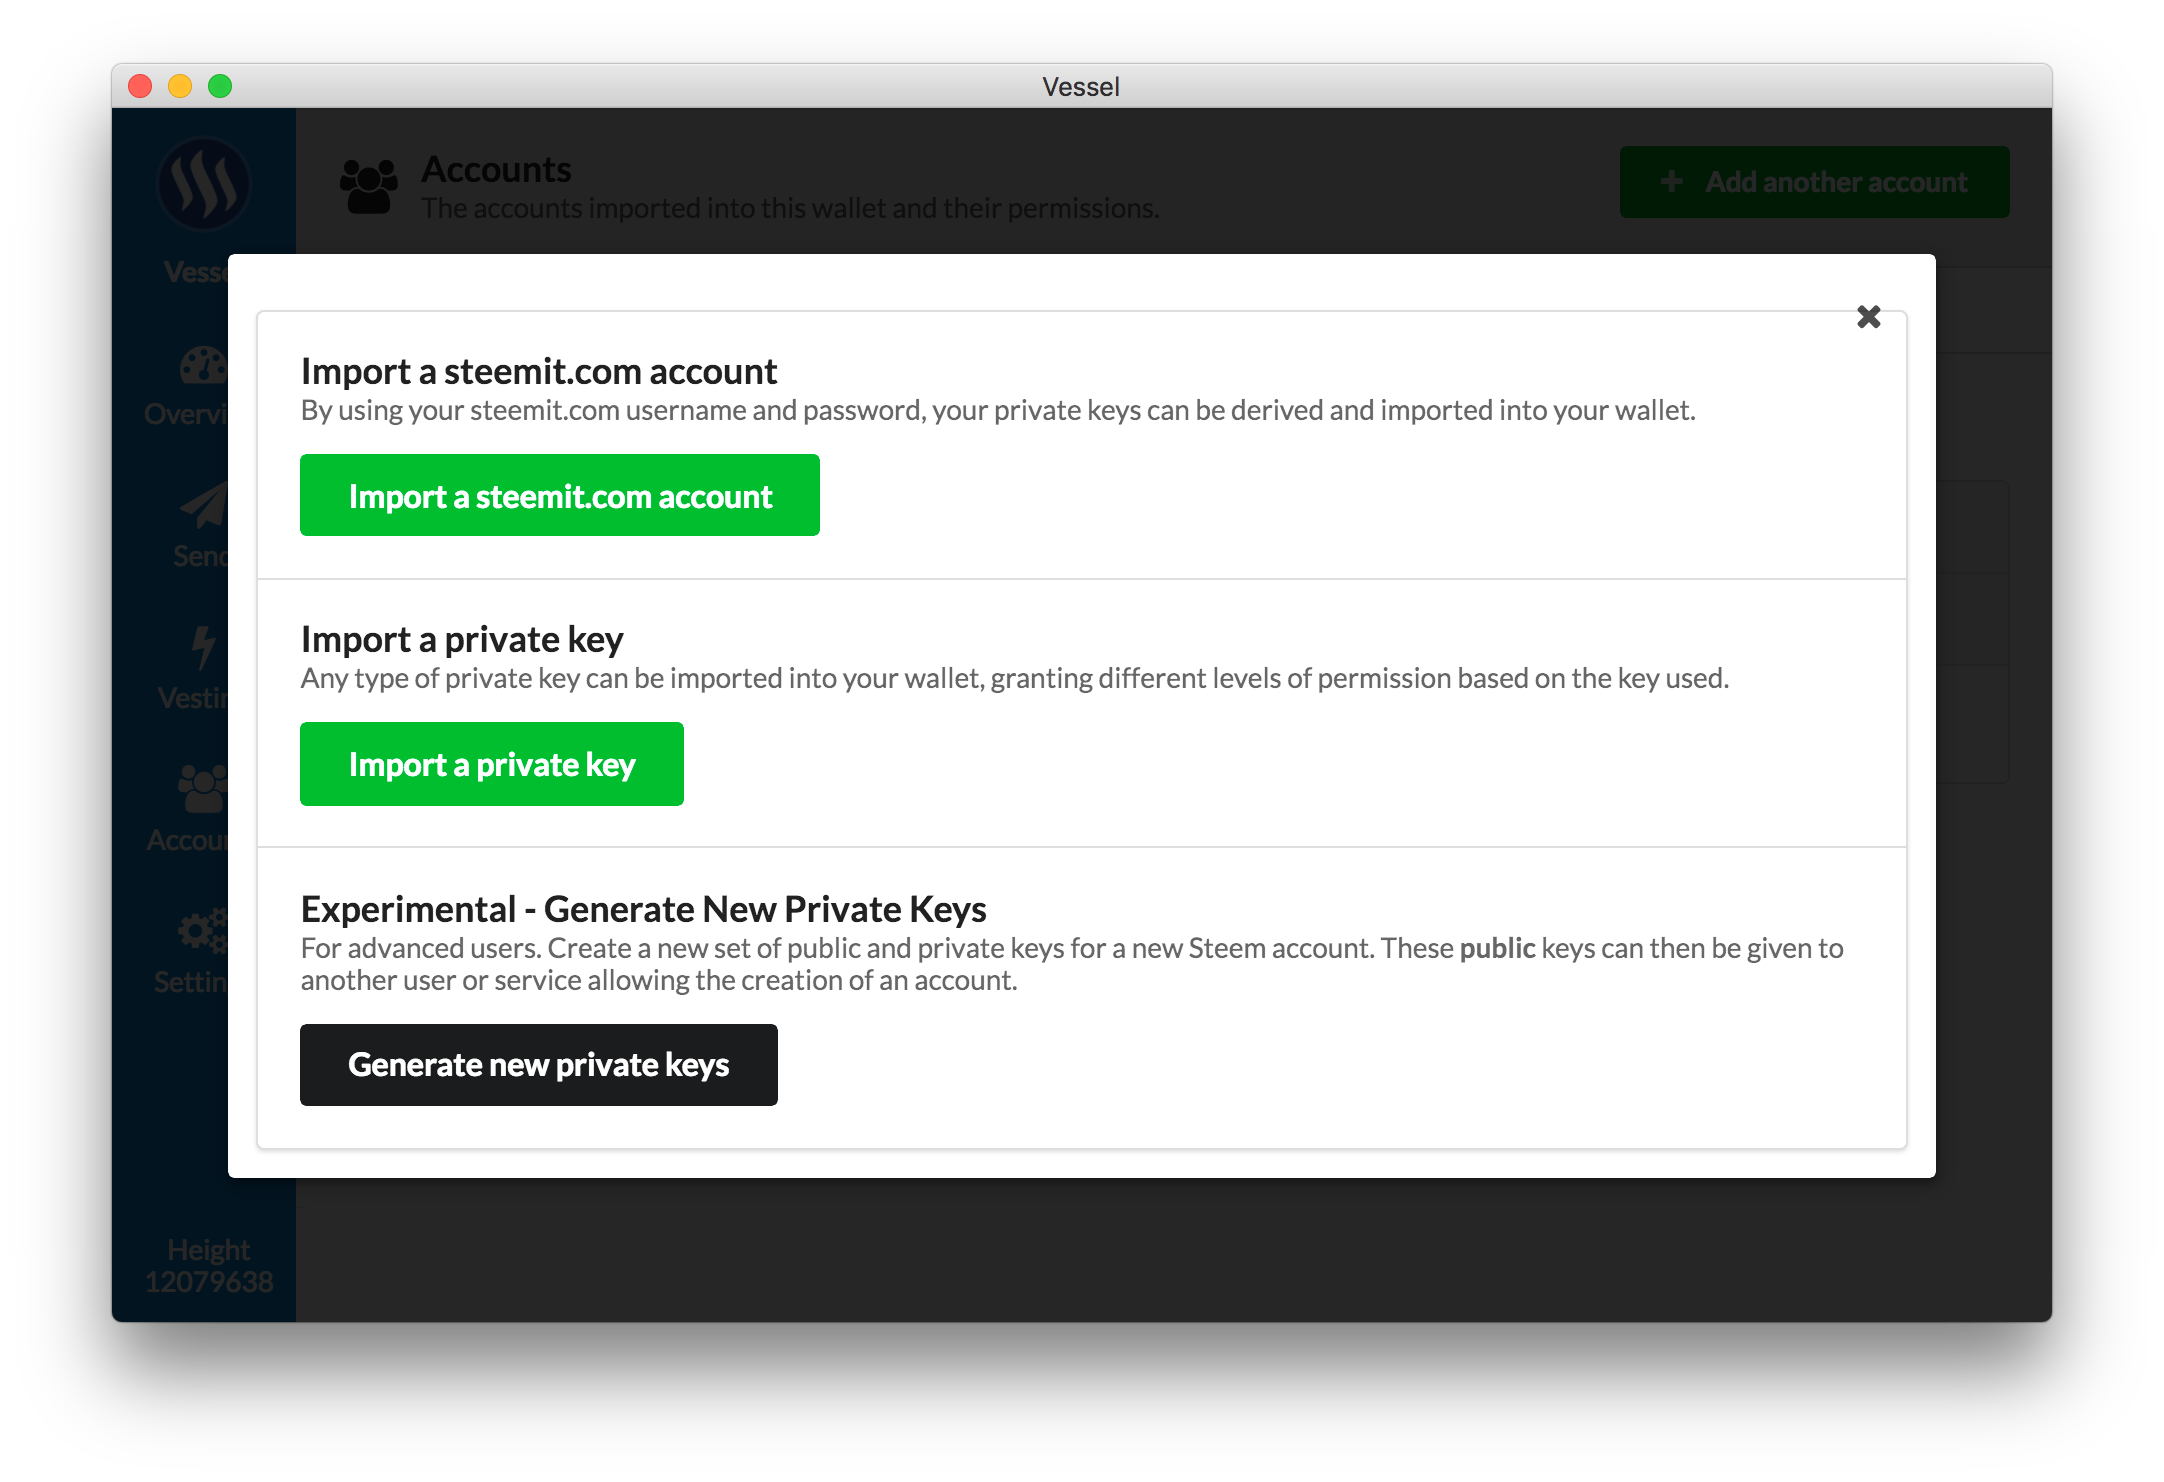
Choosing to add a new account prompts just like the very first screen does, and works the exact same way.
Witness Proxy
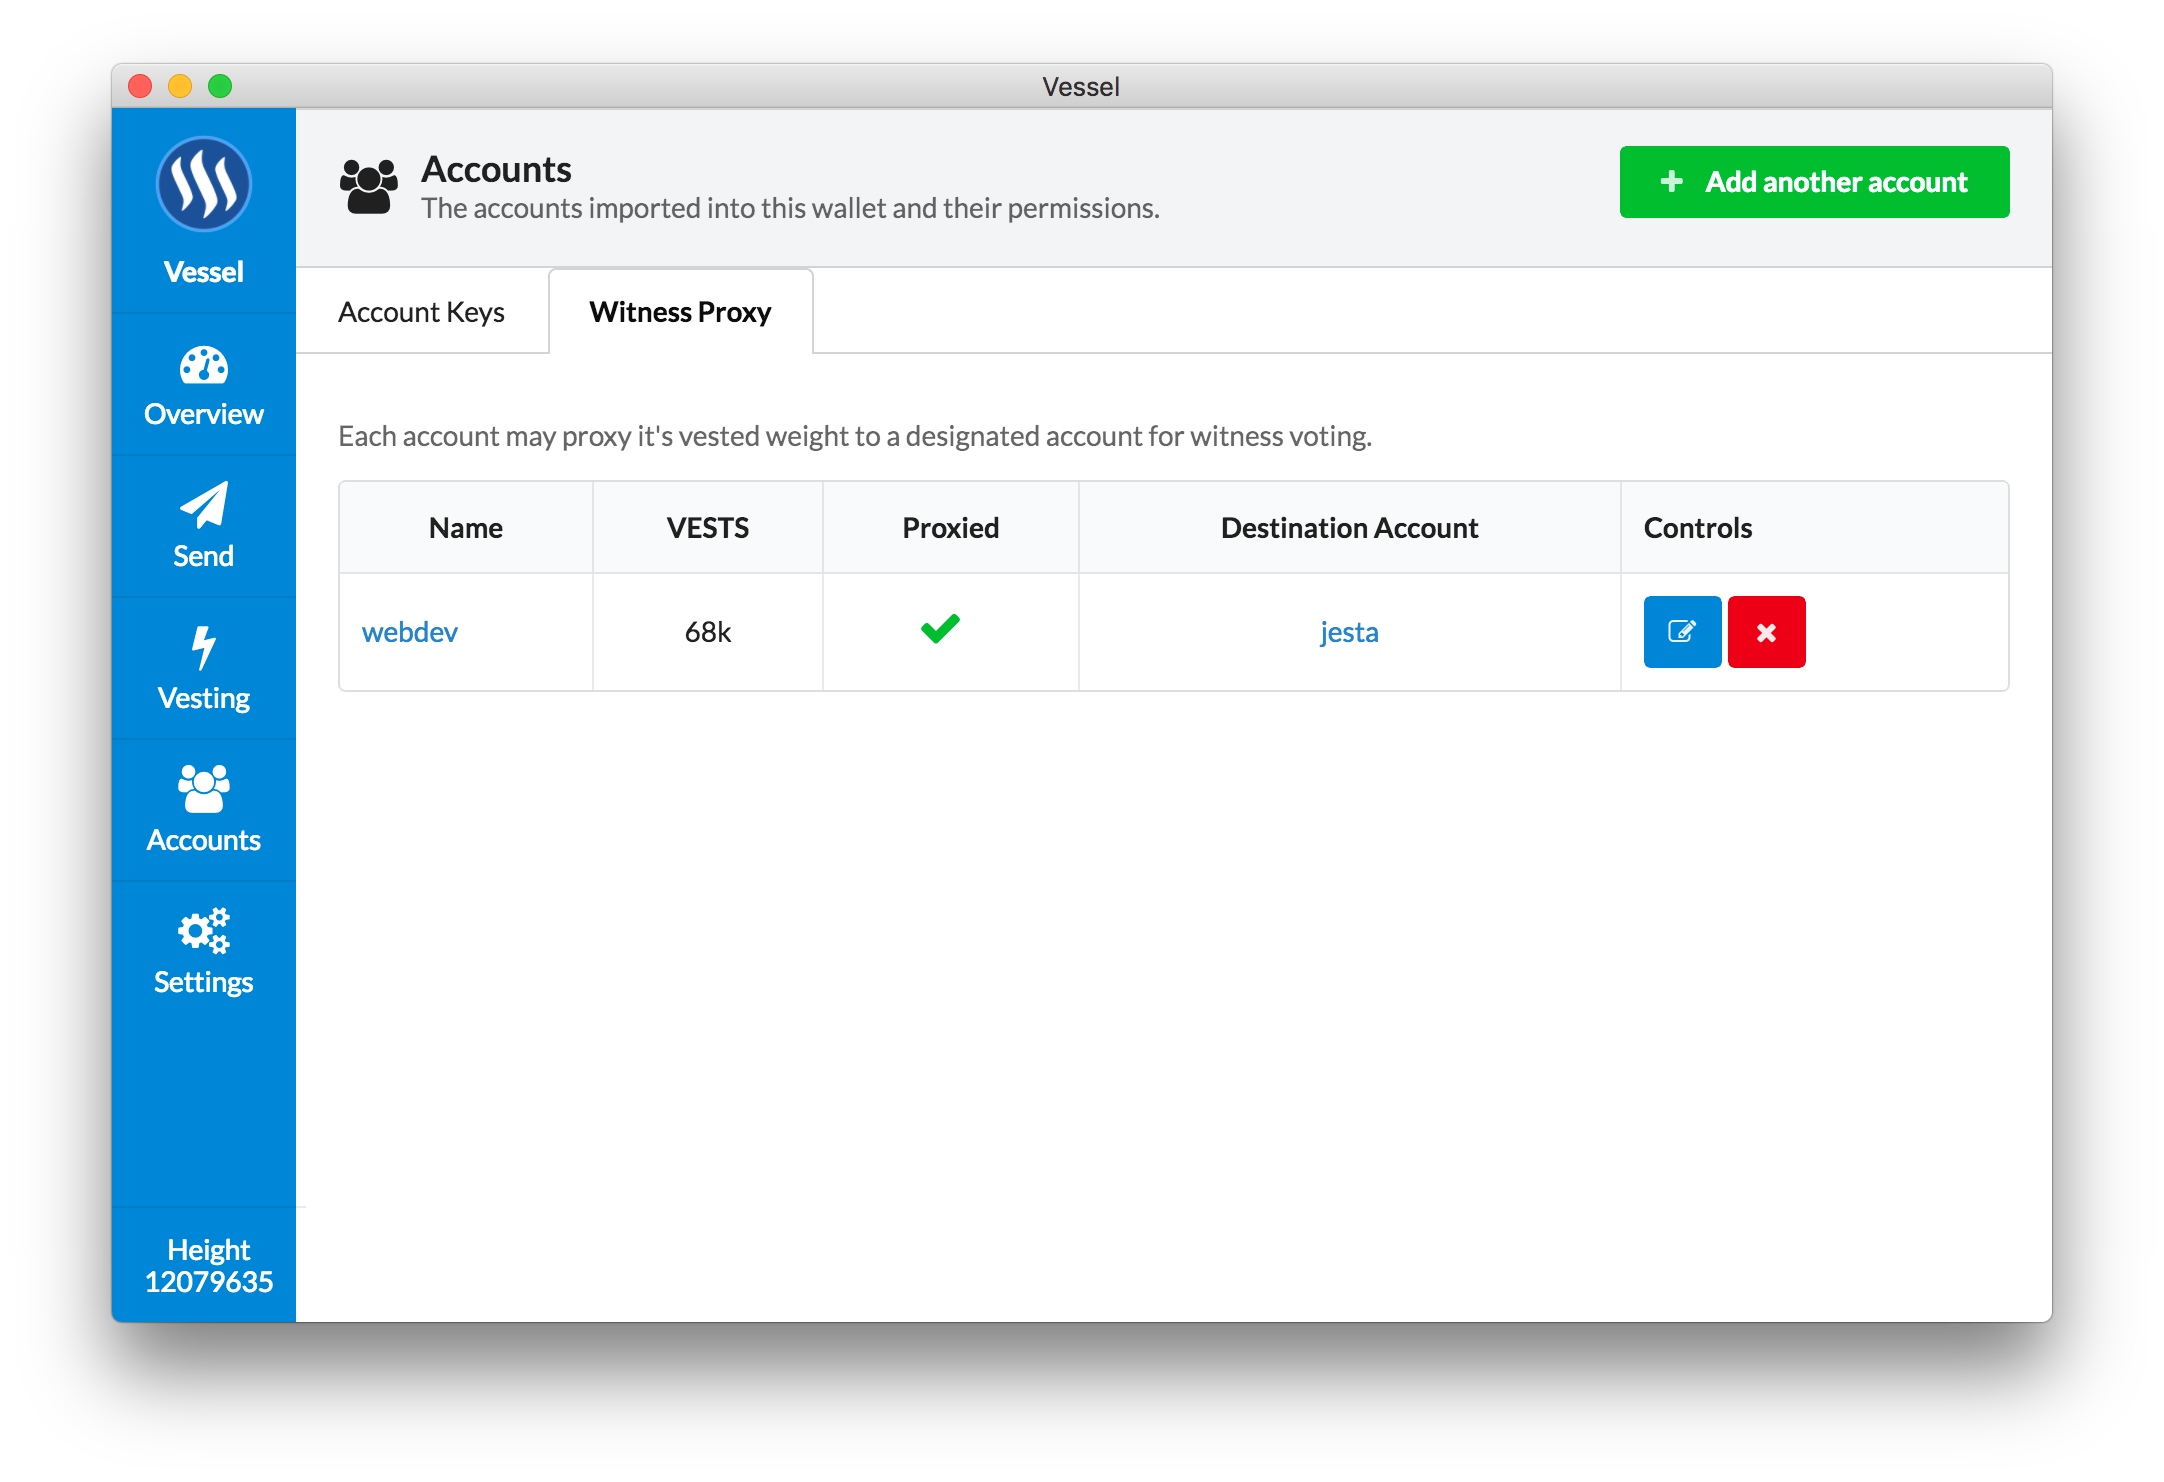
This is a subsection of the Accounts screen, and I plan on adding more. This specific screen allows you to proxy your witness voting power to another account.
Settings - Exchanges
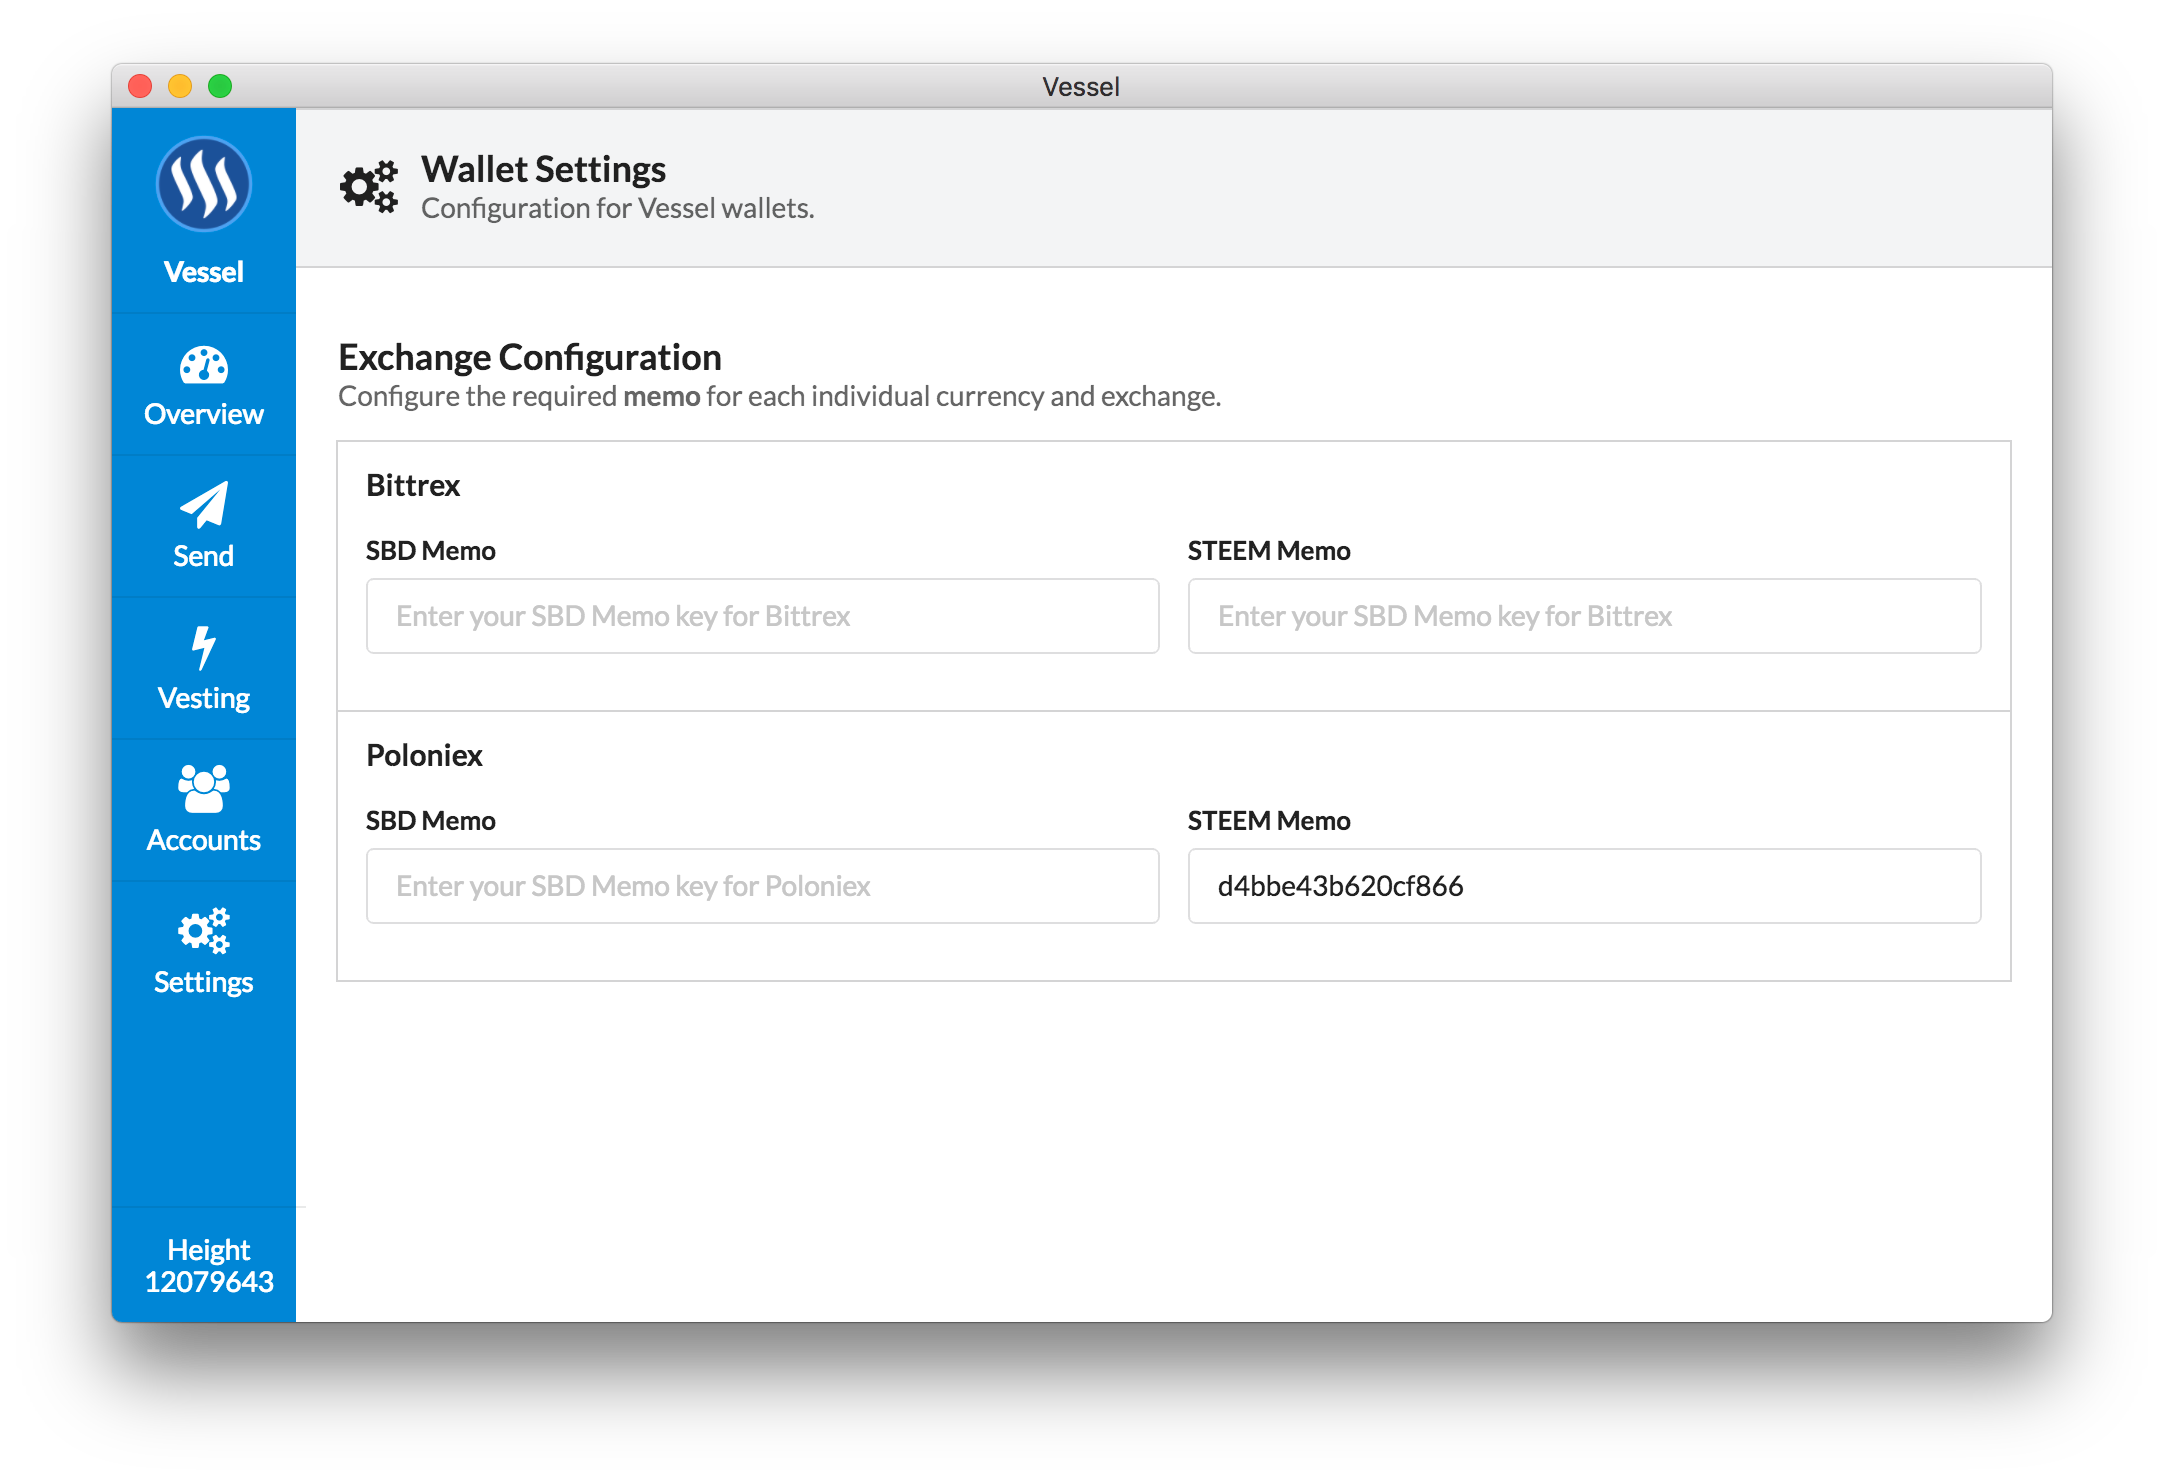
The settings panel will be for wallet settings, and currently is only used for the Exchange Configuration.
The Exchange Configuration allows you to specify the MEMO fields required for both Bittrex and Poloniex. These MEMOs will automatically fill the MEMO field on the Send page when you go to send to an exchange.
Enjoy!
I hope you find Vessel as useful as I do. It's not perfect, but as an open source project, over time we'll get damn close.