Welcome to the introduction for The Beginner's Guide to Steemit, a project seeking to demystify Steemit to brand new users and make joining the platform a seamless experience. The following is intended as a simple guide to get a user going on Steemit as quickly as possible.
Once someone has gone through this section, they'll be ready to head out on their own as they use the following sections of the guide to learn more about the platform in depth. If you're a returning user, I'd love your feedback on this. Would it have been helpful to have something like this when you signed up? Please leave your feedback in the comments!
If you're brand new to the platform, I hope this guide will help you get started! Enjoy!
Welcome!
If you're taking a look at this guide, you've shown interest in learning about Steemit! So let's get right to it.
Steemit is a relatively new social media website where you can share your thoughts, music, photos, videos, and more! Other users on the platform may interact with your posts and show their approval by giving votes and leaving comments. In these aspects, it's very similar to networks you may already be familiar with like Facebook, Instagram, and Twitter. So what makes Steemit unique? Why should you spend time migrating to a new platform?
On Steemit, votes are worth something, and we're not just talking about the good feelings you get from likes or retweets. You can actually earn money for the posts and comments that you contribute to the community. How does it work? It's based on a digital currency. If you've heard of bitcoin, it's similar, but you won't need to fully understand the technology behind it to take advantage of the rewards.
This guide will address many terms and topics that you'll encounter as a new Steemit user. Each lesson will focus on a specific aspect, so you can read up on each topic in detail. However, you don't need to understand everything about the platform to get started, so the rest of this introduction is designed to get you going on Steemit. The best way to learn is to check things out yourself!
Signing Up

It's completely free to sign up for Steemit, so there's nothing stopping you from getting involved today!
If you're intrigued and want to learn more, first head over to https://signup.steemit.com and follow the steps for sign up!
Be sure to pick a username that you want other users to be able to identify you by when you're on Steemit. It will also be how others can find your profile since your unique profile URL will be steemit.com/@yourusername. Steemit also asks for your phone number during this process to verify that you're a real person.
You'll receive a confirmation email right away, so be sure to confirm through the link so you'll be on your way to account approval.
At the time of writing this, Steemit accounts can take 24 hours or more to be approved, so you'll have a little time before you're able to get started. You'll receive an email when your account is approved! You may read ahead while you wait for account approval, or come back once you've logged in for the first time.
It's also important to note that Steemit will generate a master password for you when you finish your account setup. Be sure to write this password down. It cannot be recovered if it is lost.
Account security is extremely important on Steemit since your account will be associated with your identity as well as have monetary value. Part 2 of this guide provides a more in-depth look at account security. For now, here are the basics:
After you've received your master password, use it to log in to Steemit for the first time and then immediately browse to your Permissions page by browsing to the following URL:
steemit.com/@yourusername/permissions
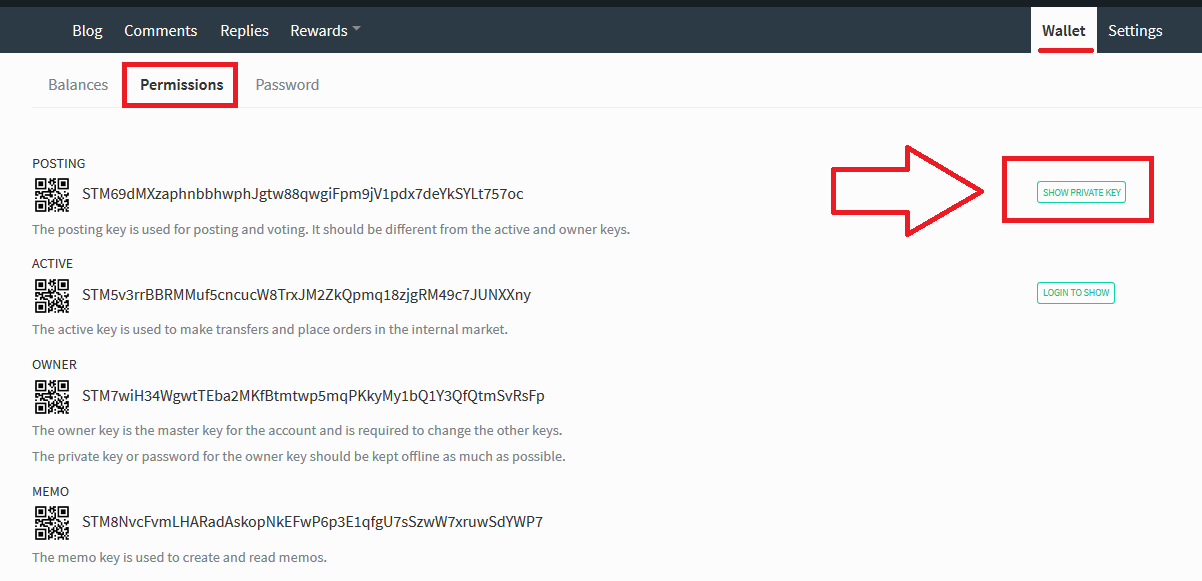
or by clicking your user avatar in the top right of the page, selecting Wallet, and then clicking on the "Permissions" tab (see image below for position of the Permissions tab)
You'll see four different long strings of numbers and letters. These are your account keys. We will discuss each of these in more detail in the next lesson, however, it is important that you click the button that says "Show Private Key" beside of the Posting Key. This will reveal your Private Posting Key, which you should always use instead of your master password when you log in to Steemit:
The master password is a backup key to recover your account if necessary. It should be stored offline and used as little as possible. Think of your Steemit account like you do your home. Your account keys are like the lock on your front door. As long as you are the resident of the home, you could give keys to anyone, knowing that you could change the lock at any time to prevent them from accessing your home. However, the master password is like the deed to your house. If you gave it to someone, now you've relinquished your claim to your home and someone else is in control of who comes and goes. It's a silly situation to imagine, but analogous to what can happen if someone gains access to your account's master key.
Now that you've secured your account, let's explore Steemit!
Here are some of the first things you'll notice about Steemit:
You Have Your Own Blog Page.
This is where your posts will show up for everyone else to see. For example, here's what my profile page looks like:

You'll have a few options to customize your profile, like adding an avatar or profile picture as well as a cover image to go at the top of the page (accessed via the Settings button).
You Can Follow Other Users
If you have friends who are already on Steemit, or you are browsing and find a user's posts that you really enjoy, you can follow them. Simply browse to the person's profile by using the following URL:
steemit.com/@usernamehere
For example, if you wanted to browse to my profile, you'd type:
steemit.com/@ethandsmith
This also works for your own profile, as I mentioned before.
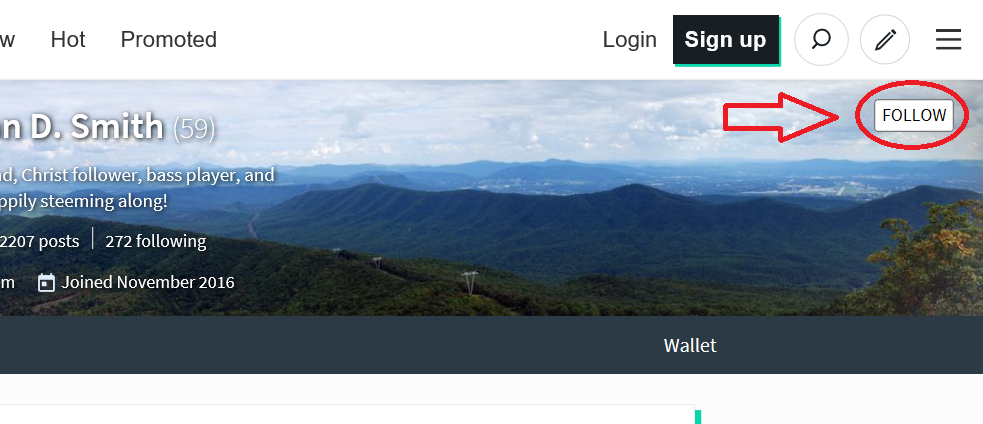
In the top right corner of the profile, you'll see a large "Follow" button. Click it to follow them!
When following another user on Steemit, any time that user shares a new blog, it will appear on your feed. Think of it like your feed on Twitter, Instagram, or Facebook. It's just a list of the latest posts shared by the people you follow.
Each time you type steemit.com into your browser, you'll be looking at your feed. Nothing will show up in your feed if you haven't followed anyone!
You Can Interact with Other Users by Voting, Resteeming, and Commenting!
Showing your approval for someone's post is as simple as going to their page, clicking on a specific post, and using the social functions at the bottom! Here's what they look like:

Starting from left to right, you'll see when the post was shared. This is important on Steemit because posts only earn rewards over the first seven days. Therefore, if the post is more than seven days old, avoid voting as it no longer benefits the other user.
Next, you'll see the user who shared the post. In this example, it's @ethandsmith. The number beside the username in parentheses is the user's reputation, which is a measure of how active and influential a user is on Steemit (right now this can be from 0 to 77, and when you register, you begin at 25).
Moving across further, you'll see the small green arrow within a circle. This is the vote button!

This is what you click to vote on a post. Voting is the method by which posts earn rewards, so every time you vote on a post, you're actually increasing the rewards that post will receive. Your vote is worth something! Likewise, others may vote on your posts using this button to increase your post's rewards.
You may vote on as many posts as you want, but your vote's value will decrease the more you vote. We'll discuss implications of this later, but for now, try not to vote more than 10 times in 24 hours. For more info on voting, check out the voting section of this guide.
Speaking of rewards, you'll notice a dollar amount next. This loosely corresponds to the amount of rewards a post will receive when it pays out! You may also click on the small arrow beside the dollar amount to see a summary of the rewards so far as well as how much longer a post has before it pays out. We'll talk more about rewards more later.
Beside the vote button, you'll see the number of users who have already voted on a post. Clicking the small arrow beside this will display a list of the users in order of whose vote is worth the most.
If you keep moving across to the right side of the social bar, you'll see a small arrow icon:

Clicking the small arrow allows you to "resteem" a post, so that it will show up on your feed alongside your own blogs. This is similar to retweeting or sharing a post on Twitter or Facebook. Note that resteeming cannot be undone once you've confirmed the action. When you resteem, a post will remain on your blog indefinitely!
The "Reply" link will allow you to leave a response on the post, called a comment.

This is the main way you can engage another user or other users can engage you. Leave your thoughts about their post. Did you like it? Do you have any questions about it? Let them know! Other users will do the same!
Comments may be voted on or responded to like posts, so if another user likes what you have to say, they can reward it and respond once you've shared your comment!
If you want to learn more about what's appropriate for comments, check out this guide.
Just to the right of the "Reply" link, you'll see two numbers. The first tells how many comments the post currently has, and the second number shows how many views the post has received.
Check out this post on Steemit.com to familiarize yourself with the layout of a blog post and the social actions you can perform!
Your Account Has a Wallet
Since you can get paid for your content, there has to be somewhere for the funds to go. That's where your wallet comes in. Wallets on Steemit are public, so anyone can see how much you have at any given point. Here's what a wallet page might look like:

There are a lot of things going on in the wallet, and we'll talk about all of them in later lessons. The main things worth noting are:
- STEEM- the liquid currency associated with Steemit
- STEEM Power- the measure of how much influence someone has on the platform. Higher values mean your vote is worth more!
- STEEM Dollars- another liquid currency that you get from post rewards.
Right now, the main thing to know is that your earnings will get deposited here, so don't worry if the numbers and terms don't quite make sense yet. If you want to read ahead, here's the draft of the guide to STEEM currencies.
There Are Many Topics to Explore

Steemit is organized by tags, which appear similar to "hashtags" on Twitter and Facebook. These can be anything like "photography," "travel," "blog," "gaming," and many more.
You can browse the most popular posts in a specific tag in two ways. First, you can go to the Steemit home page, where you'll notice a list of the most popular tags over on the left side. Simply click on one of them to browse that specific tag.
You may filter these results four ways by clicking the links at the top middle of the page:
- Trending- The most popular posts sorted by pending payout amount
- New- The newest posts that have been shared in the specific category
- Hot- Similar to trending, but the posts have received many votes and comments very quickly after they were posted.
- Promoted- Steemit has a promotion feature where users may pay small amounts of money to have their posts appear on this page.
So if there's a particular topic you enjoy, check it out using Steemit's tag system!
If you want to browse a custom tag, you can just include it in any of the following URLs. Replace "yourtaghere" with the desired tag.
Trending:
steemit.com/trending/yourtaghere
Hot:
steemit.com/hot/yourtaghere
New:
steemit.com/created/yourtaghere
Everything is Public and Permanent
On Steemit, all posts and wallet transactions are publicly viewable by any user. This means other people may view the contents of your wallet page at any time, and you may view the wallets of other users as well. It's as simple as browsing to steemit.com/@yourusername/transfers. Replace "yourusername" with any user, and you'll be able to see the value of their account and a list of all recent transactions.
Give it a try. Go see what I've been up to lately. Here's a link to my wallet page!
This has to do with the fact that Steemit is based on what is called blockchain technology, but you won't need to know how it works right now. We'll discuss it briefly in future lessons.
It's also worth noting that after seven days, all content posted to Steemit.com becomes permanent. There is no way to delete it once you've shared it. This is an important aspect of the platform, so be sure to take this into consideration before posting or commenting.
So What's Next? Where Should You Get Started?
One of the first things you can do is introduce yourself to the Steemit community! Introduction posts are a great way to share the things that you enjoy so that you can connect with other users who share similar interests.
Get some ideas together about what you'd like to include in your intro post. Here are some examples of questions you can answer:
- How did you find out about Steemit? If a specific user referred you, mention them!
- Where are you from? Share photos from areas nearby.
- What do you think of Steemit so far?
- What are your unique hobbies, interests, or passions that you might enjoy blogging about?
- What do you hope to learn from your time on Steemit?
Gather some thoughts that you want to include. I suggest typing them out in an offline editor. To compose your blog post on Steemit, you'll be using a language called markdown. We'll discuss markdown in more detail in a later lesson, but for now, you can check out this short guide to help you with a few formatting tips. If you want to compose offline, check out Atom or Haroopad. Otherwise, you can just compose right on Steemit.com!
The following section outlines the very basics of sharing a new post, but if you'd like to read more about these concepts in detail, check out this note (This will be a later lesson in the guide, but I've made a draft available now).
Composing Your First Blog Post
If you're logged into Steemit, you'll see a button with a pencil on it in the top right beside your avatar:
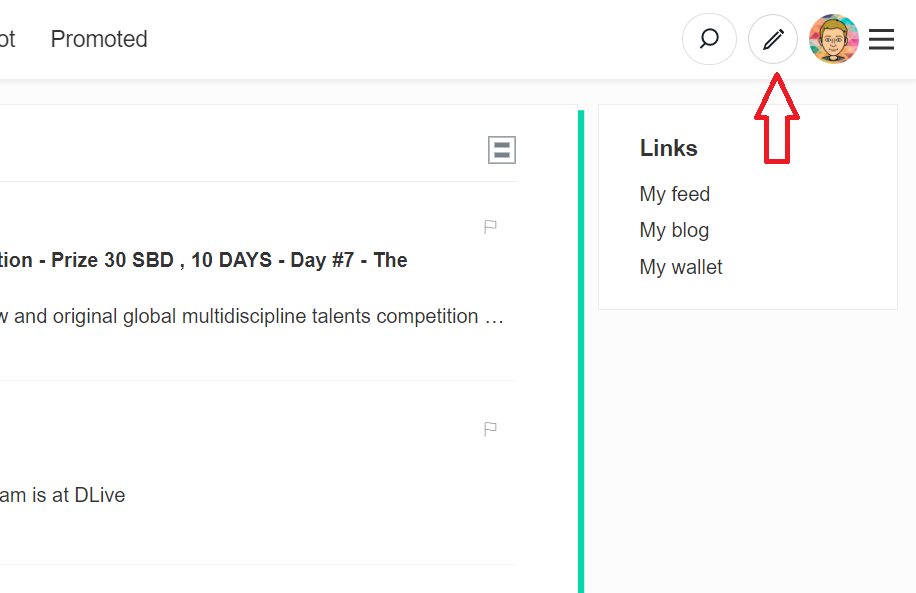
Click the button, and you'll be taken to the compose page! It will look like this:
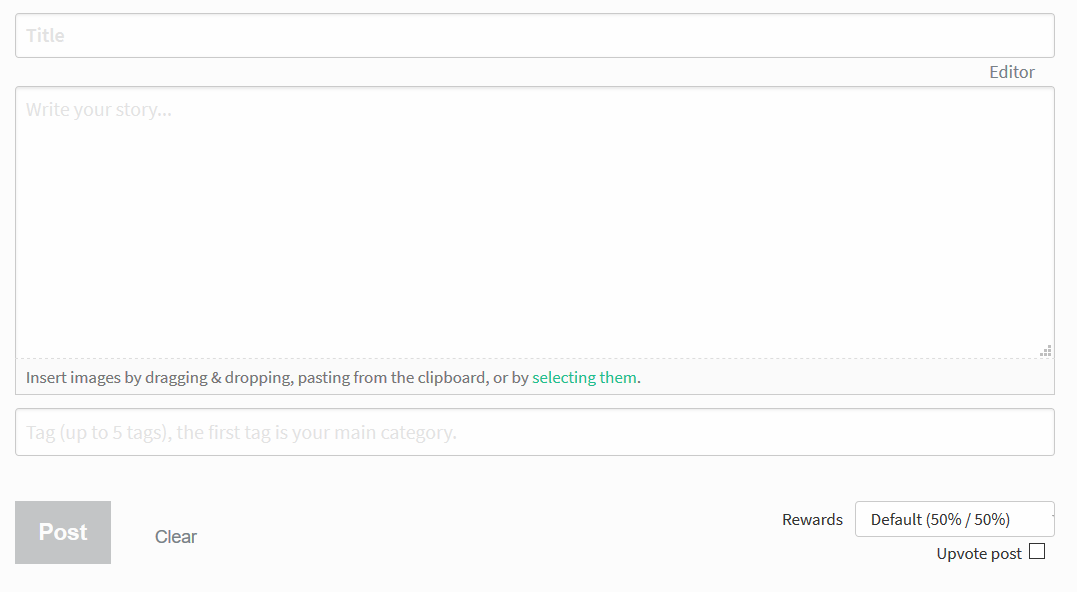
First, you'll see a place for a title. This is what others will primarily see when they view your post across Steemit or by visiting your blog. You want to make your title appealing, so be creative!
The next field says "Write your story." This is never relevant more than when you're making your first blog post. Introduce yourself to the world. Tell Steemit your story. Include as much as you want! Photos are great. In fact, you can include images by dragging and dropping, pasting, or selecting them as the message says at the bottom of the field.
This is where you can make use of Markdown formatting, but if you want to come back to markdown, you can click the "Editor" link below the title field, which will change the page slightly:
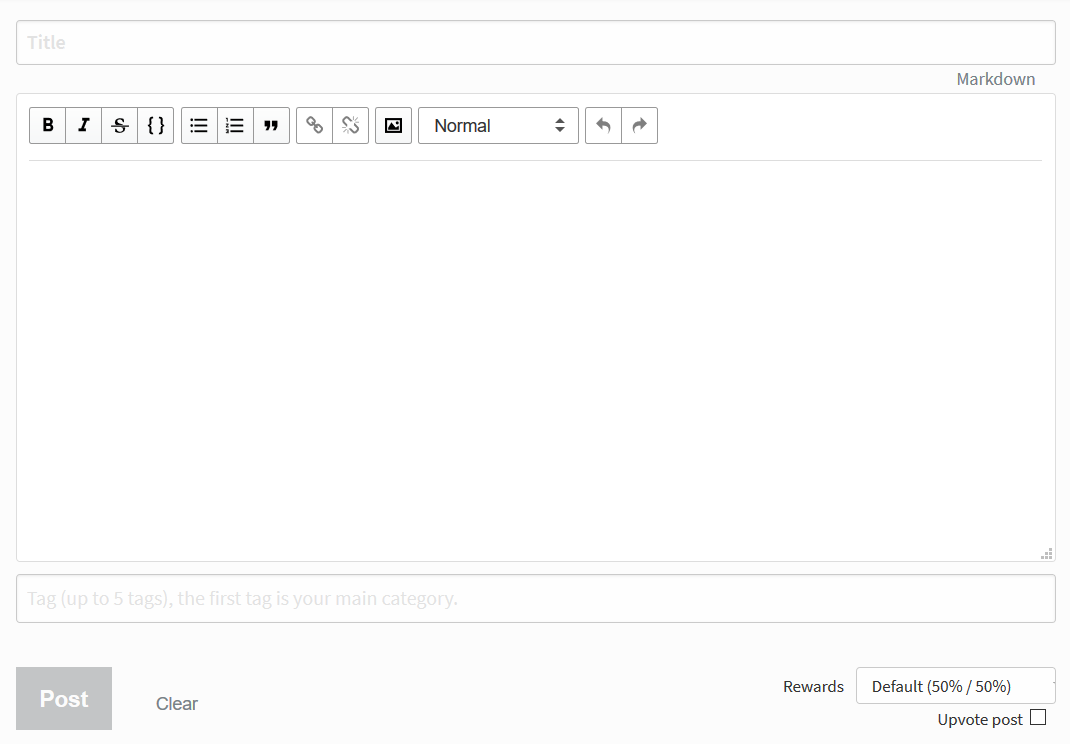
Here you may see some buttons that are familiar to you. There are buttons to make your text bold or italic, include bullets or numbered lists, and even insert images and links. This may be very helpful when beginning, so make use of these tools!
Once you've wrapped up your post, you'll need to tag it! We discussed tags briefly above, but when you're introducing yourself for the first time, there are a couple of tags made for such an occasion! Be sure to use introduceyourself and introducemyself as your first two tags. Then you have space for three more tags (Steemit posts may only be tagged with up to five different categories). Choose three that work. Steemit, life, and blog are three popular tags if you can't think of anything, but again, they can be whatever you want!
It's also important to note that the first tag you choose is often the most important tag since it appears in the URL of your post once submitted. It also makes your post easier to find via searches of that specific tag.
If you would like some examples of Introduction posts, I encourage you to visit steemit.com/@thefreshfive and browse through the blog posts there for many examples.
Before you click "Post," you'll see a few other options over on the bottom right of the page. Leave Rewards as "Default 50%/50%." We'll talk about what this means in a later lesson about Steemit economics. Finally, if you'd like to upvote your own post, you may check the "Upvote post" box. This is completely up to you. We'll talk about self-upvoting in a later lesson. If you're unsure, leave it unchecked. You can always vote on your post later if you choose to do so.
That's it! You're ready to send your first post into the Steemit world! Remember that whatever you share in your blog posts becomes permanent after 7 days, so keep this in mind and make any final edits. Click "Post," and that's it! You can browse back to your blog page (steemit.com/@yourusername) to see your post up in lights!
Once again, you can find a more detailed explanation and guide to intro posts and sharing your first blog here.
I've Shared My Post, Now What?

Now that you've gotten one post done, what you do next is up to you. Steemit.com does not have a built-in notification system, so you'll need to check back on your post to see if it has received any votes or comments. You may also use the "Replies" tab on your blog page to access recent responses to your blog posts.
If you do get some responses, be sure to reply back to them. Ask people questions, thank them for their time, and if they took the time to leave a meaningful response, go check out their blog. You can vote and comment on their posts, too!
Getting responses on your blog as a new user may seem difficult. With a bit of time and effort, however, you can start to increase your followers and post views, which will likely lead to seeing the payout number go up on your post.
Remember the tags we mentioned earlier? Go browse through posts in tags that interest you. Find other authors and leave comments on their posts. Read their entire blog and ask questions about specific portions of their work. Comment on what you like (Need more advice on how to comment? Check out this post).
Other users on Steemit appreciate genuine engagement, so as you're making these comments, don't be surprised if these other users visit your blog. Your intro post will be there when they do, so they can learn all about you and perhaps even vote and comment on your post and follow your blog!
If you'd like to read more about how to build your audience once you've stated blogging, here's another helpful resource.
There are plenty of other ways to build community on Steemit, and they involve finding groups and communities that are already established! Many Steemit groups reside on two different websites: Steemit.chat and Discord. Both of these websites provide ways for users to chat in real time since Steemit does not have a private messaging functionality. Examples of these groups include
- The Minnow Support Project (@minnowsupport)
- The Writers' Block (@thewritersblock)
- The Steemit Ramble (@shadowspub)
- Voices of the Underground (@votu)
- The STEEM Engine (@thesteemengine)
- BuddyUP (@buddyup)
- SteemSTEM (@steemstem)
- Steemit Education (@steemiteducation)
- Qurator (@qurator)
and many, many more. As you browse across Steemit, you'll find that there are communities dedicated to almost everything. Be sure to browse to these accounts listed if you want to learn more about what each of them does for Steemit.
Your Next Blog

Now that you've gotten one blog post under your belt, start thinking of ideas you for your next one. Elaborate on one of your interests that you mentioned in your intro post. Share your thoughts on Steemit so far. Find inspiration from someone else's blog. As you browse across Steemit, you'll find many contests and challenges that you can participate in. Feel free to enter those. You'll get some more visibility right away, and there are often rewards associated with contests that you can use to grow your account.
You may have plenty of ideas right at the start. That's great! Consider spacing out sharing them. I know you'll be tempted to get everything out there, but I advise posting one blog a day to ensure maximum views and rewards. This gives other users time to see all of your blogs and their feed won't be inundated by just your posts.
The sky is the limit. If you can write it, you can share it on Steemit.
Reaping the Rewards
Posts pay out after seven days. This means your account won't see any rewards until exactly seven days after you've shared your first blog post. To claim these rewards, simply browse to your Wallet (steemit.com/@yourusername/transfers), and you'll see a summary of any rewards that are waiting for you beside a button that says "Redeem Rewards (Transfer to Balance):"

Since you selected 50%/50% for rewards when you shared your first blog, you'll likely see two different numbers, one in SBD and another in SP. These currencies are how rewards are distributed to you on Steemit. You can learn about these currencies and Steemit economics in a later lesson.
Click the button, and you'll see these amounts indicated in your wallet. There are various things you may now do with your earnings, so feel free to skip ahead to the currency lesson for more details! (Again, I've provided a link to the draft version since the actual blog post may be shared after this post can no longer be edited.)
Moving Forward
That's it! You've learned the basics of navigating the Steemit ecosystem! There's so much more to learn, but by now I hope you feel much better about getting involved. You may have many questions, and this guide will seek to answer them all. I encourage you to read through this guide and explore Steemit simultaneously. You may learn better by doing, so feel free to continue on your own and reference this guide if you have specific questions!
Otherwise, if you have a pressing question, the community is always here to help! Feel free to browse to any of my personal blogs (steemit.com/@ethandsmith) and ask for help. Alternatively, you may join any of the groups listed above and ask for help. There are plenty of resources available to you outside of this guide.
If you haven't already, I'd suggest browsing through the Steemit FAQs. They cover most of the basics of how the platform works and provide very useful information if you're just starting out. There's also the Steemit Etiquette Guide, which can give you more insight into how to interact with others and properly introduce yourself!
The next lesson will provide a brief overview of how Steemit works and where the rewards come from, as well as more details about the sign up process and account security!
Final Thoughts
This represents a very basic introduction to Steemit that I believe will serve as a good introduction for the rest of the planned Beginner's Guide. I want to thank many users for helping inspire this project, specifically @markrmorrisjr for helping adjust my perspective on how to introduce many concepts, and to @dreemsteem for reading and thoughtfully commenting on several of the drafts for this and upcoming entries into the guide. Also thanks to the team at @thesteemengine for their support of this initiative.
I welcome all feedback. Do I need more images? Does the order need to change at all? Should I mention any concepts that I've left out? Please let me know in the comments so I can make notes and change things for the final version. There's still a lot of work to be done.
The next installment will briefly explain the blockchain aspect of Steemit and focus more on account signup and security. Look for it soon!
All images are screenshots taken by me or are CC0 obtained on Pixabay.com.