This post is an answer to @tamersameeh 's question, "How Can I Deposit STEEM To My Account?". It covers withdrawals from both Bittrex and Poloniex, and there are screenshots aplenty. To make it easier to read, the exchange-specific instructions are in medium-sized headlines; the general instructions are in medium-large. General-instruction steps are separated by a horizontal rule, like so:
An instruction is this size...
...and an exchange-specific instruction is this size.
So let's begin!
You've Bought Some STEEM And Want It In Your Steemit Wallet...
The STEEM you've bought will appear in your exchange Wallet. The page in which your balances appear will be the same page that you place your withdrawal to your personal wallet. Once it's there, you can do three things with it: hold it, stick it into Savings or power-up with it. At the end of this post, you'll find out how to do each.
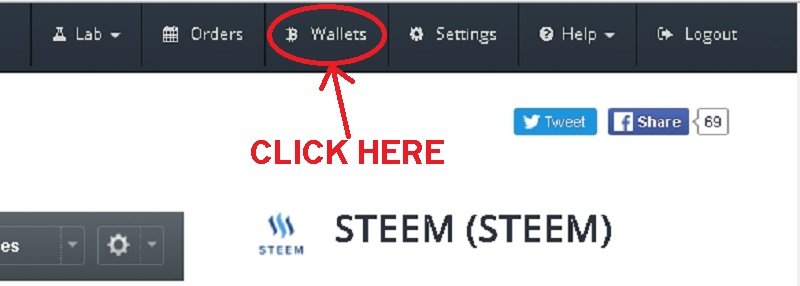
If you have an account on Bittrex:
you'll find your "Wallets" tab on the upper right of your browser tab:
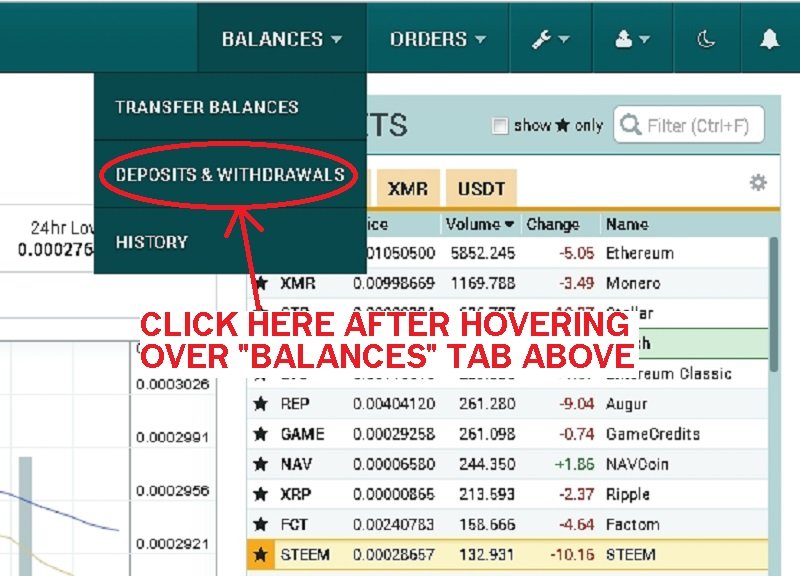
If you have an account on Poloniex:
you're looking for Deposits and Withdrawals. You find it by hovering over the "Balances" item in the upper-right horizontal menu. After you hover over it, the "Deposits and Withdrawals" button will appear in the middle of a three-item drop-down menu.
Either will bring you to the page where you make your withdrawal.
Withdrawing Your Balance: Your Exchange Wallet Page
The Bittrex Wallets page is more complex even though it's easier to get to. Accessing Poloniex's Deposits and Withdrawals page is a bit tricky, at first, but its interface is much simpler.
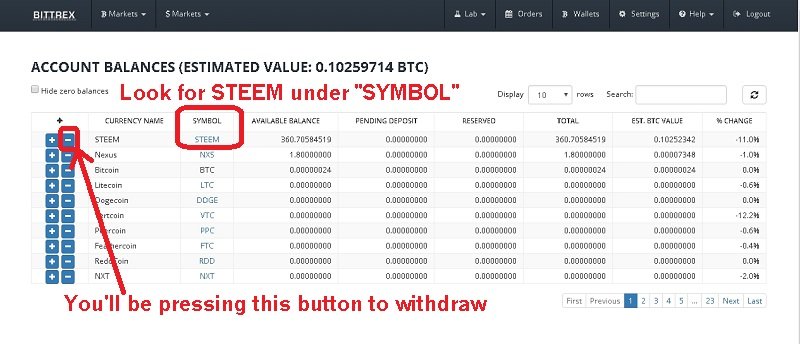
If you have an account on Bittrex:
you'll see your STEEM balance easily. It's set up so that your balances are ordered by value. Like so:
If you have an account on Poloniex, the interface will be straightforward provided you check the checkbox "Hide 0 Balances". If you've done so, your "Deposits and Withdrawals" page should look something like this:
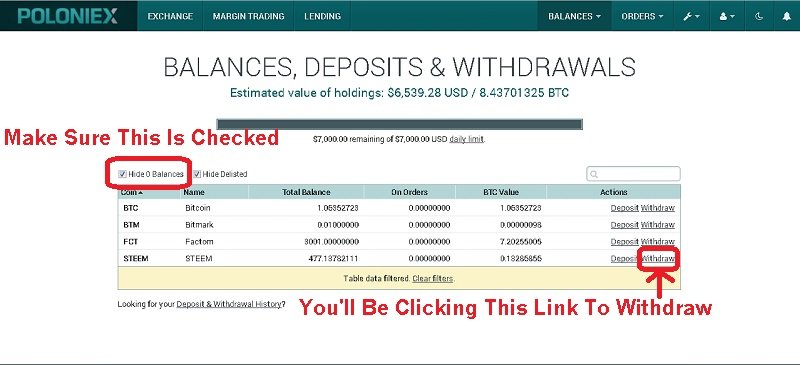
If instead you see a huge list of alphabetically-ordered wallets, make sure you check that "Hide 0 Balances" checkbox.
Open Your Steemit Wallet In A New Tab; Find "Permissions"
This part is the most complicated one, but the complication is there for your security. Your personal STEEM wallet is registered on the blockchain by your username; your username is an alias for your address. It's a convenient system, but it carries with it the risk of someone hacking your exchange account and using this simple system to rob you. We don't want that....
So, Steemit has an added security feature that the exchanges have implemented. In order to withdraw, you need to show you have control of your account. To do this, you need the Memo Key.
Here's how you find it:
- Open up your Wallet in a new tab, like so:
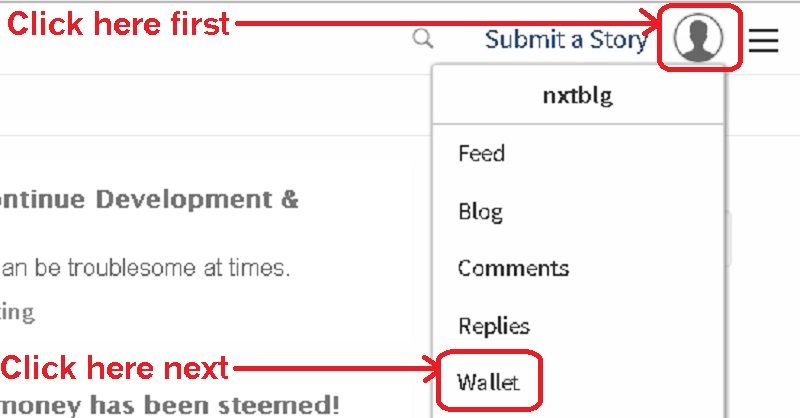
Preferably in a new tab.
- Once you're at your Wallet page, look for the "Permissions" link. Like so:
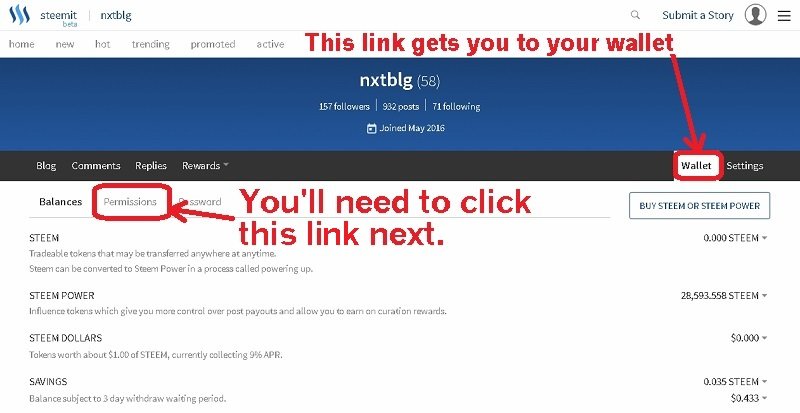
If you can't find your wallet, any page with blue near the top will have a "Wallet" link in the same location as the circled one in the above screenshot. Just get to a page with the blue rectangle, and you can get to your wallet easily. Once you're there, as said above, you next have to click the "Permissons" link that I circled in the above screenshot.
- Once in "Permissions", look for the Memo Key:
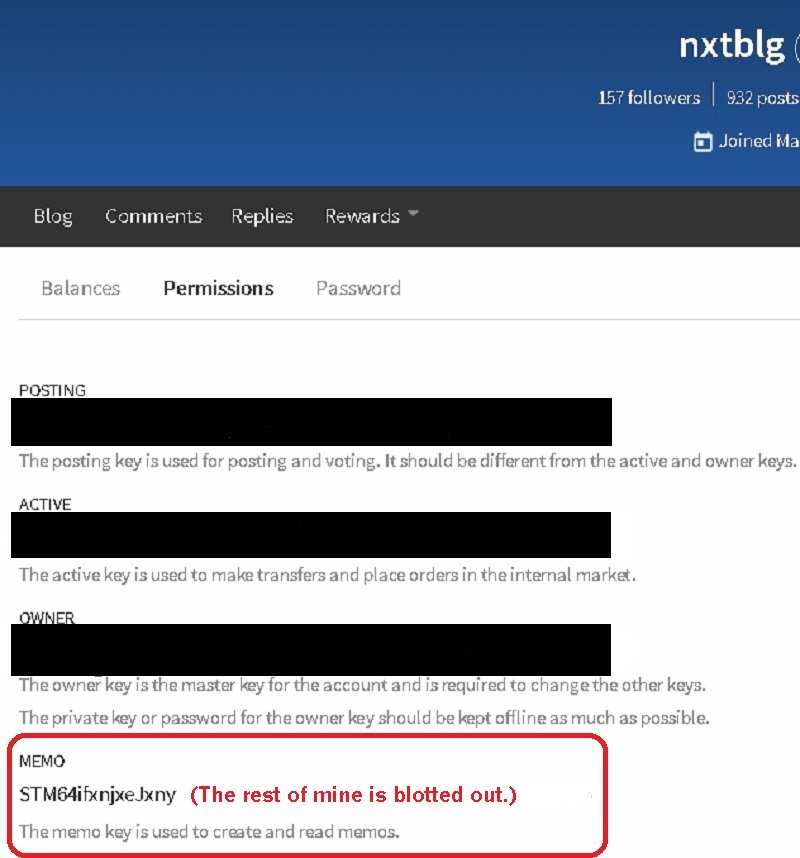
This screenshot is from my own Permissions page; the blot-outs are for privacy. As it shows, the Memo key is the one at the bottom; the value itself starts with "STM". Hover your mouse over it and it'll be highlighted.
You'll need to copy that key in its entirety to make your withdrawal. To be prudent: open up a Notepad/text-editor, copy the Memo key, and compare to the one on the Permissions page to make sure it's exactly the same.
Now that you've done the most complicated part - the part that represents the steepest part of the learning curve, if you're like me - head back to your exchange wallet. You'll now see why you need the Memo Key.
Getting Your STEEM To Your Wallet: Prepare For Launch
As explained above, you'll need your Memo key when you withdraw. To do so, start by clicking the withdraw link.
The Bittrex link looks like this:

The Poloniex one looks like this:

Once you click whichever, you'll see a withdrawal form.
Bittrex's withdrawal form:
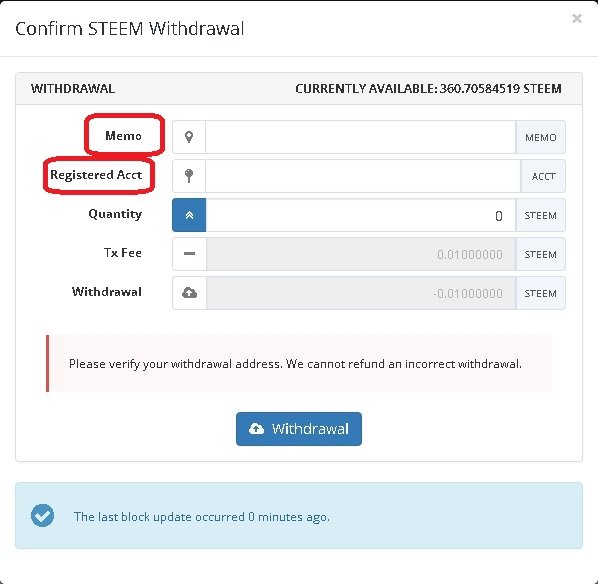
It pops up when you click the withdrawal link. Note the two circled fields: you need to fill them both in carefully. The first, called Memo, is the field where you stick your Memo Key. (You did clipboard it to a text editor and check it, I hope.) The second, called Registered Acct, is the field where you put your username.
The third, Quantity, is straightforward. For this example, I'm withdrawing all that I bought.
When you've filled it in, it should look like this:
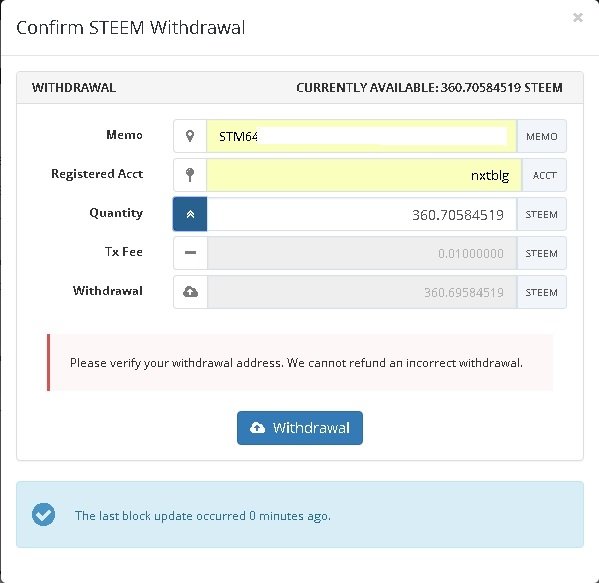
Again, I've blotted out my full Memo key. You should check both to make sure both are accurate. (Quick Tip: Most clipboarding errors leave out the first or last characters. Check the first and last characters of your Memo first!)
Poloniex's withdrawal form:
It's organized differently from Bittrex's:
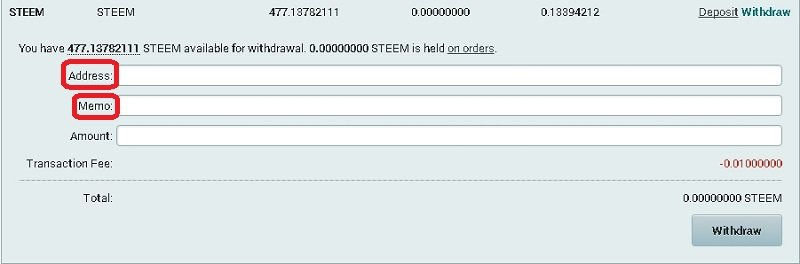
Instead of popping up, it pops out: the page expands. More importantly, the Polo field has the "Address" first. Address is the same as "Registered Acct": you put your username there. The "Memo" field is second, so your Memo key should be below your username Address. Like so:

Again, I've whited out the bulk of my Memo key.
Once you've filled out your own form, you should check to make sure the data you've entered are correct. Bittrex has a conformation form, so you'll have a second chance to check before you send your withdrawal in.
Getting Your STEEM To Your Wallet: It's Go-Time!
The next part is as simple as clicking the "Withdrawal" or "Withdraw" button, plus the "Confirm" button if you're on Bittrex. If your account is set up like mine, though, there's a little more work to do. By default, both Bittrex and Poloniex have Email confirmation of withdrawals. In order to finish, you'll have to open up the Email account you used to sign up. There'll be a confirm Email with a link to click. Until you do, both your withdrawals will be Pending.
Even after you click the link, each withdrawal will spend some time in "Pending" or "Processing" limbo. The exchange wallet needs some time to get around to sending your STEEM to your account via the blockchain. Normally, this takes only a few minutes after you've clicked the confirm link in the Email but it could take longer if the exchange's servers are busy. You might need a bit of patience.
If it does take a long time, contact the exchange's Support.
"I've got my STEEM! What can I do with it?"
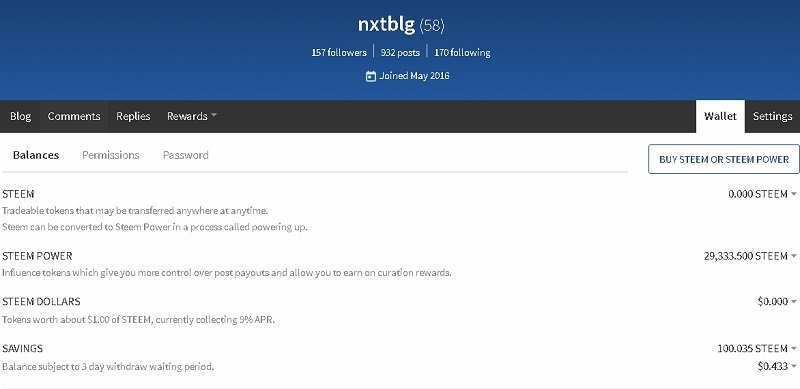
As I noted above, there are three things you can do with your STEEM once it's in your wallet. Like this in mine after my Bittrex withdrawal went through:
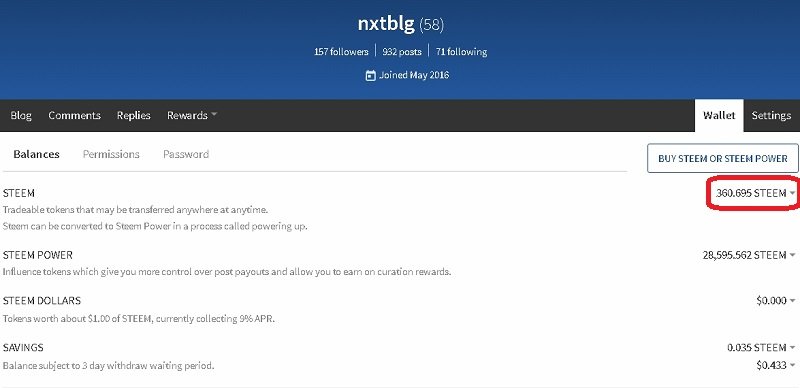
If you're still on your "Permissions" page, a quick click back to "Wallet" will show your deposit.
The first thing you can do with your STEEM is leave it where it is. So long as your wallet security is okay, it'll stay there for as long as you want it. As with any other cryptocurrency holding, it'll stay there as long as you want.
The second thing you can do is transfer it to Savings. If you do, please remember that your STEEM is going to be illiquid. If you want to withdraw from Savings, you have to wait three days (seventy-two hours) for the transfer to be complete.
This is a security feature. If your wallet is hacked, the hacker has to wait three days to steal your STEEM in liquid form. That gives you some time to change your password if you find out your wallet's been compromised.
To use this feature, just click the little triangle to the right of your balance. You'll see a drop-down menu appear:
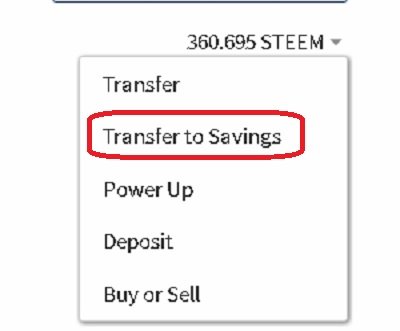
Click the circled link, "Transfer to Savings," and you'll get a transfer screen that allows you to confirm and specify the amount of STEEM you want to put on lockdown:

For this example, I did change it manually to 100 STEEM:
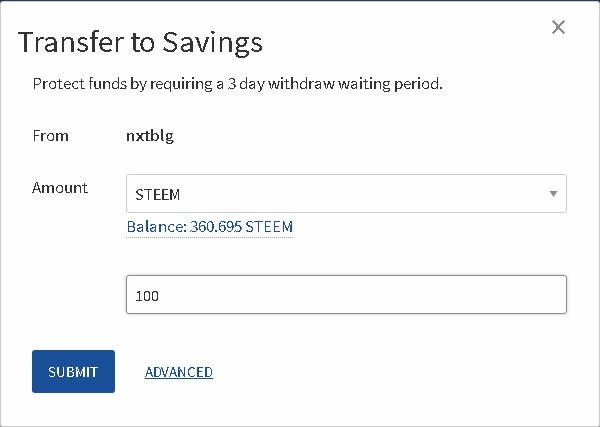
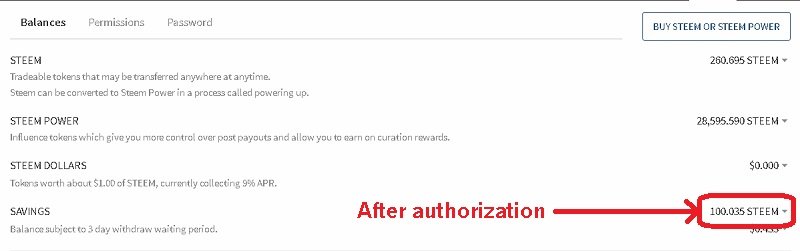
With a click of "Submit", the wallet asks for authorization. Your password will get it done. Once you've signed it, you'll see the authorized amount transferred to Savings:
The third thing you can do - my favourite, to be honest - is to power-up: change your STEEM into Steem Power. The more Steem Power you have, the more rewards your upvotes dish out (and the more curation rewards you get.) In short, the more influence you have.
But the price of this greater influence is locking away your STEEM for thirteen weeks. It's quick and easy to Power Up, but you have to wait a while to Power Down. Once you authorize a Power-Down, you have to wait a full week for the first thirteenth to appear in your liquid STEEM balance. Then, you have to wait another week for the second thirteenth, and so on, all the way up to week thirteen.
This is a deliberate feature of the Steemit system. It ensures that the folks with greater curation clout are holding their STEEM for the long term.
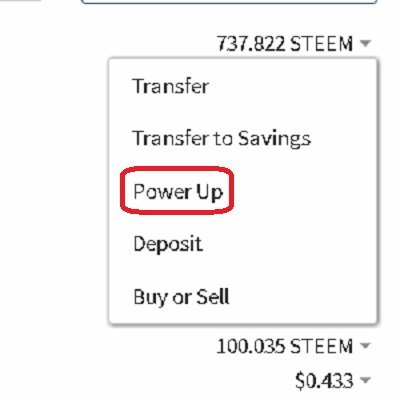
To Power Up, just click the little triangle just to the right of your STEEM balance. You'll see the drop-down menu pop up:
Once you click the Power-Up choice, a pop-up form will appear asking you to specify the amount to convert to Steem Power:
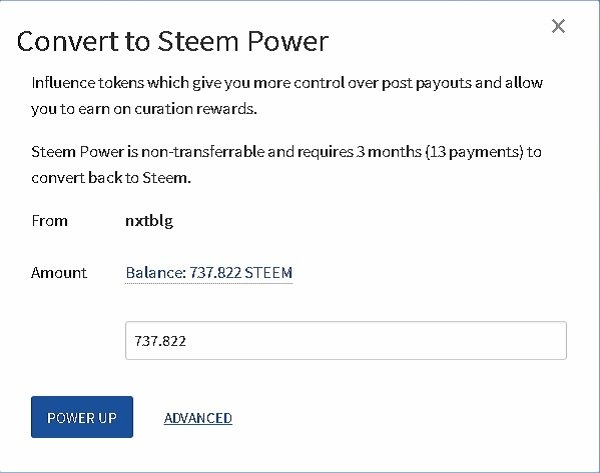
As with the "Convert To Savings" form, you can click the "Balance" to put the full balance in the field.
Also as with "Convert to Savings," you have to authorize it with your password after you hit the blue button. You have to "Sign" the request:
Once it's done, your balances will change accordingly. Just like mine did after I hit the "Power Up" button:
As you can see, all my liquid STEEM is gone and my other balanced have increased accordingly.
Thanks for reading this guide, and I hope it helped! If you want to use or adapt this post for a Steemit help guide or wiki, feel free to do so. I'll be flattered. :)

(Image from here.)