Introduction

If you are starting out it can be confusing getting to grips with Markdown.
Markdown is a formatting system that allows you to make posts quickly using symbols as shortcuts for formatting without the hassle of using html.
Here are some of the most basic markdown shortcuts that I personally have started using.
Why use Markdown over HTML?

- Simplicity and ease of use compared to HTML/CSS.
- Faster than HTML/CSS due to less typing.
- Faster than the WYSIWYG Steemit text editor for similar reasons.
- Easier to read/review/spot errors and also edit compared to HTML/CSS.
- Can be combined with HTML/CSS for more advanced formatting and features.
Once you learn how to use these very basic techniques you will be much quicker at posting.
Other Resources I Recommend
- For more detailed information I would suggest using the Markdown Cheatsheet by Adam Pritchard which has been recommended by a number of people.
- You can also pick up tips from other users - there is nothing wrong with asking!
- In addition I should mention that @charlieshrem has created a markdown editor at Steempower.org which is also a very useful tool for composing and posting in markdown. Not only that but it also allows you to save your posts and submit them directly to Steemit!
Format of this post
I will be using screenshots to illustrate the actual text you type into the markdown editor and then illustrate the preview that you get.
(This is because if I actually put the markdown text in the post it will not show as is but will become formatted according to the markdown specs.)
The markdown text you type has a CREAM background colour to stand out.
Basic Points Before we get to the Markdown
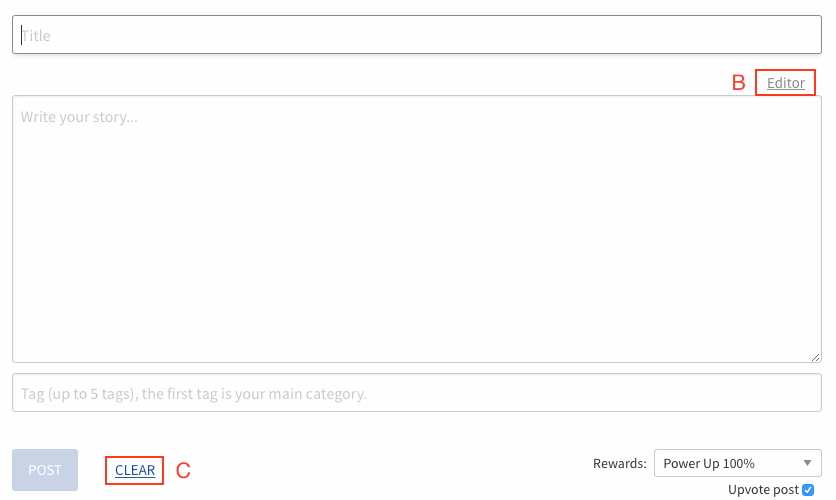
Here is a view of what you see when you click on the "Submit a Story" button (A) at the top right of your Steemit browser window:

The default view allows the entry of markdown or html below:

If you click on the top right corner where it says "Editor" (B) it will take you to the very basic text editor which is fine but WILL NOT allow you to use markdown or html.
Further it could in the past cause you to lose certain html/markdown formatting so I think the last update prevented switching once you start entering text in order to prevent this happening.
That said you can still go into the regular text editor by accident before you start typing. If you find your markdown is not working this may be the reason. If you can't see the "Markdown" button to switch back you will need to do this:
Copy your text to the clipboard or a separate document and hit clear (C). The "Markdown" option should reappear as shown below (D), click it and then you can paste your text back in.

The Markdown Bit (Finally!)
Paragraphs
This is one of the best points about Markdown.
Unlike html where you need to use formatting tags for paragraphs, simply hitting Enter/Return once or twice in Markdown will create paragraphs (depending on how you prefer to format).
It works exactly the same way as a standard word processor.
That saves a lot of typing compared to html.
Headings
For headings use a hash symbol "#" followed by a gap:
e.g. you type this:

and you get this:
Heading 1
Heading 2
Heading 3
The more hashes you use the smaller the heading.
You can use up to 6 - NB don't forget to leave a gap between the hashes or it will confuse the editor.
Italics
Italics use underscores or asterisks
e.g. you type:

and you get this:
underscores or
asterisks
Bold
For bold use double underscores or asterisks
e.g. you type:

and you get:
double underscore
double asterisk
Both Bold and Italic Combined
Mix them (asterisks and underscores) for text that is both italicised and bold:
e.g. you type:

and get:
Mixed
Numbered Lists:
You type numbered points like this, the number followed by a full stop/period:

and you get this:
- Point 1
- Point 2
- Point 3
Bulleted Lists
For bulleted lists use asterisks with a space:
You type:

and you get:
- Point 1
- Point 2
- etc
Links:
The easiest way to do these is to use square brackets to surround your title followed by round brackets (without a gap) with the link:
e.g. you type:

and you get:
Images are similar but formatted like this:

e.g.
You type:

and you get:

{N.B. You don't have to use a separate image name and file name and can simply use  or even use just a link on it's own for Steemit - but just in case there is a problem with the link loading I would still use a title though.}
Youtube Videos
Thanks to @kryptik in the chat for asking about these as I forgot to mention these in the original edit. Basically just treat the youtube video like an image link so the format would be:

Quotes use the "greater than" mathematical symbol i.e. ">"
e.g. you type:

and you get:
This is a quote.
Section Dividing Lines
Three or more asterisks, hyphens, or underscores make a dividing line to separate sections. (Thanks to @cristi for showing me this):
e.g. you type:

and you get 3 identical dividing lines:
The above all look the same in preview regardless of which triple symbol you use.
Extra tips
If it isn't working there are 3 common possibilities:
- You have either a space missing (headings - the editor will see it as a tag) or an extra space in the case of other types of text.
- You are using the text editor which does not read markdown (which I explain near the top of the post).
- You are using a feature that is not compatible with the Steemit implementation of markdown - this might happen if you are using some obscure functions.
If you get stuck - ASK for help or use Google - there are plenty of online resources like the aforementioned Markdown Cheatsheet.
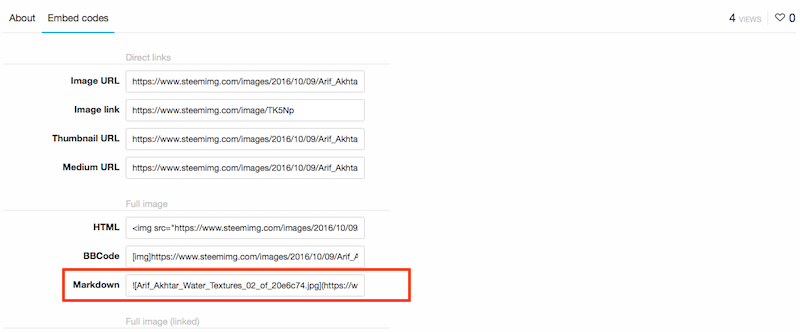
NOTE - If you use SteemImg.com for image hosting it will automatically create Markdown formatted links for you (plus HTML versions and more) as shown in the screenshot below:

Thanks to @blueorgy for creating this valuable tool for us to use.
Conclusion
These are just the basics to get you started. In fact I don't really use anything else besides these markdown tricks to format my post. As I stated earlier you can find plenty more information on line. I hope this has been useful and easy to understand. Please let me know if you spot any mistakes or anything is unclear.
The Obligatory Kitten Shot
Your reward for getting to the end:-

If you like my work and aren't already, please follow me and check out my blog (I mainly discuss photography but I do other topics too) - @thecryptofiend
Image Credits: All images that aren't personally taken screenshots are taken from my own Thinkstock account. More information can be supplied on request.
I have also created a new channel in the chat dedicated to photography of people/portraits called "Photography-portraits-people". Please check it out and post your photos there.
(Verification for me here: http://www.aapicture.com/about-me)
Some of my Previous Posts and Tutorials:
- Portrait experiments with stock photo type processing (free for you to use)
- Are governments deliberately poisoning the cryptographic/cryptocurrency well?
- Bamburgh Castle at Sunset: IR Photos (free for you to use on Steemit)
- Does your urine look like COCA COLA? - GO STRAIGHT TO HOSPITAL - Rhabdomyolysis
- Beautiful Abstract Water Textures (for you to use in your own posts)
- Steemit4free - An idea for a library of free images for Steemit reuse
