Welcome again my fellow steemit educators! Today I'm giving you 3 simple and all-time classic experiments for your Physics class. They are easy to perform and absolutely safe and as a result, ideal for primary school students of all ages.
OBJECTIVES
Teach air properties: a) the air has weight (Experiment 1), b) the air has volume (Experiments 2 - 3).
In primary school our main goal is to set a strong foundation for future knowledge to develop. We don't want to teach any complex concepts or get into numeral details the children will easily forget. We want to show them basic responses and procedures to be questioned and scientifically proven or dismissed later on in their school life.
For kids the air is something they cannot see, therefore do not perceive it as a material. We will try to explain that the air, like any other substance (liquid or solid) has the basic properties of weight (force of gravity over it) and volume (it takes up space).
DETECTING FORMER KNOWLEDGE
We first need to know what our children already have in mind. We might want to ask a few questions like:
-What is air?
-Can you see it?
-Can you touch it?
-Can you weigh it?
-Can you put it in a container?
Such questions will make the students wonder about something that probably has never crossed their minds. After we get them intrigued, we can continue with our experiments in order to give them some surprising answers to their questions.
Before you start:
Since there are no danger factors involved, it would be a nice idea to have students perform them under your guidance and assistance. If there are too many students in your class you could maybe divide your children into groups and have each group perform the experiments and keep records of their observations, then conclusions will be discussed with the class as a whole. Alternatively, you can perform the experiments yourself, just make sure that every student has a clear view of what you're doing.
EXPERIMENT 1
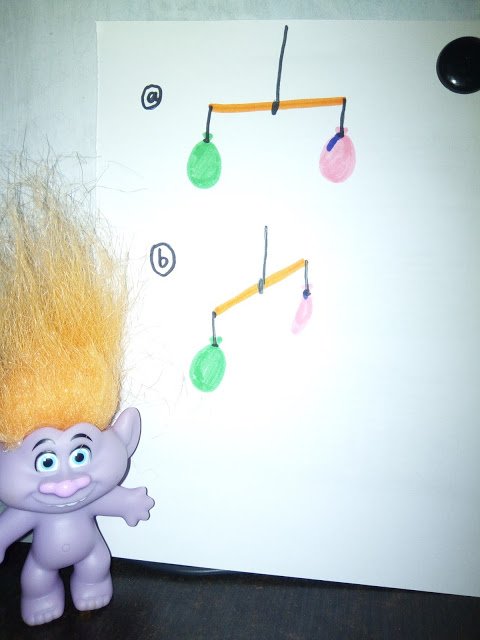
The air has weight even though we can't put it on a scales or weigh it on our hands.
Materials:
- thread
- a pair of scissors
- a straw
- 2 same-sized balloons
- a pin
- tape
Procedure:
- Take the straw and tie the thread in the middle.
- Fix the the thread on a hanger and make sure the straw balances on the thread.
- Blow the balloons in the same size and bind them carefully.
- Put a piece of tape near the "neck" of one of the balloons.
- Tie the balloon on each side of the straw.
- Fix the straw to balance horizontally.

The balloons are the same size and the straw balances like a scales.
Now use the pin to pinch the taped balloon and remove it again carefully (we use tape so that the balloon does not blow up). Wait and watch.
The air slowly gets away from the pinched balloon and the scales no longer balances, it leans to the still blown balloon.
Conlusion: The air has weight.
Tips:
- Use balloons preferably from light materials, you don't want the rubber's weight to mess with your results' safety.
- Be careful to close all doors and windows as the experiment is sensitive to any air currents around.

EXPERIMENT 2
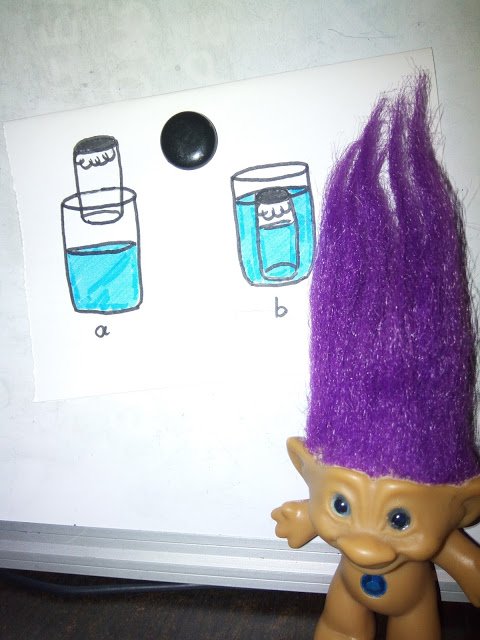
The air takes up space even though we can't see it (it has volume).
Materials:
- dry cotton
- tape
- a transparent glass
- a big plastic bottle
- water
Procedure:
- Get rid of the narrow upper part of the bottle.
- Fill the remaining down part with water (up to 2/3).
- Place a piece of dry cotton in the glass and try to stick it in the bottom (If it doesn't stay in position, use some some tape on the inside bottom of the glass to fix it).
- Turn the glass upside down (the cotton piece should not fall out) and dip it vertically in the bottle (be careful not to lean it).
- Take the glass out of the bottle and remove the piece of cotton.

The cotton remained dry.
Conclusion:
The air in the glass has volume (takes up space) and does not let the water fill the upside down glass, therefore it cannot reach the cotton.

EXPERIMENT 3
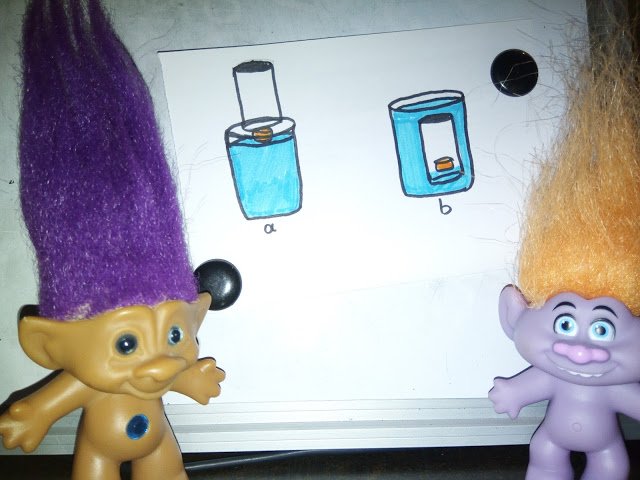
Just like in the second experiment, the air takes up space even though we can't see it (it has volume).
Materials:
- a big plastic bottle
- a plastic bottle cap
- water
Procedure:
- Get rid of the narrow upper part of the bottle.
- Fill the remaining down part with water.
- Place the bottle cap on the water (it should float).
- Turn the glass upside down and dip it vertically in the bottle, keep pushing t downwards until the cap touches the bottom of the glass.

The cap will never touch the bottom, it will float almost in the middle of the bottle.
Conclusion:
The air in the glass takes up space and does not allow water to fill it completely.

References
Panagiotis Koumaras, "A guide to teaching physics through experiments" - Christodoulidis Editions (Thessaloniki 2005)
Images
All from @ruth-girl

Thank you for reading my post, perhaps some of you will find it interesting and give those experiments a try. If you do so, please leave a comment on how they worked for you and your class.
Perhaps you'd like to go through my blog and discover plenty of lesson plans along with my bizarre natural phenomena series.
For those of us engaging with education, @steemiteducation is here to join all steemian educators in their common cause of making our job easier, more effective and more fun!
Interested in science? Please, don't forget to check the @steemstem project, a community-driven project meant to promote well-written, high-quality, STEM-related content (STEM as for Science, Technology, Engineering and Mathematics). Join them in steemit.chat for more information.
Finally, the greek community of steemit is here and waiting for you to discover it! Follow the @greek-trail for daily doses of good-quality posts by wonderful writers!
Thank you for your time and as I like to say,
Steem on and keep smiling, people! :)

