The knitting bug has hit and I have dug out my needles and yarn! This twitch I have in my fingers has inspired me to share my knitting skills and over the next few weeks I’ll be teaching you, yes you, how to knit too! My first entry into the series is called 01 - Learn To Knit: Matching Yarn And Needle Sizes and can be found HERE. I’ll be indexing each tutorial at the end of each post, to make it easy for you to move between each stage, step and stitch.
So, once you have decided on what it is that you want to knit and have purchased the correct yarn (wool) and needles, it’s time to add on that very first stitch. For some, this step might be somewhat obvious, or basic, but others might be a little clueless (like how I was at first)!
Making Your Slip Knot
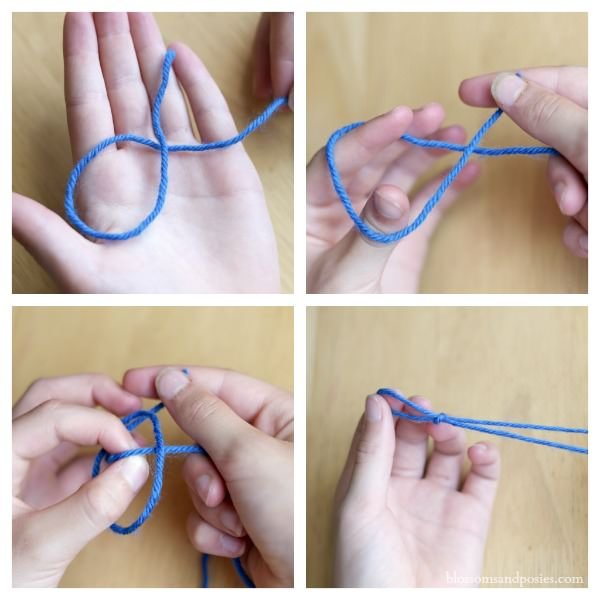
I have included a short video below to demonstrate how to make a slip knot, but I’ll discuss the steps briefly too.
- Grab your yarn and find the tail (the starting point to your ball/roll).
- Make a loop with the wool, so that the strand crosses itself.
- Holding on to the tail end, move your thumb and index finger through the loop and grab the thread leading to your ball of yarn.
- Pull is through the loop to form a lasso.
- Place your needle through this lasso and tighten your lasso around the needle.
- That’s a “wrap”!
Tip: as you begin to cast on your stitches (which I will demonstrate in my next entry), make sure to hold your tail securely to the left (or to the right if you are left-handed)
Video Tutorial: How To Make A Slip Knot
OR

That’s a wrap for my second Beginners Knitting Tutorial, tomorrow I should have a lesson on how to cast on your first stitches prepared for you! So please do come back, or even better, FOLLOW ME @sweetpea
More Knitting Tutorials:
01 - Learn To Knit: Matching Yarn And Needle Sizes
Much love - @sweetpea
(bringing you original content)

