Repository
https://github.com/aosp-mirror/platform_build
What Will I Learn?
- You will learn how to create and send Intent Data from one activity to another.
- You will learn how to create and manage ListView Widgets - ListView is a scroll-able view that can handle near any form of list.
- You will learn how to create simple a custom adapter for your ListView, so as to display data in an irregular format.
Requirements
State the requirements the user needs in order to follow this tutorial.
- Basic knowledge of Java, and XML.
- Android Studio installed on your operating system of choice.
- A device to run the application within, can be a physical device, or a VM like the one included in Android Studio's 'Device Manager'.
Difficulty
- Basic
Tutorial Contents
Introduction
In this tutorial, we will again be adding to our 'steemie' application - name still a work in progress :P. The three main things that we will be focusing on, as mention above will be Intent Extras, The ListView Widget, and Custom Listiew Adapters. I will explain each one of these tools/concepts briefly before we get into the coding. I am also aiming to make these tutorials more readable, user friendly, and enjoyable for everyone, so I will be changing the formatting a slight bit, as well as including a few more helpful images and comments.
Intent Extras: Sending Data Between activities.
As I may not have explained so well in the past, activities are simply, the user interfaces that are presented to the user, along with the corresponding code required to power the UI. In an application like 'Instagram, the home screen is one activity, and the search screen is another. When a developer wants the user to be able to pass data between these two activities, one must use something called an Intent Extra. You will see a good example of this as the tutorial goes on.
The Listview Widget, and Custom Adapters:
The ListView Widget, is rather simple to explain, it is not much different than a TextView, or a Button - They are views that are cast to the UI, and implemented in our programming. The difference between a ListView and the rest, is that we use these widgets to display a scroll-able list of data for the user to browse through leisurely. A ListView can quite easily be implemented with a simple list of strings, but today I want to show you how to set up your own CustomAdapter. CustomAdapters allow the developer to display many different types of lists, rather than a simple one by one.
Simple Edits:
Since we are doing this tutorial using the same application as before, I will be changing a few different things in the code that you currently have, aside from adding to it. I have not changed much, but this does confuse the subject a slight bit, I really should just be giving you an example.. But I want you to have an awesome application at the end of this series! All of the changed pages of the application will be available for you to simply copy and paste, if I do not give enough detail on everything changed, but it is really not all that much. We have added a few strings for the most part :P
Changes - fetchdata.java
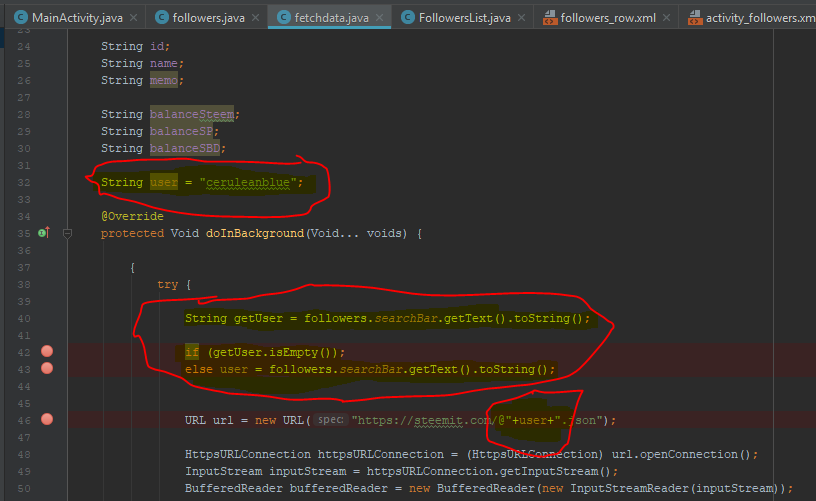
Screenshot
As you can see in the image above, I have highlighted the things I have changed from our previous code. In this new version of fetchdata.java, we have created a 'user' String, as well as changed our fixed URL, to include our variable. Above our URL, we have three new lines. In the first, we create a string, and set its value to the text that is contained within our EditText 'searchBar', from the followers activity.
The next line, is an empty if loop, that says to do nothing if the searchBar is empty, preceding an else statement, which dictates that if the searchBar is anything other than empty, to change our 'user' String to the value of the new text retrieved.
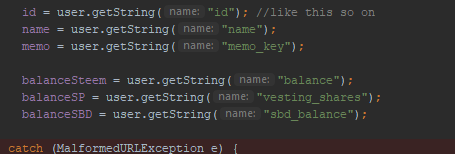
Screenshot
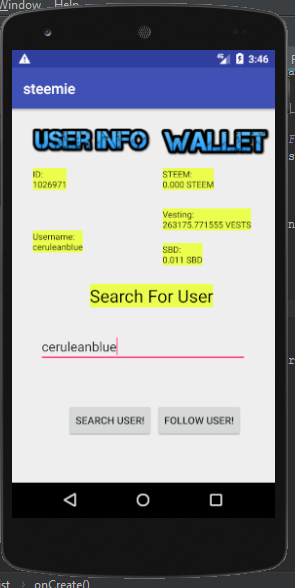
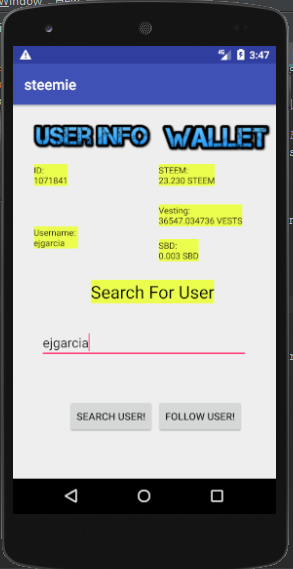
You will see in the GitHub version of this tut(Linked Below), that I have changed the XML layout file for followers.xml, so as to include a Search Bar, and 2 Buttons. The bar to contain a users name, one button to search for the new user, and another to add this new user to a list of people that you are currently following. The above image depicts some strings I have changed in fetchdata.java, as well as the one below.
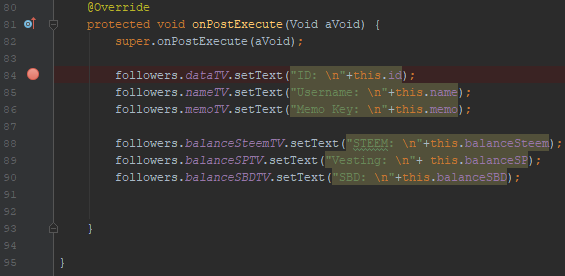
Screenshot
For the most part, these Strings were simply shortened, to make room for the new widgets, and you may feel free to arrange them in really any way you please, provided it is functional. That is about it that we have done in fetchdata, so lets carry on with the next pages.
Changes/Additions: followers.java
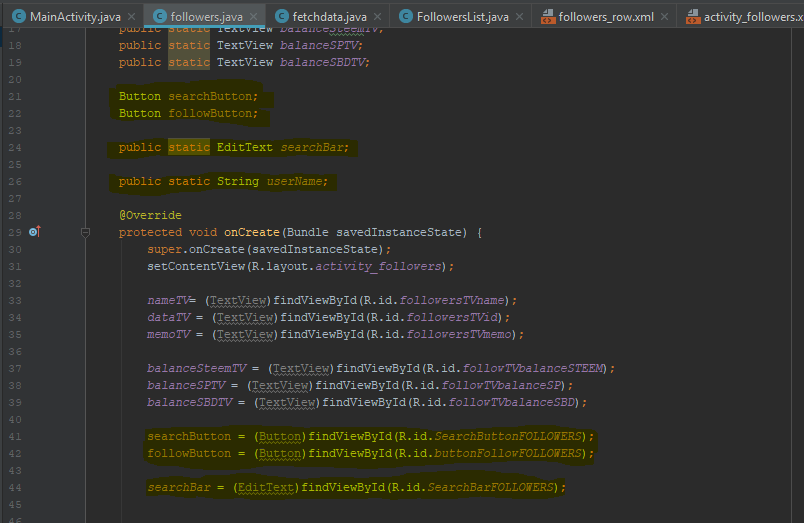
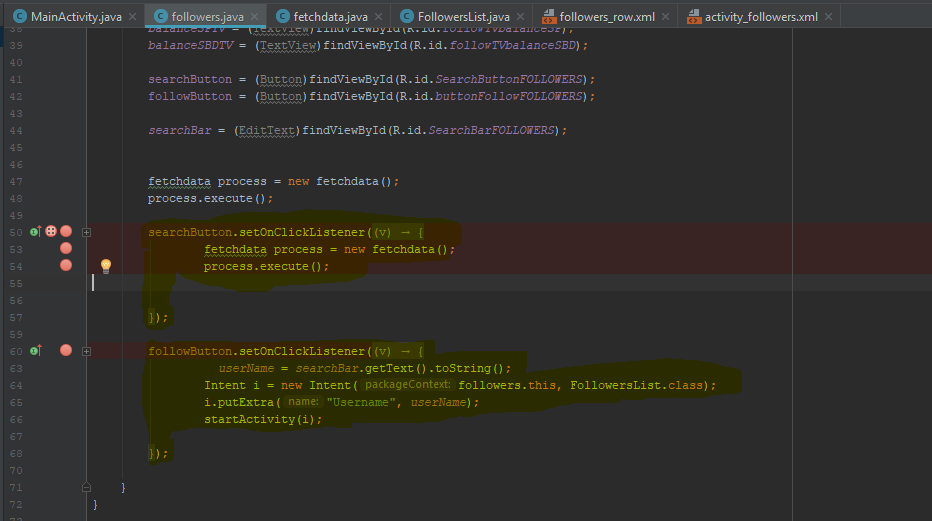
In the upper half of the image above, we see that we need to add in 2 new Buttons, as well as a public, static EditText, and String. These are made public and static to be used and reused across the application. Farther down in the onCreate(), we simply assign our variables to our widget addresses. In the next image, we implement two onClickListeners attached to our newly created buttons, like so.
Screenshot
The first listener, is attached to our 'searchButton', and for that, we simply copy and paste the process from above into this listener, as all we really need to do is the same as before, with a new username. Our variable makes this rather simple. Followbutton, is a bit more of a step, where we will actually be launching a new activity. _ This is also where we will be sending some Intent Data. Code Follows.
followButton.setOnClickListener(new View.OnClickListener() {
    @Override
        public void onClick(View v) {
        userName = searchBar.getText().toString();
        Intent i = new Intent(followers.this, FollowersList.class);
        i.putExtra("Username", userName);
        startActivity(i);
        }
        });
In the code snippet above, we first set a listener. Next we set our 'userName' String to the value of the 'searchBar' EditText. After this, we Create a new intent, launching a new blank activity that if you have not yet created, you may now want to do. Once this line is finished, we use the putExtra() function of Intent, to store our userName String, under the Title "Username". Finally, we launch the new activity. This will all happen when this new 'Follow' Button is clicked.
New Activity: FollowersList.java
Screenshot
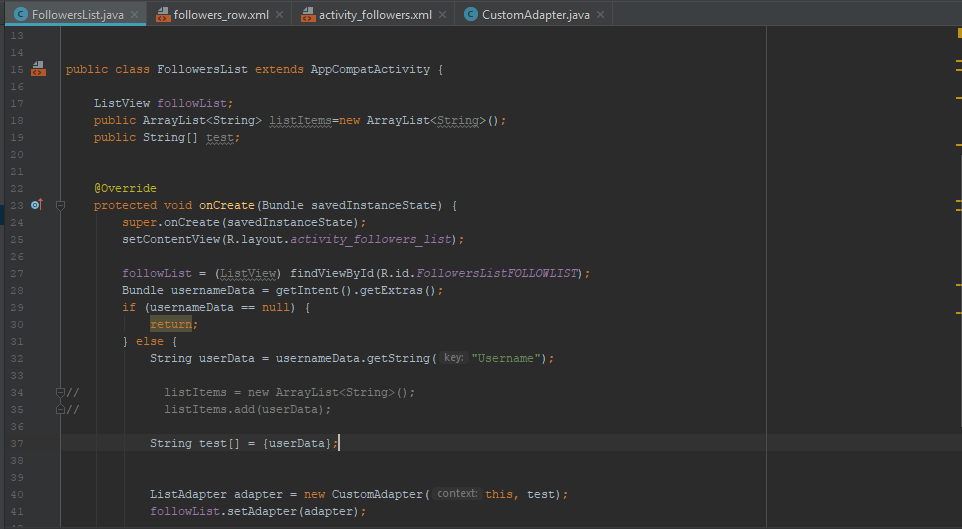
Now this is a brand new addition to our application, so I'm not really gonna bother with the highlighting this time. Instead, I'm just going to break this down for you, section by section, and give you a clear understanding of whats going on. First off, we initialize our ListView, and our Public String.
public class FollowersList extends AppCompatActivity {

    ListView followList;
    public String[] test;

Screenshot
In the snippet of code below, we first set the address of our 'followlist' to the Listview contained in our FollowersList.java file. In the next line we create a Bundle, which is used to store the data that is sent along with an Intent, and we retrieve any incoming data.
        followList = (ListView) findViewById(R.id.FollowersListFOLLOWLIST);
        Bundle usernameData = getIntent().getExtras();
Next we will need to ensure that nothing goes wrong, should we not be sending any data with our Intent, and simply launching the activity. You will see how this is handled in the following code snippet.
        if (usernameData == null) {
            return;
        else {
            String userData = usernameData.getString("Username");
            String test[] = {userData};
In the code above, we first create an If Statement, stating that if the Bundle is null, to simply return, followed by an Else Statement, saying that if this Bundle is anything other than null, to create a new String 'userData', and set its value to the string, retrieved by our Bundle.getString() Function. finally, we create a String Array, and set the first object to the value of userData. The final two lines in this page, are in relation to our next and final section, our CustomAdapter.
            ListAdapter adapter = new CustomAdapter(this, test);
            followList.setAdapter(adapter);
            }
In the code above, we create a new list adapter, and set its value to a new Custom Adapter, containing the context, as well as our 'test' String array. In the 2nd final line, we attach our adapter, to our Listview.
A Custom View: followers_row.xml
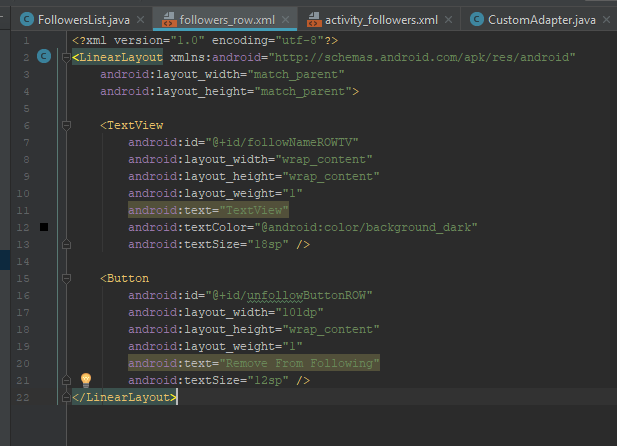
You will need to implement a new layout file, consisting of a horizontal LinearLayout, as well as a TextView, and a Button. This is rather simple, and the XML code can be found through the github link below. This layout file, will be used over and over for each row, or piece of data displayed in your ListView.
Screenshot
This is a very quick file, and we will not be spending much time discussing it. Just know, that this is the design for each your in your list. You can choose to include more TextViews for more data to be displayed, or an ImageView, whatever pleases you really, but for the means of this tutorial, you will simply need one TextView, and one Button.
The Custom Adapter: CustomAdapter.java
We need to create a new class file for this. You can go ahead and do that now. This class will also need to extend 'ArrayAdapter< String>', so that we can use all of its functions. You can see in the snippet below how this is done. The next three lines, are simply a constructor, that you must include with the use of this class. Create a variable for the context of the adapter like so, and include a String[] variable for us to pass in a String Array. This is what we do in the first line of the constructor.
( I had to spell ArrayAdapter<-String> wrong, as the steemit editor interprets this as HTML code. Look at the images for correct spelling.)
public class CustomAdapter extends ArrayAdapter< String> {

    public CustomAdapter(@NonNull Context context, String[] items) {
        super(context, R.layout.followers_row, items);
    }
Finally, we set the context of our adapter, the layout file that we will be using for our custom row, and the name of the array that we would like to pass in. The last thing we will need to do in this tutorial, is override one major operation of our ArrayAdapter Class. This method is the getView() function, and is what will be used to get our custom view, and handle the widgets within it. Code is as follows.
Screenshot
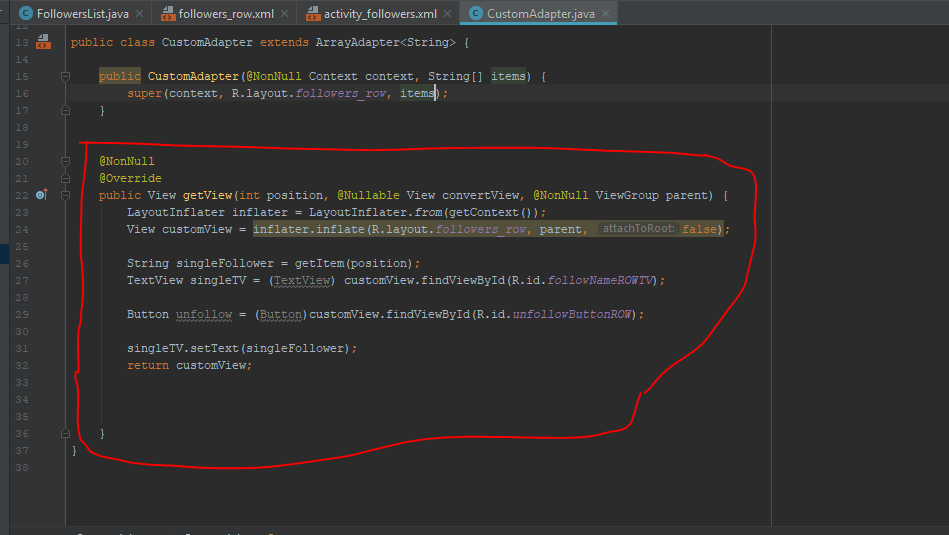
The getView() Function can be overridden by going to Menu>Code>Generate, or pressing Alt+Insert. As you can see in the following two lines of code, which come immediately at the start of our getView(), our first line creates a LayoutInflater 'inflater', and set it to the current context. The second line, creates a new View, 'customView', and inflates it, using the layout file 'R.layout.followers', or followers.xml. The second bit of data included in this function, is a boolean set to false, representing that this is not the root layout.
LayoutInflater inflater = LayoutInflater.from(getContext());
View customView = inflater.inflate(R.layout.followers_row, parent, false);
In the next snippet, the first line is responsible for creating a new String, and setting its value to the value of the item at that position in the String Array. The second and third line below, creates a TextView, as well as a Button, and sets its address to the appropriate addresses, directing them to our custom row layout file.
String singleFollower = getItem(position);
TextView singleTV = (TextView) customView.findViewById(R.id.followNameROWTV);
Button unfollow = (Button)customView.findViewById(R.id.unfollowButtonROW);
The last two lines of this function, are responsible for setting the text, as well as returning the view. There is not much to explain here, other than that since we are using a custom layout file, we must ensure to use the widgets corresponding to that layout, which will be later inflated.
singleTV.setText(singleFollower);
return customView;
Conclusion
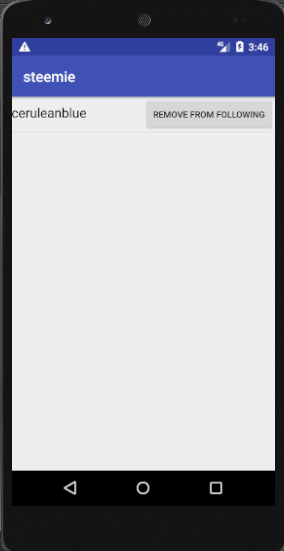
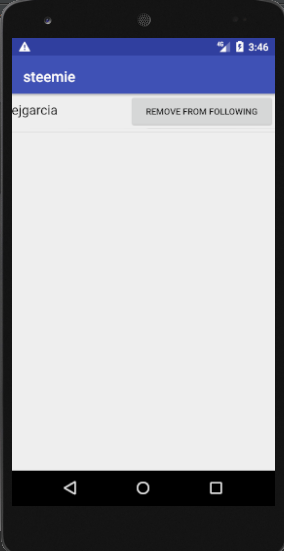
Well that is it for this tutorial guys! I will carry on just to show you around the new and improved 'steemie 2.0' :P but you have gotten through the bulk of the work. As you will see in the following pictures, we are now able to search for new users, as well as add them to a list of followers.
There is still much to be done, as you can probably see from the following images, this Custom ListView activity that we have created, does not retain its memory once we have left the activity. At its current state, we are only able to retain user data provided we are within the activity. This can be solved numerous ways, from SavedPreferences(), to an SQLite database, though it is nearing 6 AM here, and I would much like to wrap this up for now. That will be explained in an upcoming tutorial.
I hope this has been an informative read for you all, and that I managed to explain all of my changes in detail, and did not confuse you to much. From a tutorial standpoint, I really should be giving these examples in a fresh application each time. We will start doing that eventually, but I really am enjoying working on this current application, and I hope you have been as well.
Happy Hunting,
Cerulean
Curriculum
This is the 3rd release in this series.
- Android App Development Series #2 - Web Requests and Parsing JSON Objects
- Android App Development Series #1 - Basic Web Browser
Proof of Work Done
https://github.com/cerulean-skies/android-app-development-series/blob/master/Series%20%233.md

