In this class I have just a couple things, but one of them is a big announcement so stick around to see what it's all about.
My first topic is about my recommendations for using Grammarly and StackEdit. I'd feel remiss if I didn't address the issue they have together in this class.
You may or may not have seen my post entitled: DO NOT use Grammarly with StackEdit or end up like me!

@ntowl/do-not-use-grammarly-with-stackedit-or-end-up-like-me
If you have, what I'm going to talk about will make sense. If you haven't, bear with me as you might find this useful in the future.
After I lost all the formatting on my post (as described in the link above), I emailed Grammarly support.
I asked them to either work on becoming compatible with StackEdit, or if that wasn't possible to at least give a warning when a user is on a site that is known not to work.
I received a reply that said they do not support Markdown, but my request has been forwarded to the developers.
Hmmm....I don't think the support person really understood my issue. Because it isn't about Markdown. I've edited Markdown in other browser text windows - like Steemits - and it worked just fine.
Anyway what I want to do is offer some work arounds for those, like me, that want to use both Grammarly and Stackedit.
I call these work-arounds because none of them are really very good options if you want to use StackEdit. But they will work.
Alternative #1
Compose your post in another program, like Word, Notepad, or Google docs - whatever you normally use that likes Grammarly.
Once you've got your final edited version, copy and paste it into StackEdit to use its simple markdown editing tools.
That means waiting to include any links or pictures until you're in stackedit.
Alternative #2
Write and format your post in StackEdit.
Copy and paste it into another editor (like Word or Google Docs or Grammarly's own browser based editor)
Look at the edits that need to be made, and then go make them in StackEdit. This means going back and forth between two different editors, so either split your screen or use two monitors.
This is a really pain to do. You could experiment by copying and pasting your edited version back into a new document in Stackedit to see if the formatting holds. It probably depends on the editor whether it will work or not. If you do this step please comment to let me know how it worked and what editor you used.
Alternative #3
Grammarly works just fine in the SteemAuto editor.
If you compose in Stackedit and use SteemAuto's post scheduler, you can copy and paste your content into their text editor and Grammarly will work just fine.
So you can make the edits you need to right in your post without having to go back and forth to fix it. And there's only one copy and paste that you'd have to do anyway.
The formatting is preserved this way, and editing can be done easily.
If you don't know about SteemAuto you can find a starter's guide in our resources section on the Dynamic Steemians Discord. It tells you how to get started with it and how to follow curation trails.
But once you're setup and have your account, it's easy to see where the schedule posts go.
I'll add making a video of scheduling a post to my to-do list though, so it covers just what you need to know about posting.
The easy way to format your headlines
In a previous class we talked about writing the perfect headline.
But we didn't cover how to format it.
There's two parts to this: Proper English grammar for titles and how to do it in markdown.
There are specific rules in English about how titles should be written. They include things like which words are capitalized, which ones aren't, and all those silly rules.
As I mentioned last time, I'm not crazy about grammar rules and often get hives thinking about them.
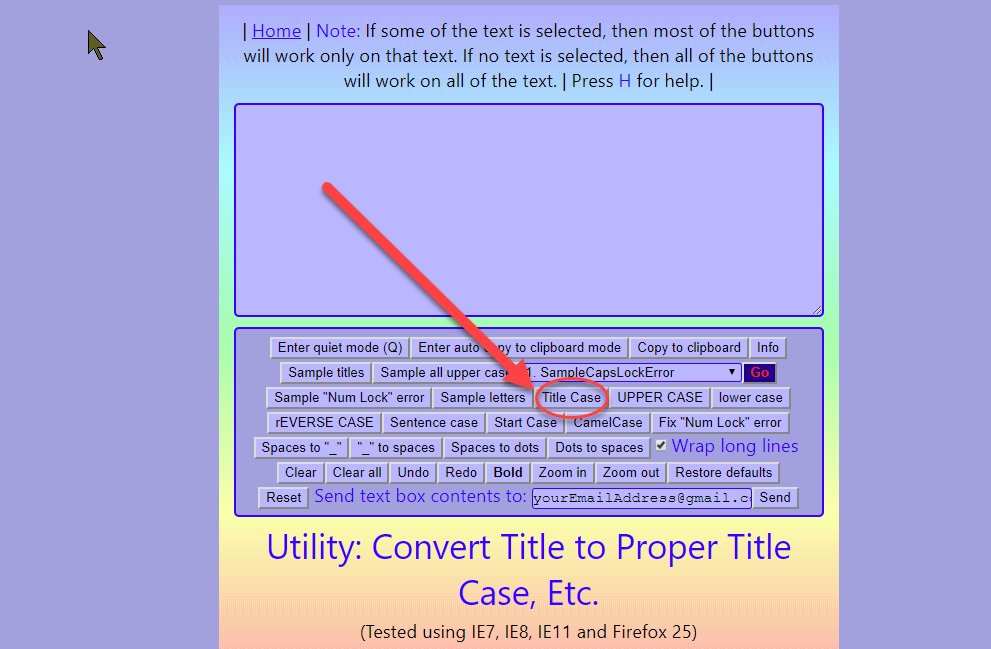
So when it comes to headline,s I use a tool that takes care of the formatting for me. It's called LLBest.
And it's a website straight out of the 1990s:

Pretty, isn't it?
Don't let all those buttons scare you. The only button you need is the one in the circle at the end of the long arrow.
All the other buttons are there to help you learn how to make the correct form of a headline - or title as the website calls it.
So feel free to explore and learn the rules if you want.
But all you need to do is copy and paste the headline you have - or type it in - to the big text box at the top.
Then click that button that says "Title Case" and voila!
Your headline/title is now formatted according to the proper grammar rules.
This tool is for the lazy (like me) or the unsure (like me) but who care about getting it right.
Now if you've read my posts, you might have noticed that I don't follow the rules at all. Most of the time anyway.
I make a stylistic choice to use lowercase words in my title (excpetions for the first word and proper nouns).
To me it feels more relaxed and friendly. But it is technically incorrect. If I were writing for my clients I'd use the LLBest tool to make sure I had it right. Or if I'm writing something more formal that calls for it I'll use the proper way.
You can get away with a lot when it comes to blogging so if you decide to do something that is not technically correct, just be consistent about it. Once people realize that's your "style" then you're good to do it the way you want.
Be prepared though, to recieve helpful advice on how to fix it from your readers that know and care about doing it right.
My daughter and I have get along really well, but when she is reading my writing she goes bonkers on the stylistic choices I make. She's not wrong of course, but I almost always refuse to change it unless its something that needs fixing because of clarity or flow that would hurt the readers experience.
But I digress...
Here is the link to the website:
LLBest - Utility - Convert Title to Proper Title Case, Etc.
Who wants 3 shares in @steembasicincome?
Yesterday I posted my Introduction Post Contest. The winner will get 3 shares in sbi. You can find out how awesome that is by visiting them @steembasicincome.
You can see the full description and rules in the announcement, but here are the basics:
All you need to do is write an amazing intro post! That's it.
Ok, there are some caveats. The winning post will meet the following criteria - as judged by me:
- Has an attention grabbing headline
- There is an engaging opening that makes the reader want to keep reading
- At least 2 photos that help tell your story
- Is formatted for easy reading
- Well organized and obviously planned out
Bonus points if you make sure you've put all your commas in the correct places. You can see the summary notes for Session 5 to see why.
Contest runs:
Start of contest: Monday April 16 12 am Eastern US
End of contest: Sunday April 22 12 pm Eastern US
The Winner will be announced during my live class on the 22nd. You don't need to be present to win, but if you're awake and online please stop by!
See the full rules here:
Intro post contest rules


If you have any questions about this content, please let me know in the comments. Or better yet, click the banner to join my channel on Dynamic Steemians' Discord!

Remember you can post any question at any time. You don't need to wait for a live session.
Note: All images are mine or licensed from Adobe except for the Dynamic Steemians' banner except where noted. This was thoughtfully provided by @baa.steemit.
