
What a journey it has been! What started as a far fetched idea has now nearly become reality as we reached the final two days of build! The most important work happening was the plastering of the roof structure. The volunteers were all busy mixing cob and plastering the outside and inside walls. We also had a lot of glass bottles that formed part of the main load bearing walls, and these were also being plastered so that just the bottle face showed and everything was flush.
Day 13: Plastering The Walls
The final plastering is something that can make or break the final look and feel of a wall. It isn't easy to get certain finishes, and a smooth glossy finish with zero cracking and a long life is one of the harder things to achieve. It takes some skill and experience to know the right mix of dirt, clay, sand, and water that is required. Not only is the mix critical, as well as the mixing itself, but also the application of the plaster is a very skilled process. It takes quite a lot of time to rub a good mix until it forms a good seal, and timing is everything. For this reason its not even worth trying to achieve a perfect finish if you are new to plastering, and for me it wasn't even something that I particularly desired. I like a rustic look and feel, and so a more course finish not only looks nice, but makes the whole process a whole lot easier. If i really want to nail the plastering in terms of strength and durability then I add about 10% cement or limestone. This provides a fast and cured plaster that can withstand much more wind and rain and sun without cracking. Since the final plaster is very thin you don't use much cement at all, and so there are times when I am happy to use it. Limestone is definitely preferable to cement in many ways, but the availability and long curing times can make it unsuitable in many scenarios.
Since we had plenty of clay and roasting hot conditions I did not use cement in the final plaster on Earthship Ananda. In fact, the cob started to dry too fast, which can also cause cracking and the plaster may pull away in large chunks if it is put on too thick. Therefore you should really cover a mud plastered wall to protect it from both sun and rain whilst it dries. A few thin layers work much better than one thick one if you have the time! We had already filled the gaps and covered the tyres with a very rough cob mix as we were making the wall, and that had already dried. This initial rough mix also contained chopped hay or straw to help bind it all together. In order to get a good adhesion to the new plaster we first dampened the wall with water until it was nice and wet. It's even worth waiting a bit after you wet it to let the water absorb. Then when you add the final layer of plaster it will hold and bind well. We also made sure that the rough plaster had many scratches and lines in it so that the final plaster would grip well. This is done with a tool or any hard object when you finish applying the rough coat (scratch coat).
Once you get a wall plastered you do need to seal it! That final seal is very helpful to prevent weathering and also for waterproofing. There are many options for sealing mud plaster, and some are more eco-friendly than others. That choice depends on you and your personal priorities. In my case we had almost no options due the lack of materials in a remote part of India. We had 2 options basically, Linseed Oil and Floor Wax Polish. I have used linseed oil before on Earthship Karuna and really loved it for many reasons. It is non-toxic and leaves a beautiful shiny finish when done properly. It also seals very well and penetrates into the plaster itself and sets it all like a resin. This means that it also helps to reduce cracking over time as it really binds the plaster. The main drawbacks are that it takes several weeks to do it properly as you need to add at least 3 or 4 layers with decreasing dilutions of thinner each time.
Floor polish is not something that most people would think of or use to seal mud plaster, but in the end this was basically my best and cheapest option. This polish is something that is normally rubbed onto clay tiles and concrete to seal, polish and protect the material from water, stains etc. I couldn't see a problem with using it on our walls and it was very easy and quick to apply. We used rags and just rubbed the polish on as much as we could. It does take quite some rubbing to really get the polish to blend in and seal well, but it was easy and fun work compared to pounding tyres all day! It actually worked really well, and you could see the lovely sheen come through as we worked. Earthship Ananda was looking beautiful and I felt like a proud father!
The hardest part of these last two days was that roof! This job is actually quite easy IF you have done it before and know what you are doing. The maisoners I was using had never done anything like this and were very uncomfortable with it. This meant that they worked very slowly, and also had some issues keeping that lovely metal roof frame in shape! We supported the inside of the dome roof with long wooden sticks to make sure it didn't deform, but since everyone had already squeezed the whole frame between two trees two days before, it wasn't really looking so wonderful!
Day 14: The Grand Reveal!
On the last day we took an infinite number of photos between us! The volunteers has an amazing time, and were all very proud of themselves for achieving this. I was also proud of them for sticking with it. Almost no one left the group during the whole two weeks, and the only ones that did leave had to go for personal reasons. In just one or two weeks you can really pick and and learn quite a few important skills. Whilst you will never learn everything you need to know in a workshop, you can definitely learn the basics and the most important mistakes to avoid. Every build is different and there are never really two builds that are alike.. especially when you are working using whatever resources you have available, rather than shipping in whatever materials you want.
I also learned a LOT during this first dedicated workshop of mine. I did my best to prepare and I also faced very difficult circumstances with having no support very unreliable labour and preparations. I learned a LOT about managing a group and the best ways to organise things so everyone is happy and we are also productive. I was totally exhausted by the end of it, and had deal with SO much over the two week build. Luckily I was at an Ashram so I was in the best place to recharge, relax, and center!
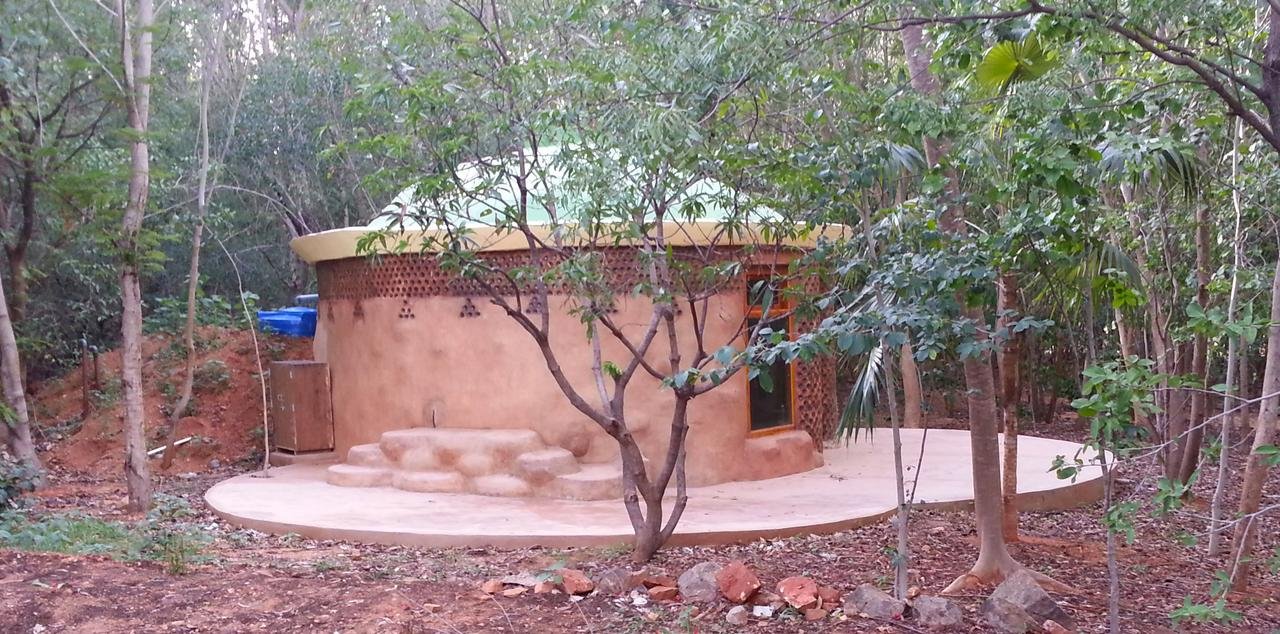
And now, for the grand reveal!
These pictures were taken a few weeks later after the local labour finished the balcony and roof.
My partner @clara-andriessen in her lovely sari!

Side View Of Earthship Ananda With Clara and Yours Truly!
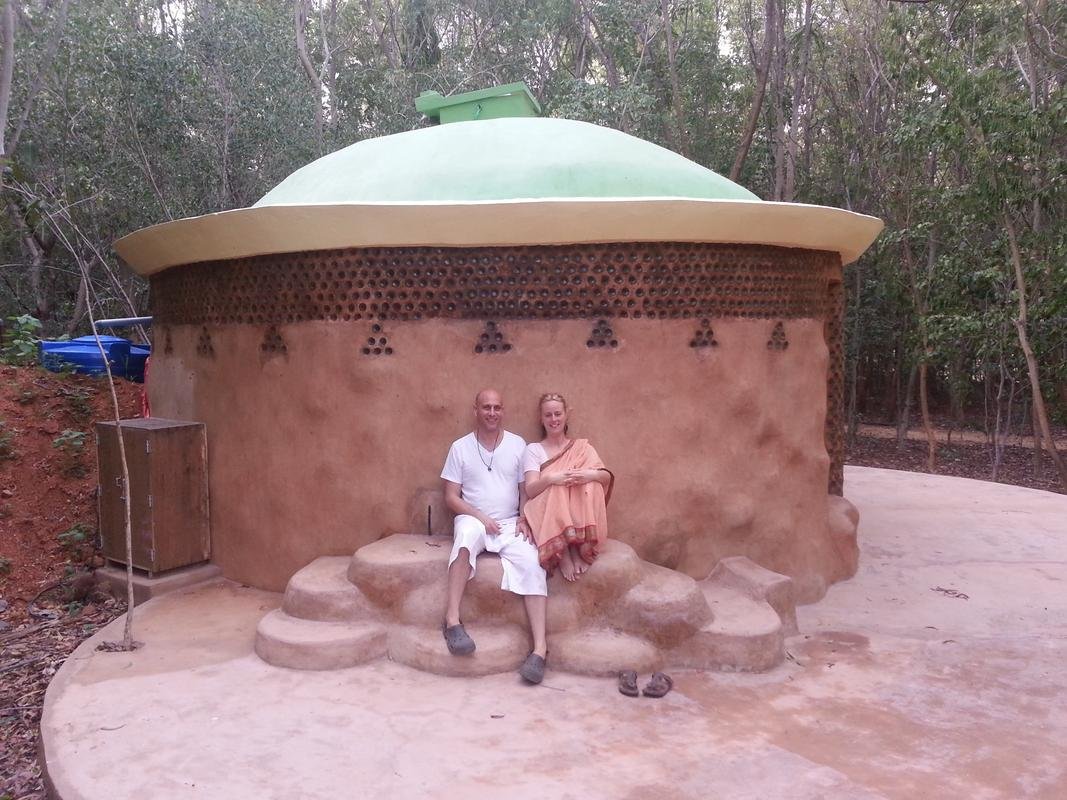

Earthship Ananda was built as a meditation space for people to use. It sits in a very special forest and I hope that over time it will bring much joy and healing space for whoever may come to use it. I am told that whenever people pass through and see it they all comment how lovely it looks.. Especially compared those square, cement monstrosities that we are all so used to!
I have demonstrated that it is possible to build a tiny eco'home' very quickly and at very low cost. Whilst Earthship Ananda doesn't have any water systems, solar power or many other features of an Earthship, it is a bare bones structure that is usable and will last for many many years to come. Now I had this under my belt I felt more confident about doing these kinds of workshops, and it wasn't long before I hatched a new plan to build a small labour room where I live in Karuna Farm for our Nepali workers, again in just two weeks! This will be my next series so please do stay tuned for that!
DID YOU MISS ANYTHING? READ PREVIOUS PARTS HERE
-
INTRODUCTION: Build a Tiny Earthship in 2 weeks on a $3,000 budget with 30 unskilled volunteers!
-
Days 1-3. "Build a Tiny Earthship in 2 weeks on a $3,000 budget with 30 unskilled volunteers!"
-
Days 4 - 6: "Build a tiny Earthship in under 2 weeks on a $3,000 budget with 30 unskilled volunteers!"
-
Days 7-9: "Build a tiny Earthship in under 2 weeks on a $3,000 budget with 30 unskilled volunteers!"
-
Days 10-12- GLASS BOTTLE WALL AND ROOF: "Build a tiny Earthship in under 2 weeks on a $3,000 budget with 30 unskilled volunteers!"
Thanks for being here with me and the ecoTrain!
We are a small community that support each other because we love what we write.

check our our ecoTrain magazine at @ecotrain
If you love to write, and would like to join the ecoTrain community as an official passenger please email me on steemit.eco.train@gmail.com
** Click Here For More Information on the ecoTrain **