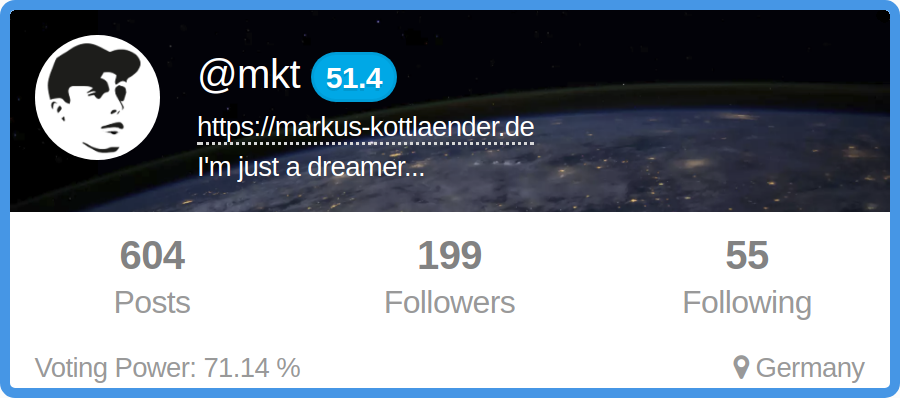
I took the new cover image feature as a motivation to further improve my Steemit Website Plugin. You can now use the ${COVERIMAGE} placeholder to use the cover image in your profile template as a background for example. The demo implementation looks like this:

Pretty neat, huh? :D If you want to use this version right away, it's very simple.
Here is how:
1. Place an empty div in your website's HTML where you want the widget to appear.
<div id="steemit-profile"></div>
2. Place this code at the end of your HTML body, right before the closing </body> tag.
<script src="https://cdn.steemjs.com/lib/latest/steem.min.js"></script>
<script src="https://mktcode.github.io/steemit-widgets/assets/js/steemit-widgets.min.js"></script>
<script>
  steemitWidgets.profile({
    user: 'mkt',
    element: 'steemit-profile',
    template: '<article class="uk-comment"><header class="uk-comment-header uk-text-left" style="background: url(${COVERIMAGE}) center center; background-size: cover;"><div class="uk-comment-avatar" style="background: url(${IMAGE}) center center; background-size: cover; width: 50px; height: 50px; border-radius: 36px;"></div><h4 class="uk-comment-title"><a href="https://steemit.com/@${USER}">@${USER}</a> <div class="uk-badge uk-badge-notification">${REPUTATION}</div></h4><div class="uk-comment-meta"><a href="${WEBSITE}">${WEBSITE}</a><br>${ABOUT}</div></header><div class="uk-comment-body uk-text-center"><div class="uk-grid"><div class="uk-width-1-3"><b>${POSTCOUNT}</b><br><sup>Posts</sup></div><div class="uk-width-1-3"><b>${FOLLOWERS}</b><br><sup>Followers</sup></div><div class="uk-width-1-3"><b>${FOLLOWING}</b><br><sup>Following</sup></div><div class="uk-width-1-2 uk-text-small uk-text-left">Voting Power: ${VOTINGPOWER} %</div><div class="uk-width-1-2 uk-text-small uk-text-right"><i class="uk-icon-map-marker"></i> ${LOCATION}</div></div></div></article><style>#steemit-profile{border-radius:6px;max-width:360px;background:#fff;border:4px solid #4696e5}#steemit-profile .uk-comment-header{margin-bottom:5px;border:none;border-bottom-left-radius:0;border-bottom-right-radius:0}#steemit-profile .uk-comment-avatar{background-position:center center;background-size:cover;width:50px;height:50px}#steemit-profile .uk-comment-meta,#steemit-profile .uk-comment-meta a,#steemit-profile .uk-comment-title a{color:#fff}#steemit-profile .uk-comment-body{color:#999;font-size: 18px;line-height: 24px}</style>',
    reputationPrecision: 1
  });
</script>
Obviously you have to replace 'mkt' with your username.
3. I used the UIKit CSS framework, so you have to add it to your <head>.
<head>
  ...
  <link rel="stylesheet" href="https://cdnjs.cloudflare.com/ajax/libs/uikit/2.27.4/css/uikit.almost-flat.min.css" />
</head>
UIKit is fully prefixed, so you can include it without messing up your existing styles. Maybe I decouple the demos from UIKit and use only custom styles in the future.
4. Checkout the documentation to see what more you can do with my plugin.
You can display not only profile information but also whole blogs or feeds and the new, hot and trending pages for a given tag or just all posts. The HTML output is completely customizable.
jQuery
The last time I wrote about it it was still a pure jQuery plugin. I decided to decouple it for those who don't use jQuery, while still supporting the syntax for those who do.
// standalone
steemitWidgets.profile({
  element: 'element-id',
  ...
});

// jQuery
$('#element-id').steemitProfile({...});
Upcoming
- display whole posts, including comments
- embed code generator with styled templates for easy copy/paste implementation
- ...?
If you have any more ideas, wishes, criticism, problems, whatever... please share in the comments! I'd really love to see some of you trying it out and giving me some feedback.
Also check out the:
GitHub Repository
GitHub Repository

Nature/Environment/Sustainability
Creativity/Programming
shared and original content
