Introduction
Following my post on creating the Steemithelp website yesterday I would like to share my recently finished "Quick Start Guide" for new users. The aim is to provide a step by step way for new users to register and make their first post in a simple and easy to follow way.
Please let me know what you think and if you spot any mistakes - once I have corrected any errors I will be posting it up on the Steemithelp website as a permanent resource.
I have already made some new additions to the website by adding my Markdown Guide for Beginners and the latest version of the Steemit Etiquette Guide.
As stated previously please let me know what other kind of resources you would like me to add to Steemithelp and if you want to point new users to the site the link is:
Registering on Steemit

Prerequisites before starting
You will need the following:
- An active email address.
- An active mobile phone number.

The following would also be helpful and are strongly recommended:
- A password manager/generator.
- A notepad or other suitable place to jot down your password, username etc. or alternatively a printer so you can print out a hard copy for safe storage.
- A cup of coffee/tea or another beverage!
OK if you have the above then go to Step 1:
Step 1- Open your browser and go to: https://steemit.com/
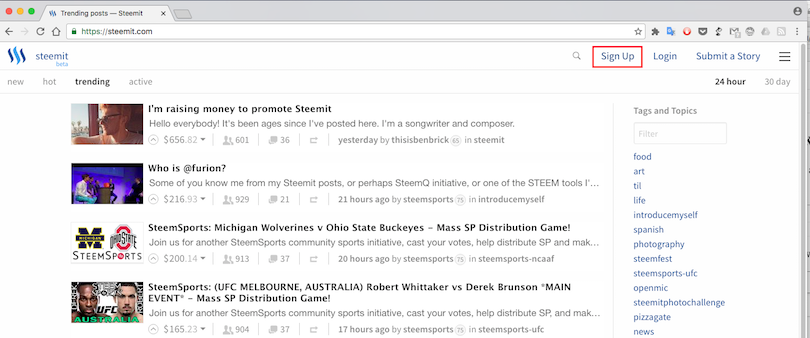
You will see a page similar to this.
Step 2 - Click on the "Signup" Button
This will bring up the email entry page.
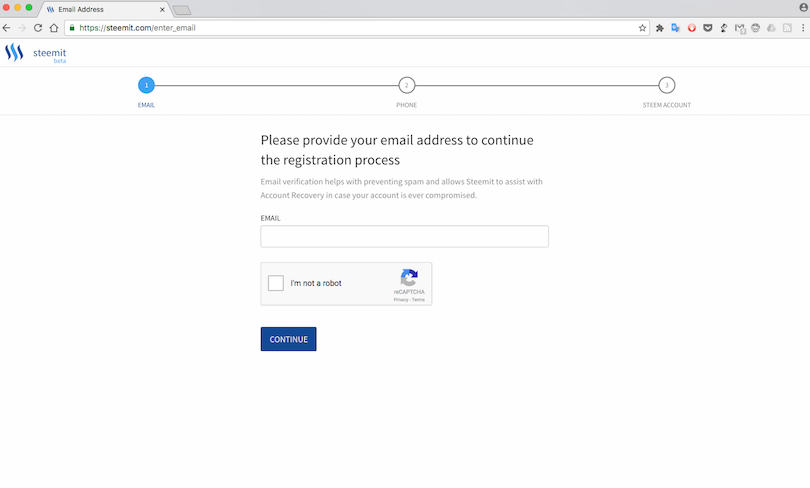
Step 3 - Enter your email address and click the check box to confirm you are not a robot.
This will bring up a captcha task like this:
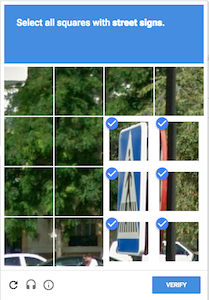
Step 4 - Complete the Captcha Task and click "Verify"
This will bring up the following page asking you to check your email:

Step 5 - Check your email for a message like this and copy/paste the link into your browser:
You could just click the link but it is probably good practice not to click links in your email directly.

The link will open the following page in your browser:
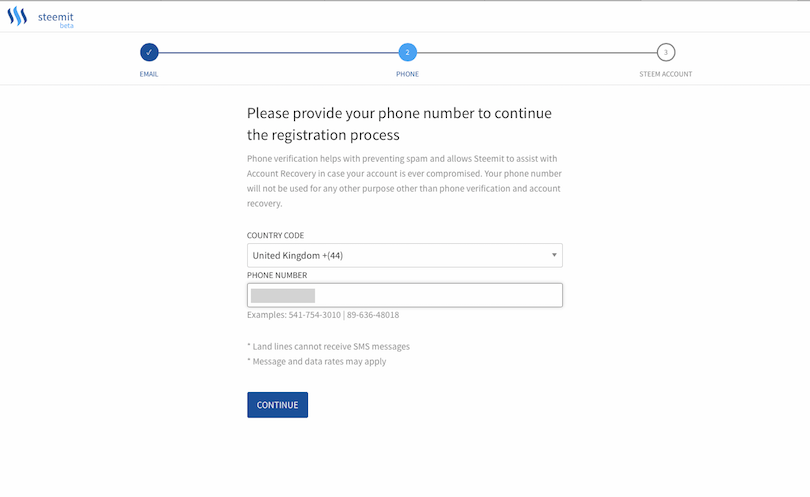
Step 6: Select your country and enter your mobile phone number on the next page and click continue.
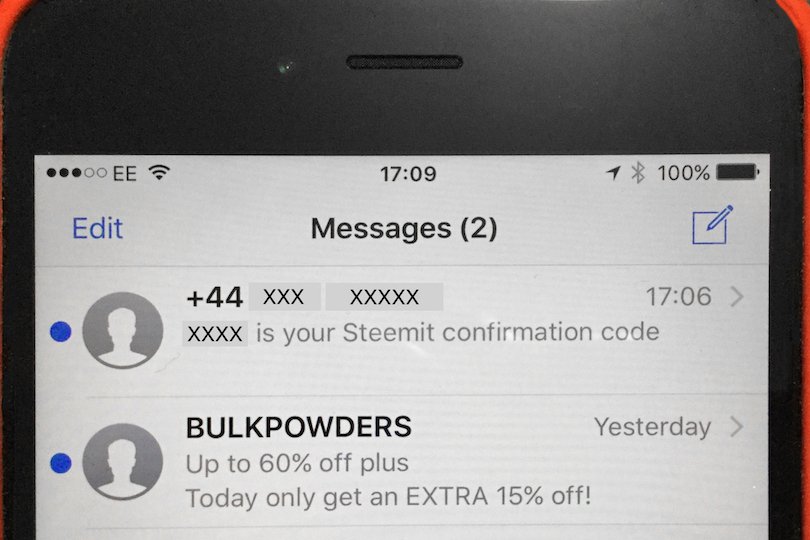
Step 7: Check your mobile phone for a text message
I have obscured the details here for security reasons.
Step 8: Enter the confirmation code into the browser window (which will look like the image below) and click continue.

Step 9: Choose a Username and Password
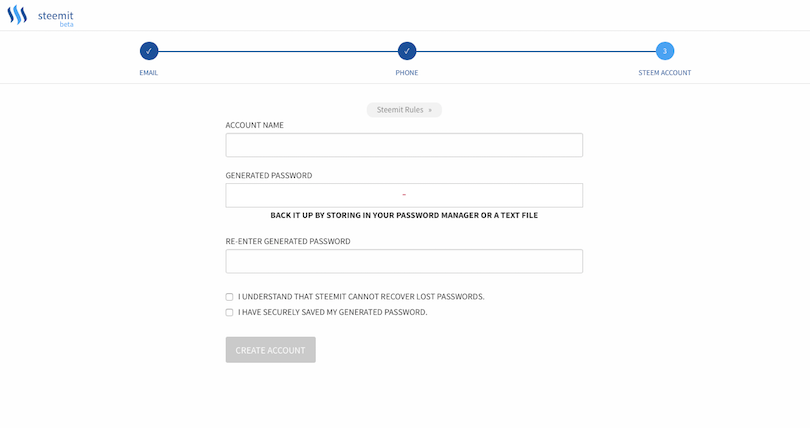
Make sure you do not forget either of these. Your password should be secure and I would recommend using a password manager. It is also good practice to keep a hard copy (in paper form) for all your passwords - keep it in a safe place though.
Step 10: Check the password related boxes and click "Create Account".
If everything has worked your new account will be created. Depending on your browser settings you may need to login again.
Well done! You are now ready to make your first post on Steemit.
Making your first post
When you login to Steemit you will see a page like this or if you are already following some people you will see a different feed composed of the people you are following.

Either way you will need to click on the "Submit a Story" Button (see image above) to take you to the posting page.
The Posting Page - Default View (Markdown Editor)
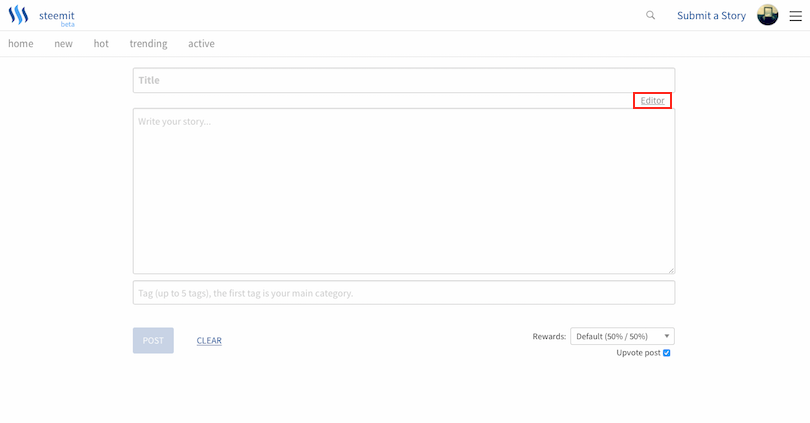
This will bring up the Markdown editor which is the default editor view. Markdown is special way of formatting text using various symbols which is a lot simpler and faster than using .html or word processing tools.
For a basic guide on Markdown have a look here. If you are not familiar with Markdown and want to get posting right away you can switch to the WYSIWYG (What You See Is What You Get) style view by clicking on the button indicated above by the red rectangle.
This will change the view to the following:
The WYSIWYG Editor (Word Processor Style)
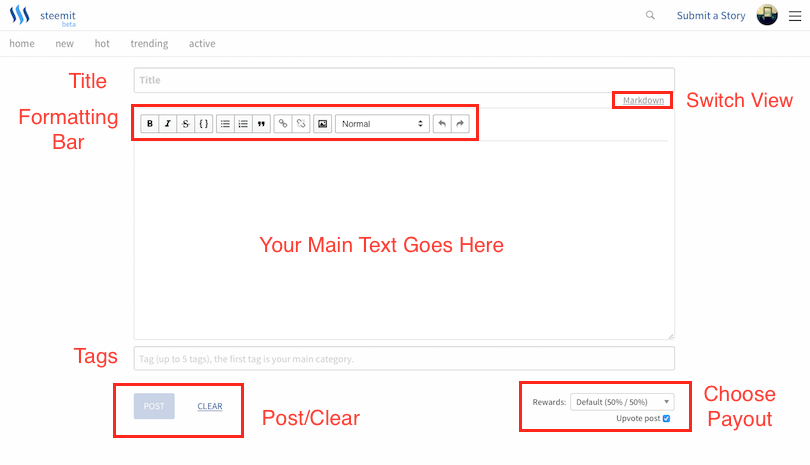
This is pretty easy to understand but I have labelled the different sections for you just in case you have any problems. In this view the formatting bar works very much like in a word processor. You will need to select your text and click the appropriate button to format it.
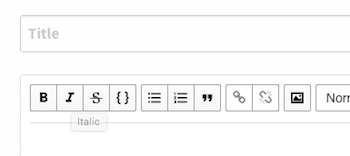
Hovering the cursor over the toolbar will bring up tooltips to show the function of each button.
For your first post you may want to write something about yourself by way of an introduction. Choose a suitable title e.g. "My Introduction". Write some text about yourself in the body - what you write is purely up to you. Often people will use their first post as an opportunity to post a photo of themselves and they may also use it to provide some verification (read about verification here).
Adding Images
You can add images using the "Image" button shown below:

At present you can't upload images directly to Steemit. You need to use an image hosting site which will provide you with a link to insert into the editor.
There are lots of options but the easiest and quickest to use is Imgsafe as you don't even need to register:
Uploading your first image using Imgsafe.org
Go to: https://imgsafe.org
This is what the Imgsafe page looks like. You can register and login but you don't have to.
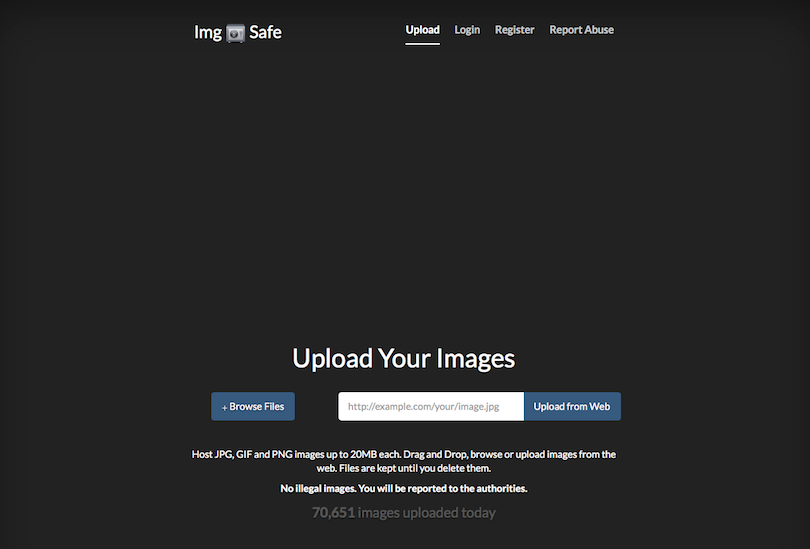
You can either browse images on your computer to upload or simply drag and drop them as below.
This will bring up a thumbnail of your image and an upload button. Click the upload button.
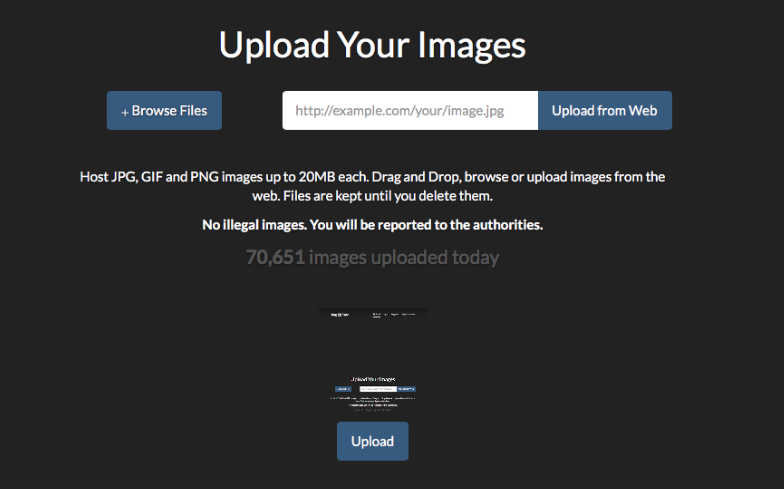
Once it has uploaded right click on the thumbnail and select "Copy Link" - or "Copy Image Address" - it may vary if you are using a different browser.
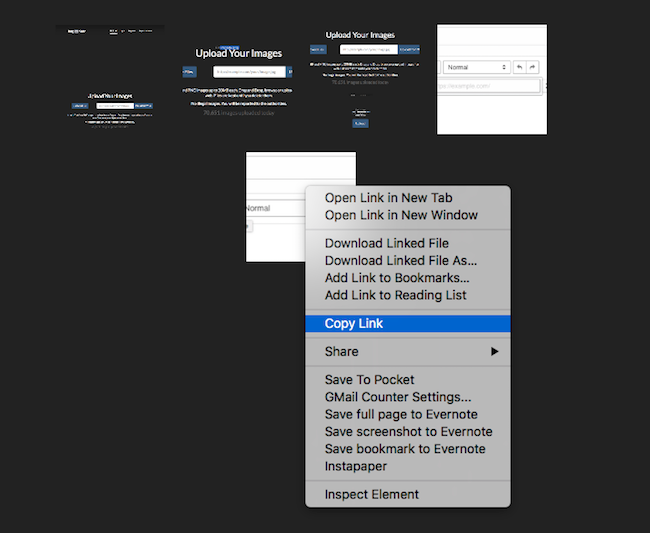
You can now paste that link into your document by clicking the image button and inserting the link text as shown below:

Tag your post
Next choose some suitable tags such as "introduceyourself" (the common tag for introductions) and anything else that applies to the content of your post. The tags need to be plain text separated by spaces.
Choosing your rewards
Unlike other social networks or blogging platforms when people vote for your post on Steemit you get paid a certain amount of money (in Steem/Steem Dollars). You can receive this a number of ways. To learn more details about this I would recommend reading this FAQ.
Clicking on the triangle next to Rewards will bring up 3 different choices.
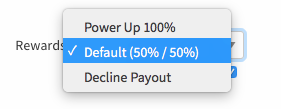
The default payment method is a 50:50 split between Steem Power and Steem Dollars (or liquid Steem depending on economic factors). You can also choose to get payed fully in Steem Power - the option labelled "Power Up 100%" and you can also decline payouts.
The last step clicking the "Post" button
If you have done everything correctly the "Post" button will no longer be greyed out. It's a good time to double check your text and make sure there are no typos or other types of mistakes. Note if you do make a mistake you can edit your post after posting it for up to 30 days.
If you are sure everything is fine, then you are ready to post:
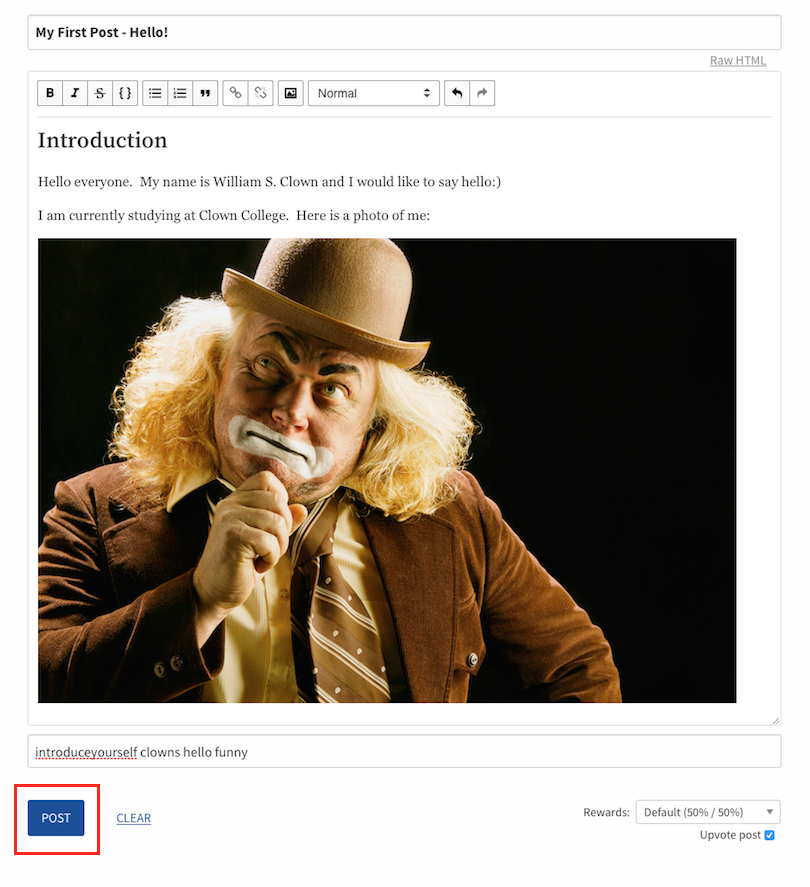
Click "Post" and you will be taken to the "New Posts" feed on Steemit where your post will be at the top:
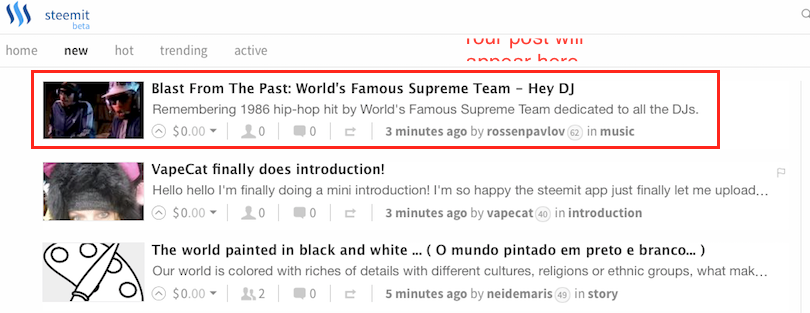
(Note the post shown in the image above is a different post from the previous image as it was merely a mockup for illustrative purposes and I wasn't going to post it!)
Congratulations! You have made your first post on Steemit.
So you made your first post what next?
You will receive notifications on your home page if anyone responds to your post (next to Replies) as shown in the image below:

You can also promote your post in various ways. For example at the bottom of your post (just above the comments section) is a footer bar with a share button.

Clicking on this allows you to share on other social media sites as shown below:

If you need to correct any mistakes in your post the "Edit" button is in the same footer (next to the "Reply" button):

You can also share your post in various other places such as the Steemit Chat. For further information please check out the FAQ and also Steemit itself as new services are being launched all the time.
How you can help
Please let me know if you spot any mistakes in this guide or find anything unclear. I have also deliberately removed personal details to avoid being spammed and cold called. If you spot anywhere that I forgot to do this please also let me know:)
Also don't forget to send new users to the Steemithelp.net website.
I have provisionally added this post to the website here in case you would like to see it how it looks on there.
Your Reward for Reading:)

If you like my work and aren't already, please follow me and check out my blog (I mainly discuss photography but I do other topics too) - @thecryptofiend
Photo Credits: All photos are taken from my personal Thinkstock Photography account. More information can be provided on request.
(Verification for me here: http://www.aapicture.com/about-me)
Some of my other recent posts
- Steemithelp.net a new resource for helping new users (with an updated version of the "Missing FAQ")
- Idea for Steemit - Tiered Voting Power Regeneration According to Vests
- More Polaroid Photos of Rachelle (Part 3) - free photos for you to use in your own posts
- TIL what JAM is and you might be surprised by the answer.
