Image Processing
In this series ("Basic Astrophotography") I've spoken more about the mechanics of obtaining photographs of the night sky. However, the image processing steps that follow are essential in obtaining a good or even scientifically valuable image. Here I will begin discussing image processing. Some of these tips may also be useful for ordinary daytime photography.
Introduction - Workflow
A typical workflow for processing astronomical images goes like this:
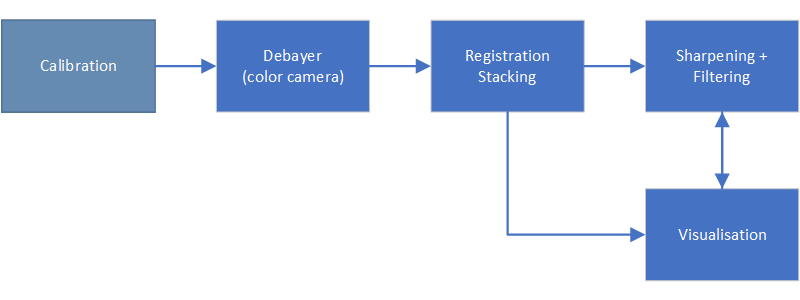
Those steps, run in the order shown, can be summarised as follows:
- Calibration - removal of imaging defects caused by camera and optics.
- Debayering - the process of turning a raw image from color camera into color.
- Registration - alignment of images
- Stacking - combining multiple images together to improve Signal to Noise ratio (i.e image quality)
- Sharpening and Filtering - Enhancement of image
- Visualisation - Presenting the image in a form useful or pleasing for the viewer
In this post I will look at Calibration, Debayering and Registration.
A quick word about Image formats
Before we start most people will have worked in jpeg as this is the most common output from digital cameras. Although the steps described in this article will work to some degree, it usually best to record in a raw format. Raw format is generally more usable by astronomical processing packages.
When working with astronomical images the most common format is FITS. Raw formats from cameras can be readily imported as FITS into many astronomical packages.
Calibration
A raw image will not only contain the object of interest but also unwanted defects such as noise, vignetting and dust shadows. Many of these defects can actually be removed using the calibration processes I am about to describe.
Not everyone performs calibration, and in some cases, it may not be necessary. However, if the images are to be used for scientific purposes it is highly recommended to perform calibration. This is particularly important in the field of photometry.
Bias and Dark Frame Subtraction
Even in complete darkness, the individual pixels in a sensor will register a small signal due to the accumulation of Dark current. As each pixel registers slightly different levels of dark current (due to manufacturing tolerances) an unwanted pattern will emerge in the image as exposure increases. This variation in dark current will manifest as hot pixels as the exposure time increases.
Astronomical cameras often incorporate a cooling system design to reduce the sensor temperature to -20 Celcius or lower. The advantage of cooling the sensor is to reduce dark current since it is a function of temperature. However, even at low temperatures, each pixel will register slightly different values for zero illumination. These values for zero illumination are called bias levels.
To obtain a dark calibration frame it is a simple matter of taking an image with the same settings but with the optical system capped off. Here is a practical example of the improvement from dark frame subtraction.
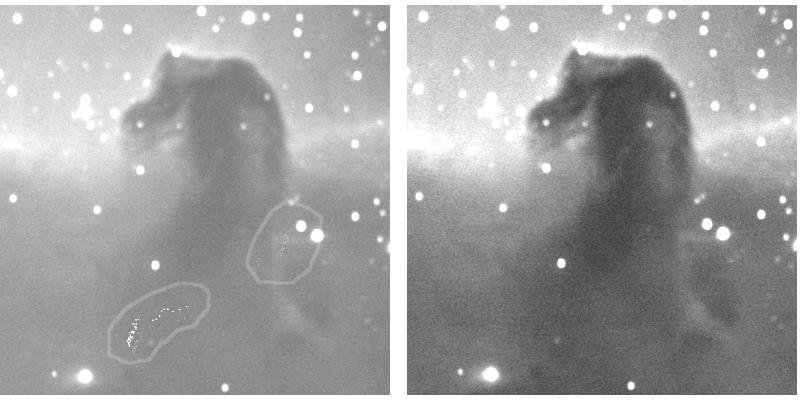
*The LEFT hand image is an image that hasn't been dark frame calibrated, note the presence of "hotpixels" which have been circled. After dark frame calibration the RIGHT hand image is the result. Note the hotpixels are gone.
Flat Fielding
Most optical systems exhibit vignetting which is the darkening effect away from the center of an image. Vignetting can be corrected using a flat field image, which is an image taken of a blank uniform screen. The following image shows the effect of flat fielding. Note how it corrects the strong vignetting and dust mote shadows.
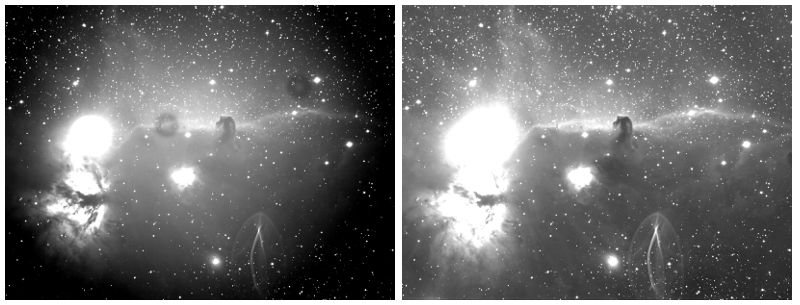
The LEFT hand image is an image that hasn't been flat field calibrated, note the image is highly vignetted and the shadows of 2 dust motes can be seen. The right hand image has been flat field calibrated and as a result the previous defects have been removed. Image Credit: Author
Cosmetic correction
Image sensors typically have at least several million pixels/image wells and even with best manufacturing processes, there will be some that are faulty. Many software packages have a function built in that allow these to be removed, typically replaced with an interpolated value from adjacent pixels.
Debayering
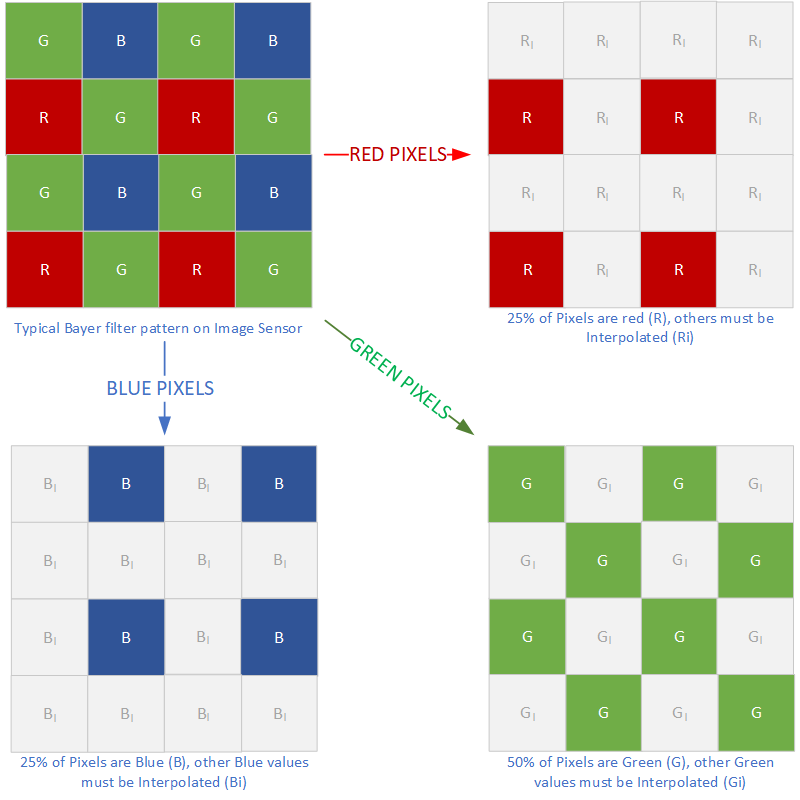
Most color sensors use a bayer filter, which is an overlay of color filters, to record color information. Because each pixel is only sensitive to either Red, Green or Blue, interpolation from neighboring pixels must be used to fill the missing color values
Debayering is the actual process of converting a greyscale raw image from a color camera into a color image. As odd as it may seem, most color cameras have monochrome sensors overlayed with a Bayer filter. The Bayer filter is a layer of alternating red, green and blue filters that sit over the sensors pixel array.
In order to sample color, the filters are arranged over the sensor's pixels in a repeating pattern of red, green and blue (as shown in the diagram above). This means there are gaps in color sensitivity, for instance at a blue pixel there will be no green or red data. To fill in the gaps interpolation must be done to estimate color data from neighboring pixels. This process is called debayering. Without this interpolation the image quality would be quite bad.
Luckily, astronomical image processing packages do the debayering for you. However it is important that this is done prior to the registration step that will discussed next. Failure to do this will erase the color data.
Registration
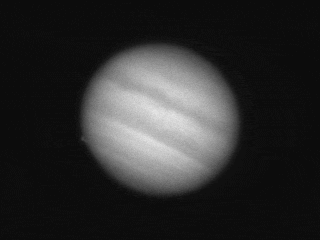
Registration is the process of aligning images. Quite, often errors in the telescope drive will cause objects to drift around over time. So if the images are combined or stacked without registration they will blur out detail. The following animated gif's of Jupiter demonstrate registration.
.
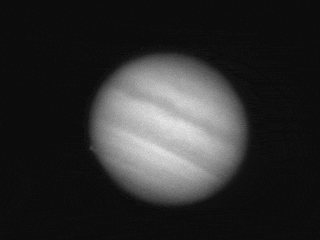
Without Registration : The video footage on the right is exactly how Jupiter is recorded through a telescope. As can be seen the planet moves around considerably which is because of slight movements of the telescope and small errors in the tracking mount. At this resolution even stamping on the nearby ground will cause visible movement.
With Registration : After registration the images are aligned so that object of interest remains stationary as can be observed here. There are many different software options for registration, the one performed here is similiar to the Centroiding method described below.
There are a number of different type of image registration, I will descibe some common ones here:
Registration Methods
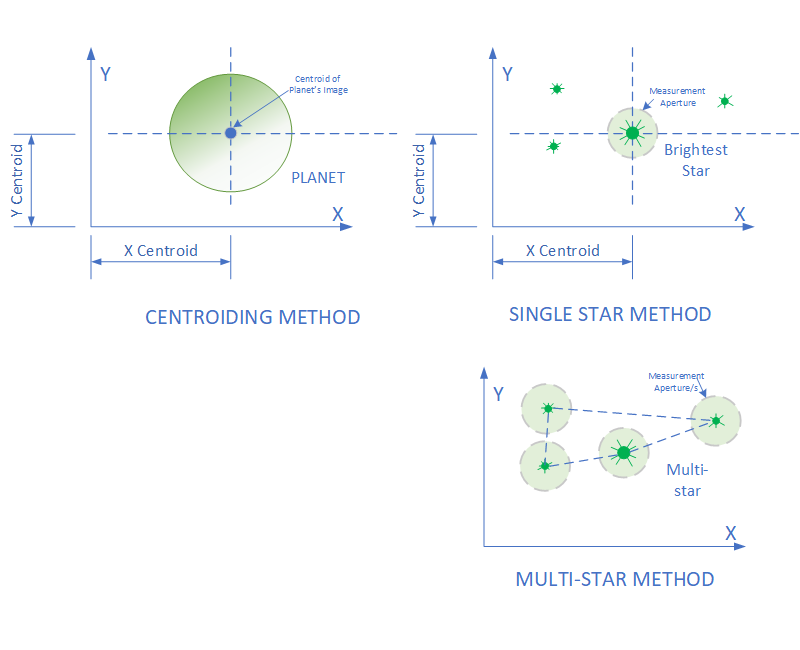
Some Common registration methods, described in more detail below
Centroiding : A registration technique that computes the xy centroid of an image, usually above a certain threshold brightness. This is repeated for each image in a set, and the images are shifted so that the xy centroid value is the same. This is very effective for centering bright planets.
Brightest star : Almost identical to Centroiding, except the brightest star is selected in the image and a measuring circle is placed around the star to compute the centroid. Selection of the star can be done either automatically or manually.
Multi-star : This is a further development of the previous 2 methods in that a star detection method needs to be used to first identify stars within an image.
Once stars are found in the image, the centroids are calculated using a radius around those stars. A pattern matching algorithm is then used to match the stars across a set of multiple images.
Unlike the other methods there a more options than simply computing an offset shift for each image. It is possible to also compute rotation and distortion transformations for each image relative to the reference image.
This method gives the best results for star fields, but is slow because of computational work required.
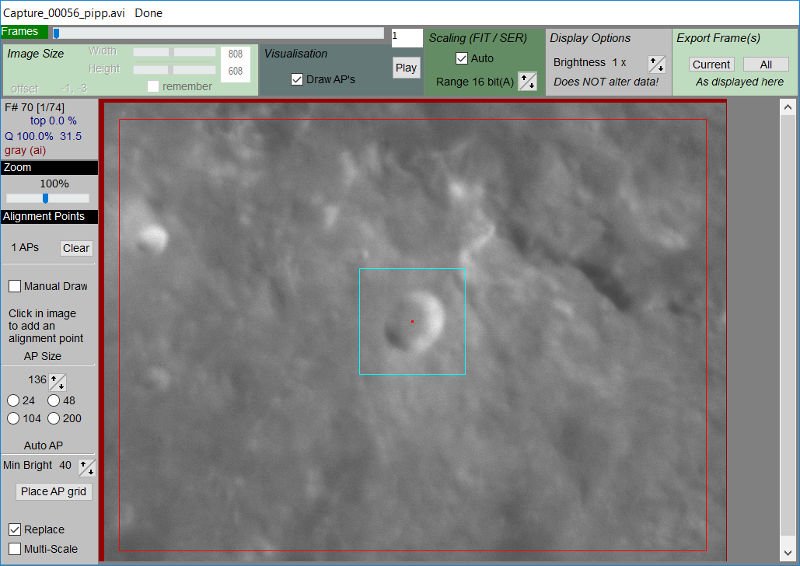
Multi-Anchor : A number of applications including Autostakkert and Registax implement more complex registration methods that allow the distortions caused by atmospheric turbulence (called "seeing") to be partly compensated for.
These methods use anchor or alignment points to lock on to small detail within the planetary surface and create distortion maps that can be used to better align detail and result in sharper detail in the final image.
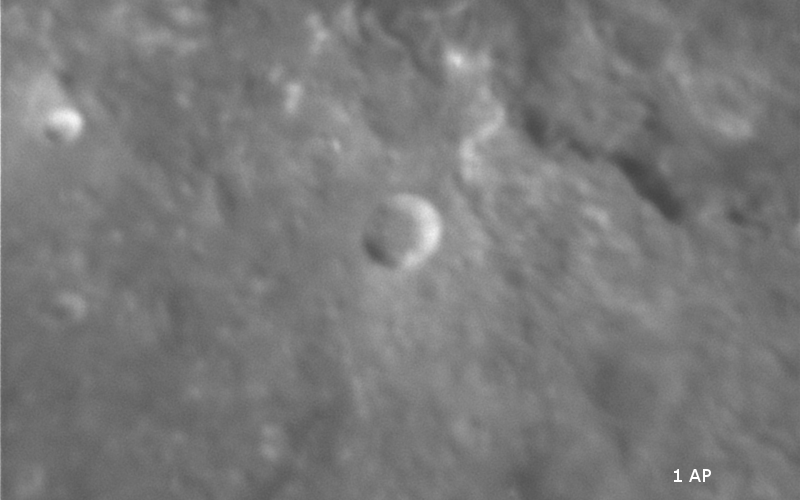
Multi-Anchor Example : The best way to see how this method works, look at this comparision of images of the moon. There were 40 individual image frames of the moon used for this example.
Example 1 has been setup to use only one alignment point, the crater in the centre. The alignment point appears as the blue square.
Example 2 has been setup with 38 alignment points distributed around the image frame.
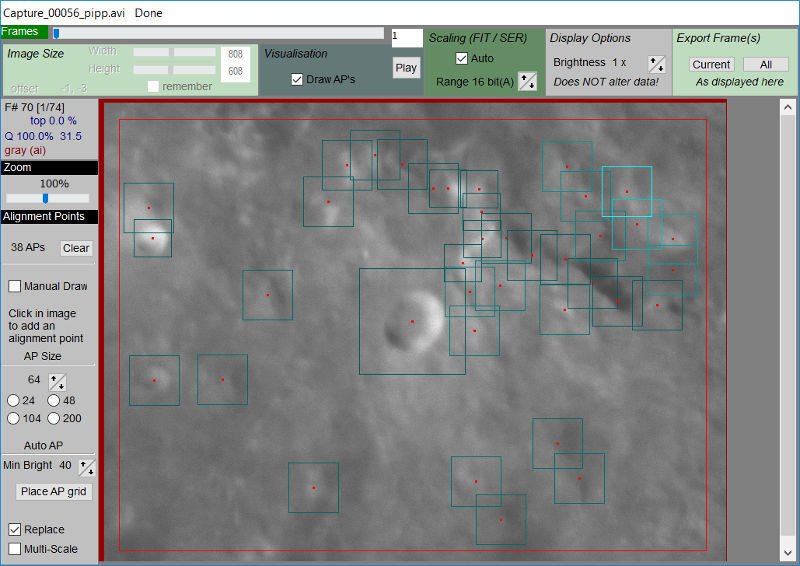
After the registration was completed and the images were combined and presented in the followed animated gif. Note the detail is significantly sharper in the 38 point image (it might take a few moments to see this clearly, look around the top of the prominent cliff in the upper right)
Conclusion
Here we discussed calibration, registration and debayering of images. I hope people found this interesting and informative. In the next part, I will talk more about stacking and filters. Also a quick note to @lordneroo, I haven't forgotten about mapping projection of planets, that is coming soon!
NOTE: All images are the Authors, please credit @terrylovejoy if you plan to use them.