This tutorial is bilingual, English first and Simplified Chinese next.
What Will I Learn?
Chrome browser is so powerful that you can write a few gadgets using Javascript for Chrome bookmarks.
- You will learn what is a chrome bookmark script
- You will learn how to write chrome bookmark script
- You will learn the SteemIt example to show the real time Voting Power and Reputation for a user.
Requirements
In order to proceed with this tutorial, you will need to have:
- a installed Chrome browser
- basic Javascript knowledge
Difficulty
Intermediate
Tutorial Contents
Chrome browser has a bookmarks bar that you can turn it on by:
- type
chrome://settings/at URL bar - turn it on by enabling
Show bookmarks bar
You can drag any URLs to the bookmarks. However, the most powerful part is that you can add Javascript code to your bookmarks.
To add a Bookmark, you can:
- type
chrome://bookmarks/at URL bar - right click the top right icon and select
Add New Bookmark
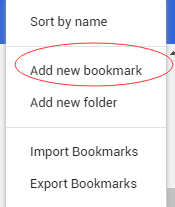
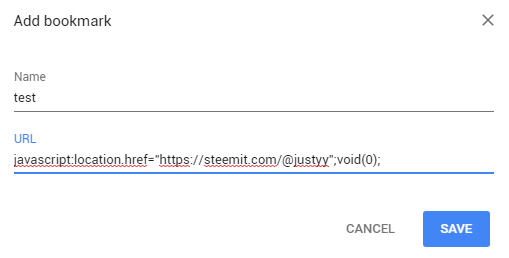
At the prompt up dialog, you can choose a bookmark name and type in javascript code that starts with javascript:
For example, the following will add a bookmark test and if you click on it, the javascript code will be executed that leads to my steemit profile page.
SteemIt Voting Power and Reputation Checker
Let's continue with a more advanced example. I have provided two APIs to retrieve the voting power and reputation in full digits:
https://helloacm.com/api/steemit/account/reputation/?id=justyythat will return a number indicating the reputation for the given user.https://helloacm.com/api/steemit/account/vp/?id=justyythat will return a number indicating the voting power for the given user.
So, the design is, if we first click the bookmark, it will ask for the steem id, which will be stored in chrome's localStorage object. Once the browser remembers the steem id, it will fetch these two data from these two separate APIs.
The first part is to ask for ID and remember it. The javascript code is:
var steem_id = localStorage.getItem("steem_id");
if (steem_id == null) {
    steem_id = prompt("Please enter your SteemId");
    localStorage.setItem("steem_id", steem_id);
}
Next, we are going to use fetch and then (the Javascript Promises) to chain these two events.
if (steem_id != null) {
    fetch('https://helloacm.com/api/steemit/account/reputation/?id=' + steem_id, {mode: 'cors'})
    .then(validateResponse)
    .then(readResponseAsJSON)
    .then(function(rep) {
        fetch('https://helloacm.com/api/steemit/account/vp/?id=' + steem_id, {mode: 'cors'})
        .then(validateResponse)
        .then(readResponseAsJSON)
        .then(function(vp) {
            var msg = "ID: " + steem_id + "\n" +
                      "Reputation: " + rep + "\n" +
                      "Voting Power: " + vp;
            alert(msg);
        })
    })
}
The validateResponse is defined as follows that checks if the API is available and returns correct responses:
function validateResponse(response) {
  if (!response.ok) {
    throw Error(response.statusText);
  }
  return response;
}
The readResponseAsJSON is just to return the text as JSON
function readResponseAsJSON(response) {
  return response.json();
}
And you just need to copy the entire Javascript to the bookmark contents (remember to insert at the begining javascript:.
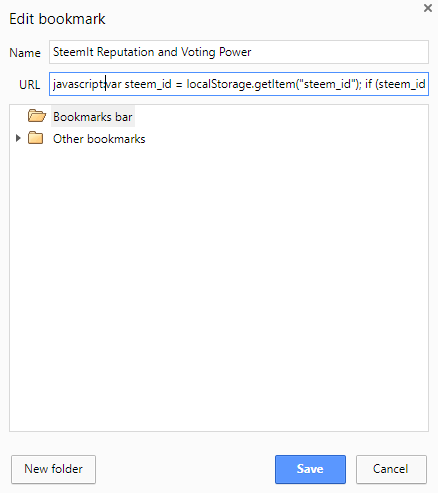
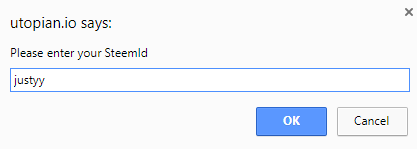
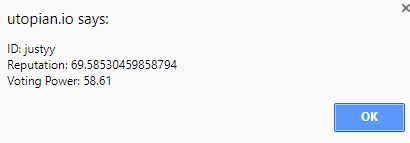
Now, if you click it, it will ask you for the ID.
Then, this small tool will show your realtime voting power and reputation by just one click.
Entire piece of bookmark code to take-away:
javascript:
var steem_id = localStorage.getItem("steem_id");
if (steem_id == null) {
    steem_id = prompt("Please enter your SteemId");
    localStorage.setItem("steem_id", steem_id);
}

function readResponseAsJSON(response) {
  return response.json();
}

function validateResponse(response) {
  if (!response.ok) {
    throw Error(response.statusText);
  }
  return response;
}

if (steem_id != null) {
    fetch('https://helloacm.com/api/steemit/account/reputation/?id=' + steem_id, {mode: 'cors'})
    .then(validateResponse)
    .then(readResponseAsJSON)
    .then(function(rep) {
        fetch('https://helloacm.com/api/steemit/account/vp/?id=' + steem_id, {mode: 'cors'})
        .then(validateResponse)
        .then(readResponseAsJSON)
        .then(function(vp) {
            var msg = "ID: " + steem_id + "\n" +
                      "Reputation: " + rep + "\n" +
                      "Voting Power: " + vp;
            alert(msg);
        })
    })
}
您将学到什么?
Chrome 浏览器支持添加书签,通过这个教程您将:
需求
看懂本教程,您需要:
- 安装并使用Chrome浏览器
- 最基本的Javascript知识
难度
中等偏易
教程
您可以通过以下步骤打开 书签显示:
- 在地址栏里输入
chrome://settings/ - 勾上
Show bookmarks bar
书签可以是网址,也可以是Javascript 小程序。添加一个书签,您需要:
- 在地址栏输入
chrome://bookmarks/ - 右键点击右上角的
Add New Bookmark

然后在弹出的添加书签窗口,输入书签名称和内容,如果是Javascript小程序则代码需要以 javascript: 开始。
比如,以下会添加一个名叫 test 的书签,并且,如果你点击它,它会导到我的SteemIt 页面

获取能量和等级的书签程序
为了这个例子,我写了两个API
https://helloacm.com/api/steemit/account/reputation/?id=justyy获取等级。https://helloacm.com/api/steemit/account/vp/?id=justyy获取投票的能量。
接下来就是设计了,当我们第一次运行这个书签,程序会让我们输入ID,然后书签就会记住了。这可以通过 Chrome 的 localStorage 对象。当有了这个ID 我们就可以通过API依次获取我们需要的数据。
第一部分的代码为:
var steem_id = localStorage.getItem("steem_id");
if (steem_id == null) {
    steem_id = prompt("Please enter your SteemId");
    localStorage.setItem("steem_id", steem_id);
}
然后,我们可以通过 fetch 和 then (Javascript Promises) 把事件串联起来。
if (steem_id != null) {
    fetch('https://helloacm.com/api/steemit/account/reputation/?id=' + steem_id, {mode: 'cors'})
    .then(validateResponse)
    .then(readResponseAsJSON)
    .then(function(rep) {
        fetch('https://helloacm.com/api/steemit/account/vp/?id=' + steem_id, {mode: 'cors'})
        .then(validateResponse)
        .then(readResponseAsJSON)
        .then(function(vp) {
            var msg = "ID: " + steem_id + "\n" +
                      "Reputation: " + rep + "\n" +
                      "Voting Power: " + vp;
            alert(msg);
        })
    })
}
validateResponse 函数用于检查API是否返回正确。
function validateResponse(response) {
  if (!response.ok) {
    throw Error(response.statusText);
  }
  return response;
}
readResponseAsJSON把数据转换成JSON格式。
function readResponseAsJSON(response) {
  return response.json();
}
然后,您只需要把整段JAVASCRIPT代码(记得在最开始添加javascript:)拷贝到书签内容即可。

来,测试一下(第一次会要求输入ID):

然后,只需要点击一次就可以获得能量和等级。

整段代码:
javascript:
var steem_id = localStorage.getItem("steem_id");
if (steem_id == null) {
    steem_id = prompt("Please enter your SteemId");
    localStorage.setItem("steem_id", steem_id);
}

function readResponseAsJSON(response) {
  return response.json();
}

function validateResponse(response) {
  if (!response.ok) {
    throw Error(response.statusText);
  }
  return response;
}

if (steem_id != null) {
    fetch('https://helloacm.com/api/steemit/account/reputation/?id=' + steem_id, {mode: 'cors'})
    .then(validateResponse)
    .then(readResponseAsJSON)
    .then(function(rep) {
        fetch('https://helloacm.com/api/steemit/account/vp/?id=' + steem_id, {mode: 'cors'})
        .then(validateResponse)
        .then(readResponseAsJSON)
        .then(function(vp) {
            var msg = "ID: " + steem_id + "\n" +
                      "Reputation: " + rep + "\n" +
                      "Voting Power: " + vp;
            alert(msg);
        })
    })
}
Posted on Utopian.io - Rewarding Open Source Contributors
