Being a mom (of three, mind you) I tend to always find ways to save money while giving my family the best that I can.
Hence I learned the beauty that is called - DIY (Do it Yourself)

Image source
Earlier, I shared how I saved on my children's birthday parties by doing most if not all, of the preparations.
Nifty or Thifty. What Kind of a Mommy are You?
I also flaunted my hair-cutting skills here on this post.
Nifty or Thifty. What Kind of a Mommy are You? -Part 2
This time I would like to share some of the little projects I finished for my kiddos when I had my annual vacation late last year.
Being expats here in the UAE, we are given 30days of annual leave. My company gives us 25 working days (5 weeks) which we have to finish in a year or they get forfeited. So last November, I had the chance to stay at home and spend 3 straight weeks with my kids.
During these times, my "maternal instincts" grew deeper. My little ones - 2.5 years and 1 year old are in the stage when they are at the peak of learning. I have read somewhere that at this stage their brains are like sponges that will absorb anything and everything that you instill.
I felt I have to be responsible to that learning.
This was also the time when I somehow became more firm on our decision to homeschool. I wrote about them here:
I am a full time working mom. Will homeschooling work for us?
Having said these, I wanted to become productive during these lazy days and make something that my children can use to play and learn.
Disclaimer: I am no artist. Just a mom trying to save money. 😅
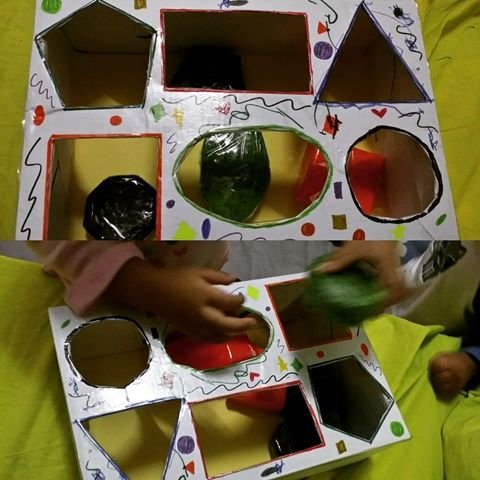
Presenting: My DIY Shape sorter
What I used:
- an old shoe box
- styrofoam
- cutter
- non-toxic paint, different colors
- color pens, to design the box
What I did:
Using basic shapes in MS Word, I printed the shapes that I will use as templates. I made a square, rectangle, circle, oval and pentagon.
I then cut the styrofoam and used the paint to color each. Let dry.
I used these shapes to trace the patterns on the box - while cutting, I just made the holes a little bit bigger so that the styro shapes will be easier to put inside.
Viola! Shape Sorter ala-Mommy:
Partly for my own sanity, I also decided to make them a simple Busy Board:
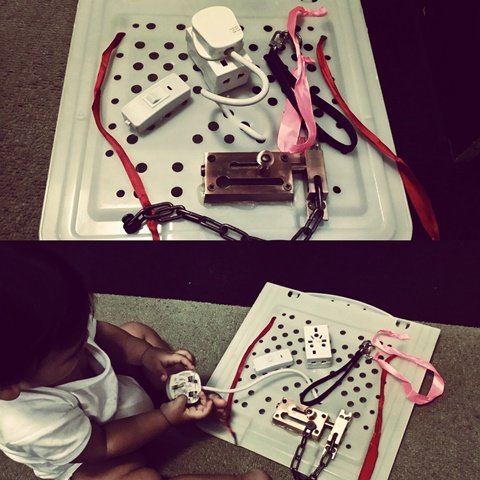
This board was made mainly with recycled materials- junk and mess inside our house.
Before our old washing machine completely broke down, hubby @kennyroy tried to tink on it and removed this white piece of plastic from underneath. This has been laying idly in our bathroom for a long time and so when I had my vacation I remembered this piece of "junk" and decided to make it as the base of my busy board.
The red strings were actually handles of a paper bag - now turned into a great tool fine motor skills development. The idea is to weave them into the holes of the board.
We know how kids love to toggle on switches and meddle with electronics plugs and outlets. That is extremely dangerous and therefore a no-no!. We parents try to kid-proof our homes to avoid accidents. So I decided to give my little ones the pleasure of toggling and tinkering all they want - on the busy board.
I also found a pair of double locks (not sure how they are called actually) and just put them on the board using a glue gun.
Hubby has an old clutch bag with chain hooks, (again sorry if I cannot find the right term!) which were not being used. They ended up on the busy board as well.
Cannot be seen on the picture above, I attached an old onesie with buttons and clips to satisfy my little girl's love of buttons!
DIY Playdough
Kids love playdough. My kids are no exception. Even my eldest son loves it, and most of the time they are required to bring some in school for projects also. I also realized that playdough could be expensive and may be harmful for my youngest who tends to put anything in his mouth! So I thought, why not make my own playdough?!
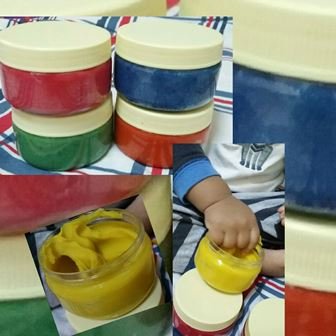
Here's the recipe that I am using:
You need:
- 2 cups plain flour (all purpose)
- 2 tablespoons vegetable oil
- 1/2 cup salt
- 2 tablespoons cream of tartar
- Up to 1.5 cups boiling water (adding in increments until it feels just right)
- food colouring
- few drops glycerine (optional- adds more shine!)
- small plastic jars to keep the playdough
Method:
Mix the flour, salt, cream of tartar and oil in a large mixing bowl
Stir continuously until it becomes a sticky, combined dough
Add the glycerine (optional)
Allow it to cool down then take it out of the bowl and knead it vigorously for a couple of minutes until all of the stickiness has gone. * This is the most important part of the process, so keep at it until it’s the perfect consistency!*
(If it remains a little sticky then add a touch more flour until just right)
Portion the playdough enough to fill your jars, add food colouring and knead again until the food coloring is evenly distributed.
The playdough, kept in an airtight container, can last up to 6 months.
There you have it, just few of my DIY projects! Stay tuned for more!
No matter what we do, as long as it is made with love and pure intentions the outcome would always be fulfilling.
As a mom, I may not be able to provide my kids with the most expensive and beautiful toys but I take pride that I have done such simple things for my children.
