In this post, I'll show you how to create your own curation trail bot.
As a reminder, a curation trail bot will allow your account to vote on posts that another account votes on. If you're looking for a bot that will upvote specific accounts, refer to this tutorial by @bitcoinparadise.

I summarized the functions of a curation trail bot as well as my personal experience learning how to use this bot in Part 1 of this post, so if you would like to read more about bots and how I arrived at the idea for this post, feel free to read it here:
Let's get started.

Here's what you'll need:
- A computer running Mac OS or Linux that is connected to the Internet
- Windows users please see the notes below.
- A text editing program (optional)
- I recommend Atom. It's available for Windows, Mac, and Linux)
- The ability to open a terminal or command line
- The ability to copy and paste or type in commands
A Special Note for Windows Users
Windows users, support for these installation instructions are not included by default in Windows. Because of this, you have a couple of options:
Option 1: Install Linux
You can forgo Windows, seek out an old PC you may have lying around, and install a distribution of Linux on it. This is a fairly straightforward process as most Linux distributions have installation guides on their websites.
If you've never experimented with Linux distributions, now is a great time to get started. It is possible to dual-boot Linux with Windows, but you would be unable to use Windows if you wanted the bot to run constantly. Also, dual-booting involves changing the boot and partition structure of your hard drive, so you should proceed with caution if you've never done it.
For users new to Linux, I suggest starting with Ubuntu. It's a common distribution that has long term support. You can read more about it and download it here, access installation instructions here, and read about how to dual-boot with Windows here.
Option 2: Enable Ubuntu Support Within Windows
The other option is to enable Ubuntu support within Windows, which is a fairly new feature and is still in beta. Steemit user @bitcoinparadise provided a great guide on how to do this, so check it out here.
If you're running Mac OS or Linux, you may proceed with the installation of the bot!
Linux and Mac Instructions

Installing the bot is fairly simple. In Linux (Mac users skip to the next command), open a Terminal and type the following command:
$ sudo apt-get install ruby-full git openssl libssl1.0.0 libssl-dev
Press enter and wait for the installation to complete. (Since you're using the sudo command, you will be prompted for your administrator or logon password, so have that handy. If you're new to Linux, note that when you begin typing your password, the cursor does not move. The password will still be entered, so type it normally and press enter.) You may also need to press the Y key when prompted.
For Mac and Linux, now type:
$ gem install bundler
Wait for the bundles to install, then proceed. The next step will clone files from the GitHub project for this bot to your machine, so you'll need to decide on a name for the folder you want the files in. Here are the commands to clone the files:
$ git clone https://gist.github.com/d57c9bc744f05ada01d173521c01df8a.git drdoogie
Note that drdoogie in this command is the name of the folder the files will clone to. If you'd like to name the folder something else, simply replace drdoogie with your desired folder name.
Now we navigate into the directory we just created:
$ cd drdoogie
And finally install the dependencies for the bot:
$ bundle install
After you've completed these steps, all the files are in place and you're almost ready to run the bot. Now you'll need to edit the configuration files to tell the bot which account you'd like to trail.
Changing Configuration Settings
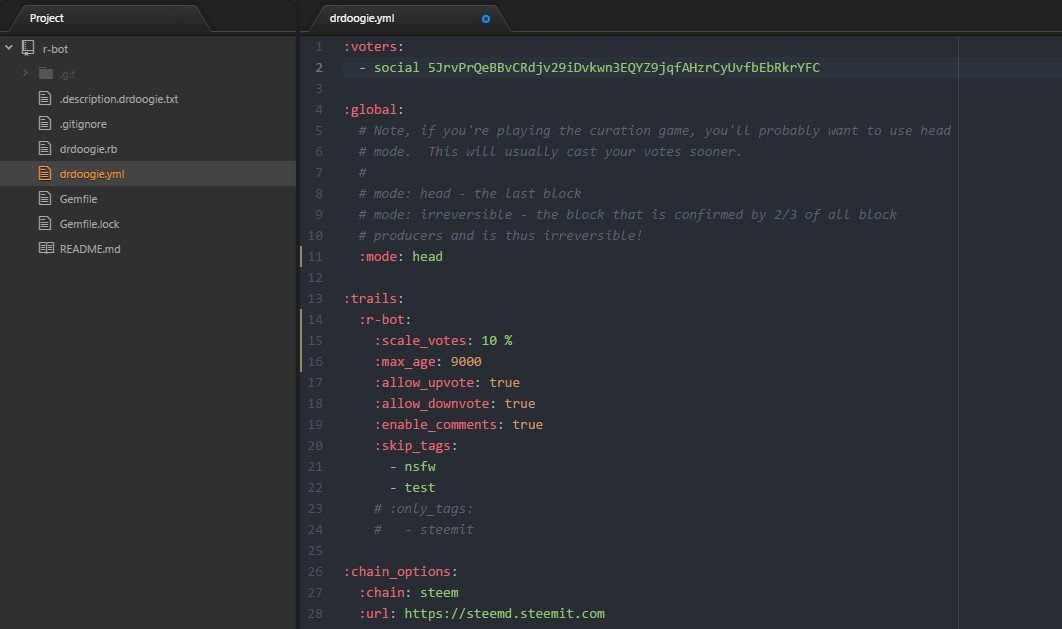
Outside of the terminal, navigate to the folder where you just cloned the drdoogie files. You should see several files, one of which is named drdoogie.yml. Open this with your favorite text editor. Now it's time to change the settings.
Alternatively, you can edit the file within the terminal. While inside the directory you just created, use the command
sudo nano drdoogie.yml
You'll see the contents of the file and be able to edit them. Follow the on-screen keyboard shortcuts to edit and save the file, then return to the regular terminal interface.
Enter Your Voting Key
You'll need your Private Active or Posting key from the Permissions tab of your wallet page on Steemit. With these handy, look for these lines in the file:
:voters:
- social 5JrvPrQeBBvCRdjv29iDvkwn3EQYZ9jqfAHzrCyUvfbEbRkrYF
- Replace "social" with your Steemit account name, and replace "5JrvPrQeBBvCRdjv29iDvkwn3EQYZ9jqfAHzrCyUvfbEbRkrYF" with your private active or posting key.
Choose Your Trailing Options
Next, you'll need to tell the bot which account to trail. The default account in drdoogie.yml is banjo, so you will see the lines:
:trails:
:banjo:
:scale_votes: 100.00 %
:max_age: 1440
:allow_upvote: true
:allow_downvote: true
:enable_comments: true
:skip_tags:
- nsfw
- test
# :only_tags:
# - steemit
Replace "banjo" with the name of the account you'd like to trail.
The scale_votes attribute accepts a percentage. The bot will vote at this percentage of the vote given by the bot account. For example, if the account you are following votes for a post at 100%, and you have your scale_votes attribute also set to 100%, your account will vote at 100%. If the account you're trailing votes at 50% and you are trailing at 100%, your account will vote at 50%.
If you prefer an equation, the bot will vote like this:
Vote weight of account being trailed (%) * [(scale_votes value (%))/100] = your voting percentage (%)
If the account you're trailing votes at 75% and you have your scale_votes set to 25%, the math would look like this:
75 * (25/100) = 18.75
Your account would vote at 18.75%.

It's important to note how the account you're trailing votes. If it typically gives out large votes, you'll want to scale this percentage down so you won't drain your voting power. This can take some adjustment to figure out, but when you first start out, it may be a good idea to start low at 25% or so and increase from there.
The max_age attribute allows you to tell the bot to exclude posts older than the assigned value in minutes. The default is 1440 minutes, or 24 hours. The max value is 10080 minutes, or 7 days, since that's how long the voting window is on Steemit.
The other attributes are self explanatory, and you can tell the bot to exclude or only vote on certain tags.
Pick a Steemit Node
The final section of this file tells the bot where to look for the blockchain data:
:chain_options:
:chain: steem
:url: https://steemd.steemit.com
Due to a recent change in the Steemit API, you may want to change this to https://api.steemit.com. As @inertia has pointed out, however, you may simply run the command bundle update within the directory of your bot to grab the latest nodes. A current list of active nodes may be found here in case you cannot get the default one to work.
Run the Bot

Now that you've configured all of the settings, be sure to save the changes you've made to drdoogie.yml before proceeding. Your bot is ready to run.
Return to the terminal window and run your bot with the command
ruby drdoogie.rb
After a moment, you should see a message that says
Now trailing [insert account name here]...
That's it! All you have to do now is wait for the account to vote, and you'll start to see some action in your terminal window. Be sure to monitor both the account you're trailing and your account on Steemd or SteemDB to be sure your account is voting correctly.
Possible Error Messages
You may see long strings of text from something called Hashie that looks like an error message. @inertia has said that these are safe to ignore as long as you can see that your account is voting like you want it to. You may see another error message that says
'from_base58': Invalid version (RuntimeError)
This means that the posting or active key you entered is incorrect. Simply update the key in the drdoogie.yml file and run the bot again.
Your bot will now run as long as your Linux or Mac is turned on and connected to the Internet.
You may need to tweak the settings, and you may do so by editing the drdoogie.yml file any time, saving your changes, and restarting the bot.
Other options
Throughout my messages with @inertia, I discovered several other features. One instance of the bot will allow multiple voting accounts and multiple account trails. I have not tried adding multiple voting accounts, but it only requires adding another line beneath where you specified your account name and posting/active key.
As for trailing multiple accounts, @inertia said that adding another account underneath the first one within colons is the proper way, e.g.
:banjo:
:curie:
and so on. When I tried this, I had mixed results, so I resorted to using multiple instances of the bot to trail different accounts. This is also necessary if you want to weight each account differently. If anyone who is better at coding has a suggestion on how to modify the bot to allow such considerations, please let me know in the comments!
Final Thoughts

I have very much enjoyed being able to trail quality curation accounts. It allows me to add value to hundreds of posts each day rather than just the few I'm able to do manually. Figuring out the voting weight takes some time and experimentation, but it's worth it in the end. I've yet to see how the bot impacts my curation earnings since I haven't had it running a full 7 days yet, but I will let you know when that happens!
I'm mostly glad that I don't have to worry about being locked out of Streemian anymore.
Please let me know if you have questions about this process. I'd be happy to address them in the comments. Also, if you have suggestions on how to improve the bot, I'd love to work with you on creating a new iteration of the bot that we can distribute to the Steemit community.
If you are interested in setting up a bot that votes on your behalf for specific accounts, @inertia has created a bot for that purpose also. You can check out the GitHub page here, and if you're interested in installing it, @bitcoinparadise has posted an excellent tutorial.
As always, thank you for stopping by!
