
We continue talking about manual camera settings and now we will take a closer look at the next of the most important camera settings. We will talk about illumination, which is regulated by the size of the aperture opening.
The size of this ring (hole) may vary depending on the lens. The smallest size is the diameter of the sewing needle tip. This is how I made a hole in the plate when I made my pinhole. With such a hole, there is no need to direct the focal length and think about the depth of field. Equally sharp (more precisely, equally unsharp is everything that falls on the matrix. But the sharpest is trash on the matrix itself. Take a picture using a pinhole) is the best way to check the purity of your matrix. You will see all the dust particles and traces of dirt in the picture.
Мы продолжаем разговор о ручных настройках камеры и сейчас более подробно разберём следующую из важнейших настроек камеры. Речь пойдёт об освещённости, которая регулируется размером кольца диафрагмы.
В зависимости от объектива, размер этого кольца (отверстия) может быть различным. Самый маленький размер имеет диаметр кончика швейной иглы. Именно так я делал отверстие в пластине, когда изготовлял свой пинхол. ПРи таком отверстии нет необходимости наводить фокусное расстояние и думать о глубине резкости. Одинаково резким (точнее, одинаково нерезким получается всё, что попадает на матрицу. Но самым резким получается мусор на самой матрице. Сделать снимок с испльзованием пинхола) - это лучший способ проверить чистоту вашей матрицы. Вы увидите все пылинки и следы грязи на снимке.
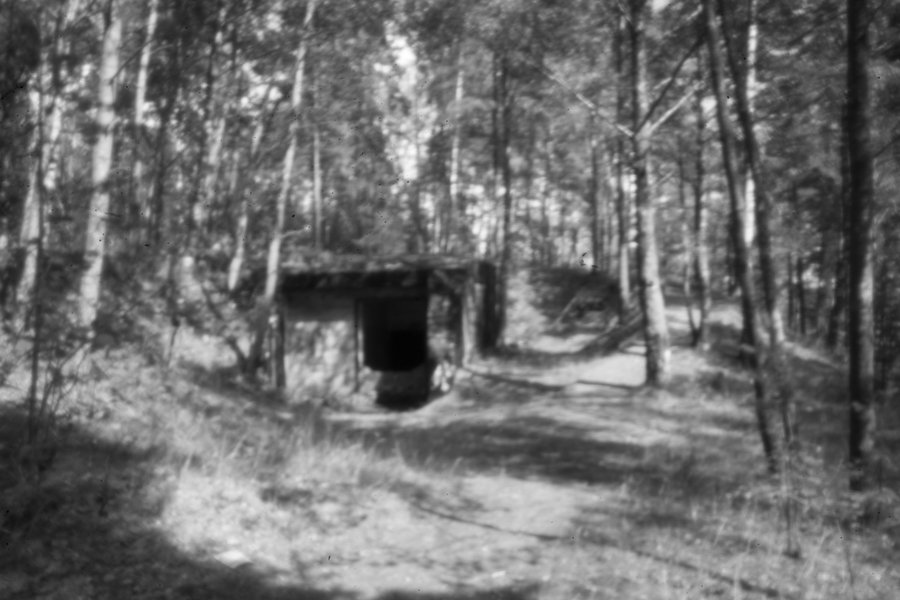

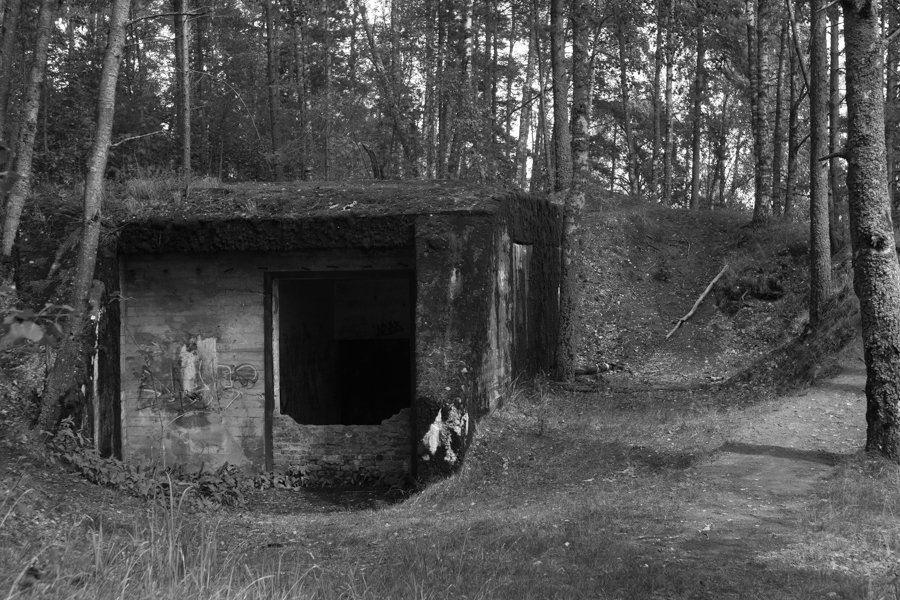
I tried to shoot in the woods using pinhole. This is a 2.5 sec tripod shot on a sunny day. The second shot is an enlargement of the first one to better see the dirt.
Looking ahead, I will say about pinhole. With its help it is better to shoot large expressive objects. When there are a lot of details in the photo and they are not very clearly visible ... for certain scenes this can be useful, but for most ordinary ones it is most likely not.
Я пробовал снимать в лесу с использованием пинхола. Это съёмка со штатива с выдержкой 2,5 сек в солнечный день. Второй снимок это укрупнение первого, чтобы лучше увидеть грязь.
Забегая вперёд скажу про пинхол. С его помощью лучше снимать крупные выразительные объекты. Когда на фото много деталей и они не очень чётко видны... для определённых сюжетов это может быть полезно, но для большинства обычных скорее всего нет.
This is the same location but with the usual Helios 44-2 lens. Its focal length is 58mm and it zooms in and out on the subject.
As you can see, this photo looks more decent.
All three photos are presented without processing.
Это таже локация, но обычным объективом Гелиос 44-2. Его фокусное расстояние 58 мм и он приближает и укрупняет объект.
Как видите это фото выглядит уже более прилично.
Все три фото представлены без обработки.

Now let's talk about the degree of aperture opening and what it affects.
We have an ordinary lens in our hands. Modern lenses have two adjustment modes: automatic via camera control and fully manual. Usually, the mode switch is located on the lens barrel.
Automatic focusing occurs when the shutter button is pressed halfway. In this case, the aperture value is set by the value wheel on the camera itself.
Теперь поговорим о степени открытия диафрагмы и на что это влият.
Мы имеем в руках обычный объектив.Современные объективы имеют два режтма настройки: автоматический через управление камеры и полностю ручной. Обычно кнопка переключения режимов находится на корпусе объектива. Автоматическая фокусировка происходит при неполном нажатии кнопки спуска. При этом значение диафрагмы задаётся колёсиком значений на самой камере.
On the one hand, it is convenient. This saves setup time per object. But you can get errors in the focus setting. Automation may choose not exactly the area that you would like to see sharp.
If you shoot in full manual lens mode, then you see what you shoot and how you shoot.
The following examples of photos were taken with the Helios 40-2 lens, which is completely manual. It does not have community autofocus and the aperture is also manually set on the lens. To do this, rotate the diaphragm control ring in one direction or another. In this case, the hole is either widened or narrowed. Let's look at some examples.
С одной стороны это удобно. Это экономит время настройки на объект. Но при этом можно получить ошибки в настройке фокуса. Автоматика может выбрать не совсем ту зону, которую вы хотели бы видеть резкой.
Если вы снимаете в полностью ручном режиме настроек объектива, то вы видите, что вы снимаете и как вы снимаете.
Следующие примеры фото сделаны объективом Гелиос 40-2, который является полностью мануальным. У него нет автофокуса сообще и диафрагма тоже выставляется вручную на объективе. Для этого надо вращать кольцо управления диафрагмы в ту или иную сторону. При этом отверстие либо расширяется, либо сужается. Рассмотрим это на примерах.
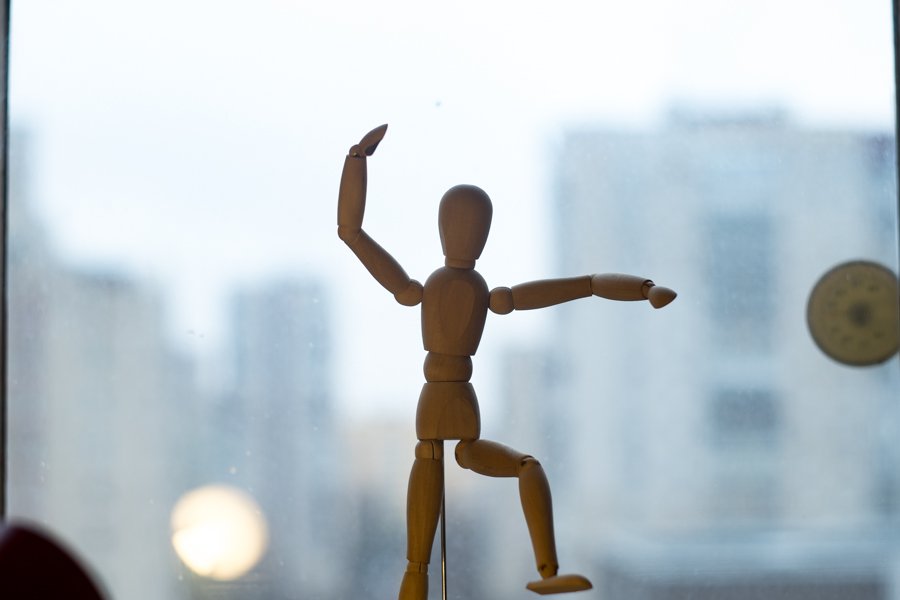

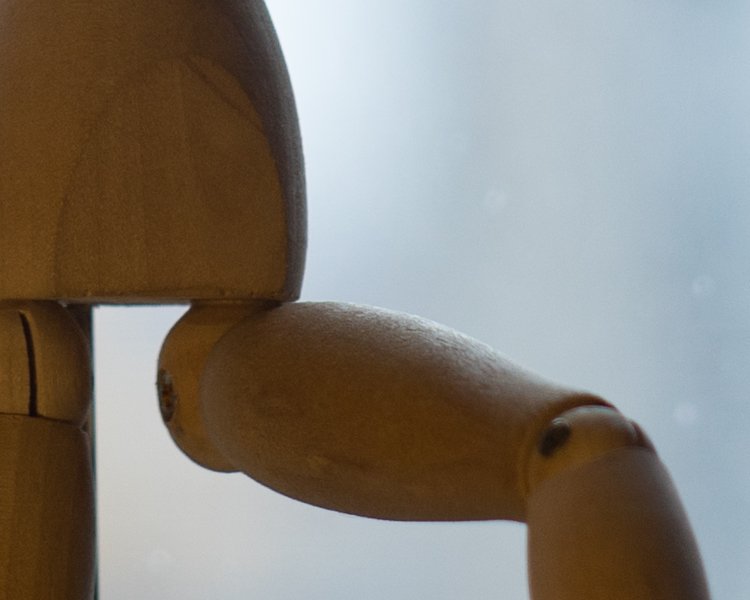
I put the mannequin in front of the window and took some pictures. First, I opened the diaphragm. You can see that not much detail is captured in the field of focus. I deliberately enlarged the area of which the sharp section of the photo is located. The thigh of the raised leg is in focus. But already the knee begins to blur.
Yes, the backlight of the window is not very good, but it is raining outside the window ... I have to use what I have at home. And I need remote objects as an example. This will be the view from the window.
Я поставил манекен перед окном и сделал несколько снимков. Вначале я открыл диафрагму. Вы можете видеть, что в зону резкости попало не так много деталей. Я специально увеличил резкую зону. Бедро поднятой ноги находится в фокусе. Но уже колено начинает размываться.
Да, контровой свет окна является не совсем удачным, но за окном идёт дождь...мне приходится пользоваться тем, что есть дома. А мне для примера нужны удалённые объекты. Это будет вид из окна.

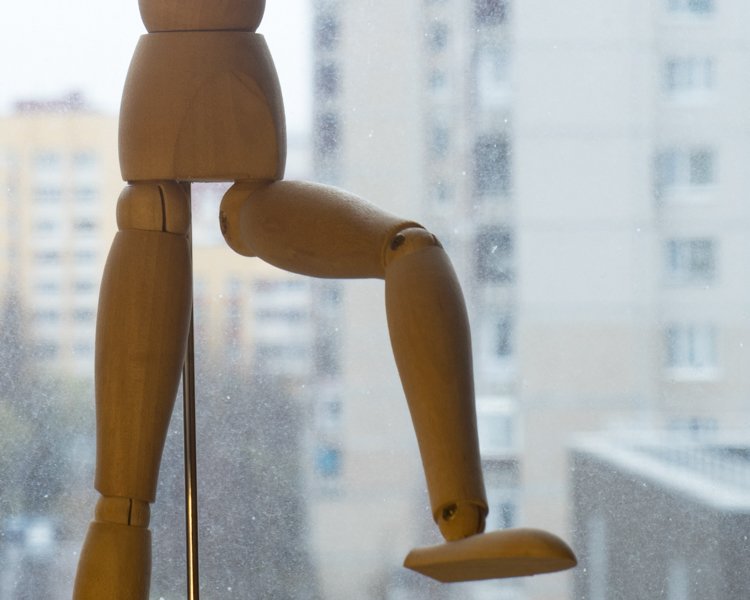
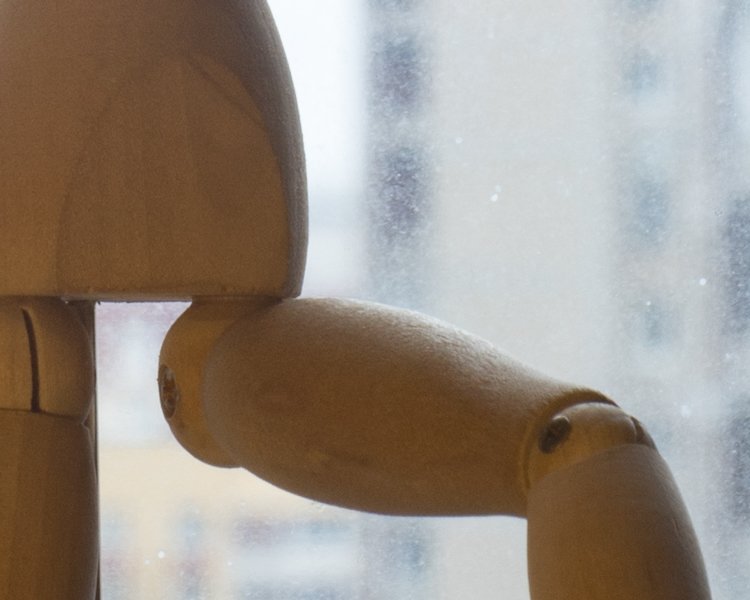
Now I made the aperture very narrow (pinched). The flow of light decreased, but at the same time, the depth of the field of focus increased (I had to increase the shutter speed, as you already know). If earlier the body and half of the thigh got into the sharpness zone, now the glass of the window and the knee looks much clearer.
The following photos show this even more clearly.
Теперь я сделал диафрагму маленькой дырочкой. Поток света уменьшился, но при этом увеличилась глубина зоны резкости (мне пришлось увеличить выдержку, как вы уже понимаете). Если раньше в зону резкости попадал корпус и половина бедра, то теперь попало и стекло окна и колено выглядит гораздо отчётливее.
На следующих фото это видно ещё более наглядно.


You see a narrow band in focus, a blurred background behind the subject, and a blur in front of the subject. This applies to the aperture (a large opening for the light flux).
In the second photo, the picture is completely different. Almost all space photo looks sharp.
Вы видите узкую полоску в фокусе, размытый фон позади объекта и размытие перед объектом. Это относится к открытой диафрагме (большое отверстие для светового потока).
На втором фото картина совершенно другая. Почти всё пространство фото выглядит резким.
How to use this effect of the size of the aperture when shooting?
If you want to shoot a beautiful landscape, while you want to see as much detail in the photo as possible, you need to hold down the aperture (make a small hole). Set the focal length to infinity. Choose a shutter speed so that the amount of light falling on the matrix is enough to get a normal photo. When the diaphragm is clamped, it is usually necessary to lengthen the exposure. You may need a tripod. The ISO value can also be increased, but remember that the higher the value, the more noise the matrix itself produces. ISO100 is optimal. So you need a tripod and a long exposure.
Как этот эффект от величины отверстия диафрагмы использовать при съёмке? Если вам хочется снять красивый пейзаж, при этом вы хотите видеть на фото как можно больше деталей, вам необходимо зажать диафрагму (сделать маленькую дырку). Фокусное расстояние выставить на бесконечность. Подобрать такуую выдержку, чтобы количество попадающего на матрицу света хватило для получения нормальной фотографии. При зажатой диафрагме надо как правило удлинять выдежку. Вам может понадобиться тренога. Значение ISO тоже можно повышать, но помните, что чем выше его значение, тем больше шума производит сама матрица. Оптимальным будет ISO100. Значит нужна тренога и длинная выдержка.
If you want to shoot an object so that it is separated from the background, then you need to do everything exactly the opposite.
Если вы хотите снять объект так, чтобы он был отделён от фона, то надо всё делать с точностью до наоборот.


In this case, you need to open the diaphragm wide enough.
Accordingly, the shutter speed will be selected shorter.
There is one caveat. Not all lenses at full aperture will produce good sharpness. Not only is the sharpness zone itself small, but also the sharpness in this zone will below. Therefore, for conventional lenses, as a rule, the aperture is covered by one or two values .
And one more practical moment. The closer your camera is to the subject, the more the field of focus becomes narrower. If you are shooting a portrait, it may turn out that, for example, the tip of the nose is in focus, and the eyes will not be sharp. It all depends on your choice.
However, all lenses are different in this sense and you need to practice more with your lens.
В этом случае надо открыть диафрагму достаточно широко.
Соответственно, выдержка будет подбираться более короткой.
Есть один нюанс. Не все объективы на полностью открытой диафрагме выдают хорошую резкость. Мало того, что сама зона резкости маленькая, так ещё и резкость в этой зоне будет низкой. Поэтому для обычных объективов как правило диафрагму прикрывают на одно-два значения (стопа).
И ещй один практический момент. Чем ближе ваша камера находится к объекту, тем более сужается зона резкости. Если вы снимате портрет, то может получиться так, что в фокусе будет например кончик носа, а глаза будут не резкими. Тут уже всё зависит от вашего выбора.
При этом все объективы в этом смысле разные и вам нужно больше практиковаться именно с вашим объективом.
You probably already noticed from my text that when adjusting the shooting parameters, the choice of shutter speed or aperture value depends on each other. Together, this is called "exposition"
Вы наверняка уже заметили из моего текста, что при настройке параметров съёмки выбор выдержки или значения диафрагмы зависят друг от друга. Всё вместе это называется "экспозиция".
In our case, the exposure can be calculated as the product of the illumination (the aperture value; how much the aperture is open) by the shutter speed during which the light acts on the photosensitive element of the matrix.
H = E \ t,
where H is the exposure, E is the illumination controlled by the aperture, and t is the shutter speed in seconds.
You can read special literature on this issue. But we are more interested in the practice.
Экспозиция в нашеи случае может быть рассчитана как произведение освещённости (значение диафрагмы; на сколько диафрагма является открытой) на выдержку, в течение которой свет воздействует на светочувствительный элемент матрицу.
H=E\cdot t,
где H — экспозиция, E — освещённость, регулируемая диафрагмой, а t — выдержка в секундах.
По этому вопросу можно почитать специальную литературу. Но нас больше интересует практика.
If you have live view, then many questions are removed. You can see in real-time what will be in your photo with these exposure settings.
In addition, most cameras have two very useful modes: shutter priority and aperture priority.
This means that you set the shutter speed or aperture value and the camera itself sets you the correct value for the second parameter. For example, you want to get a blurred background in your photos and set the maximum open aperture value. The camera selects the appropriate shutter speed for you for different lighting conditions at a constant (chosen by you) aperture. And vice versa.
You set your shutter speed based on how fast your subject is moving. In this case, the camera selects the desired aperture value for each of your photos.
This is convenient and saves time setting parameters for your work.
Если у вас есть режим "live view", то многие вопросы снимаются. Вы можете видеть в режиме реального времени, что будет на вашем фото при данных настройках экспозиции.
Кроме того, большинство камер имеют два очень полезных режима: приоритет выдержки и приоритет диафрагмы.
Это означает, что вы выставляете значение выдержки или диафрагмы и камера сама выставляет вам правильное значение второго параметра. Например, вы хотите получит размытый фон на своих фото и выставляете максимально возможное открытое значение диафрагмы. Камера подбирает вам соответствующее значение выдержки для разных условий освещённости при постоянной (выбранной вами) диафрагме. И наоборот.
Вы выставляете значение выдержки исходя из того, как быстро движется ваш объект. При этом камера подбирает нужное значение диафрагмы для каждого вашего фото.
Это удобно и экономит время настройки параметров для вашей работы.
As a homework assignment or assignment for independent work, I recommend that you take several pictures from the same location. But at the same time, you change the aperture opening parameter. It is important for you to feel the difference in the photo that you can get.
Also try shooting in these two modes: shutter priority and aperture priority.
If you wish, you can send your results here in the comments and ask your questions. We will discuss them together.
В качетве домашнего задания или задания на самостоятельную работу я вам рекомендую сделать несколько снимков с одной и той же локации. Но при этом вы изменяете параметр открытия диафрагмы. Вам важно почувствовать ту разницу в фото, которую вы можете получить.
Также попробуйте снимать в этих двух режимах: приоритет выдержки и приоритет диафрагмы.
При желании вы можете прислать свои результаты сюда в комментарии и задать свои вопросы. Мы вместе их обсудим.
I will probably repeat myself, but I want to emphasize again, in order to understand the manual settings of your camera, you have to practice a lot, shoot a lot and compare the results.
I wish you success.
Я наверное повторюсь, но хочу вновь подчеркнуть, для того, чтобы понять ручные настройки вашей камеры, вы должны много практиковаться, много снимать и сравнивать полученные результаты.
Желаю вам успехов.
Series "Practical advice" #1 - Cropping a photo
Series "Practical advice" #2 - Camera selection
Series "Practical advice" #3 - Manual camera settings
Series "Practical advice" #4 - Manual camera settings: exposure
From Russia with Love

Regards, @bambuka