"It takes the black keys and the white keys both, to make perfect harmony."
- Benny Goodman -
Today we learn more about chords.
We'll be playing the chords and the melody with our right hand.
We've learned three major chords so far.
Every key and every scale has seven notes and seven "natural" chords in it. We are using a simple form of notation that refers to these chords by number. We have learned the One, Four, and Five chords. In "real music" terminology, those chords are called the Tonic, Subdominant, and Dominant. These three major chords are found in every key.
Each chord contains three notes.
The three notes are also called a triad. However, the notes can be played anywhere up and down the keyboard. As a result, there are three different patterns for each chord because any one of the three notes in the chord can be played "on top."
Let's look at some diagrams to understand this.

Playing On The Black Keys
Photo courtesy of Anja and http://pixabay.com
The Braille Piano Method - Lesson Three
Each chord has three possible inversions, called the Root, First Inversion, and Second Inversion. The word "inversion" simply means that we're standing the chord on its head - playing the same three notes, but with a different note "on top."
We'll play chord and melody with our right hand.
Only, this time, we will pick the chord inversion that has the melody note "on top."
In other words, the basic and simple rule is that, as we play each line of our score, pick whichever of the three possible inversions of the chord has the melody note on top.
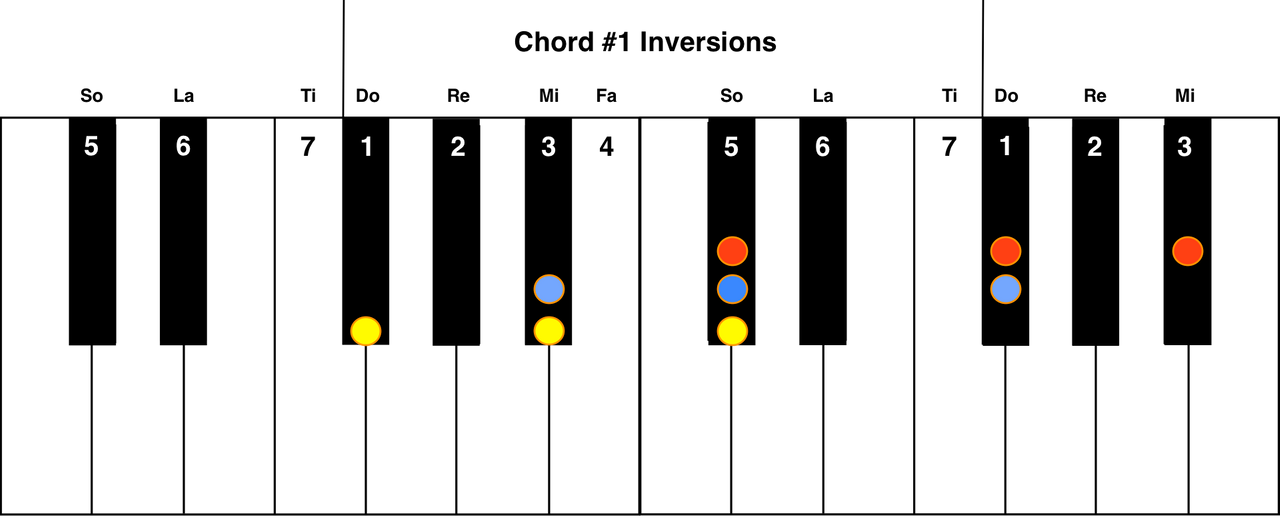
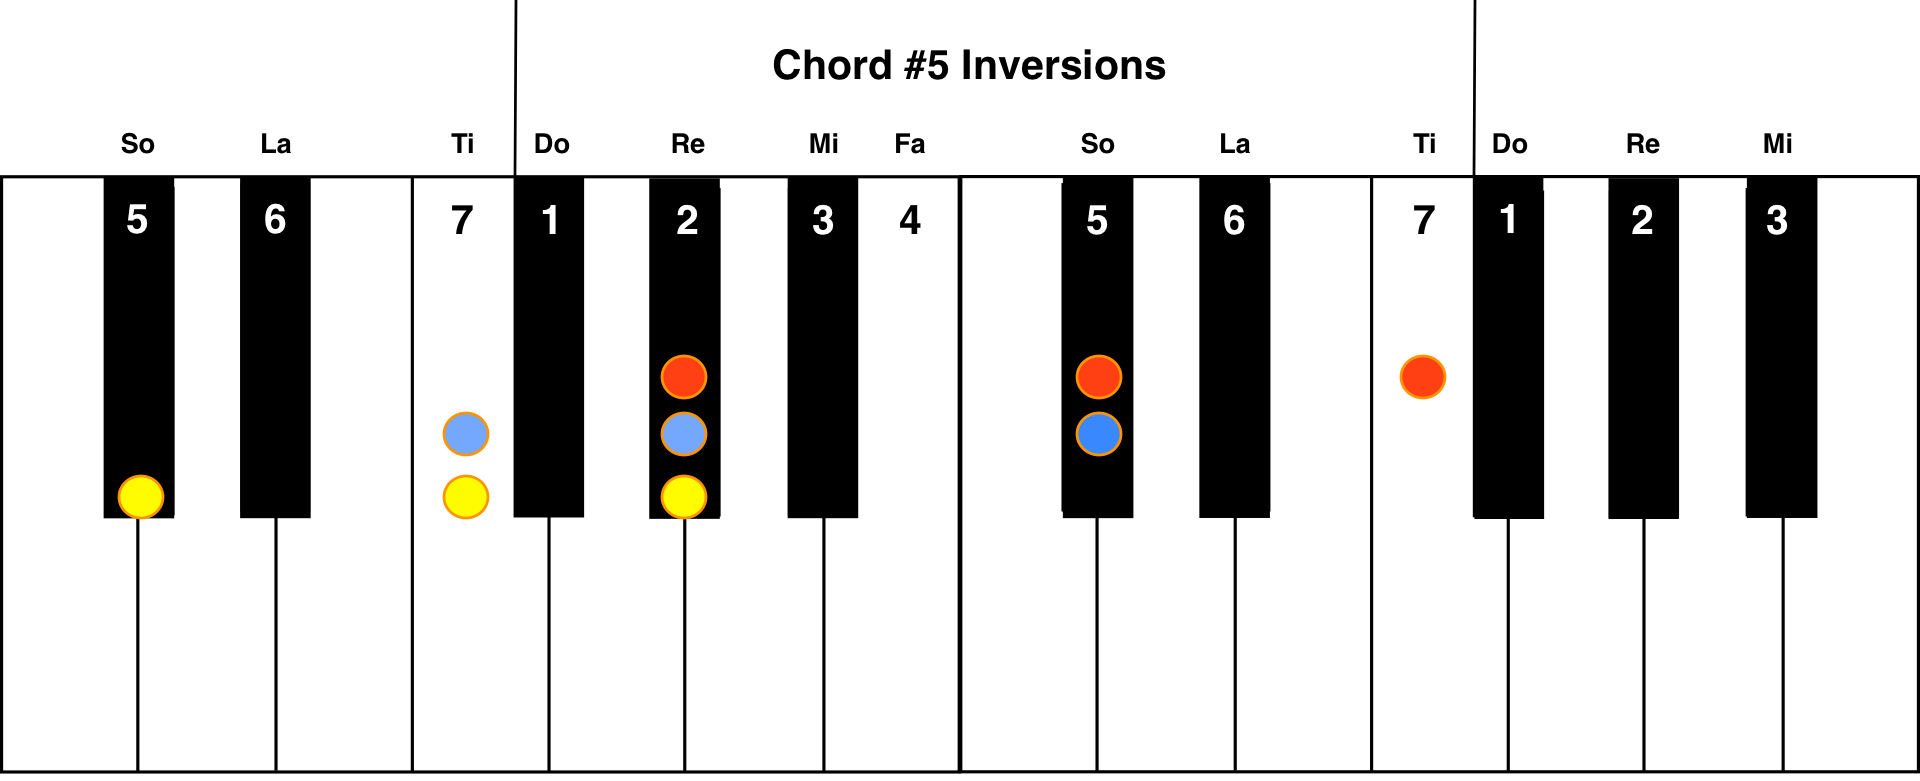
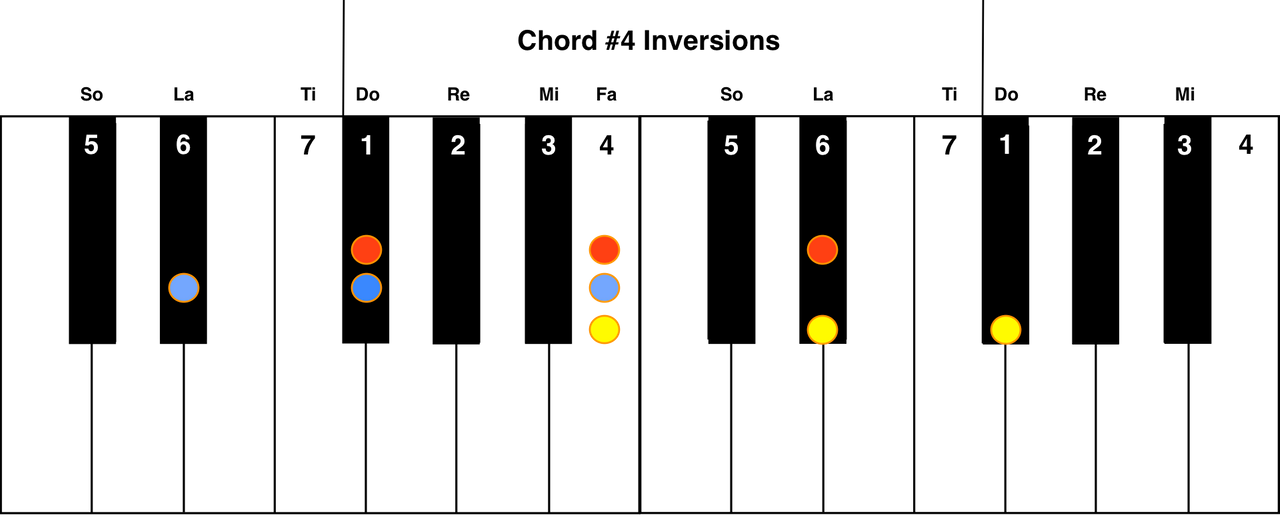
In the illustrations below, there are three inversions of each chord, highlighted in yellow, blue, and red for the Root, First Inversion, and Second Inversion respectively.
Let's try playing the first line with your right hand.
Start with the Root (yellow) for Chord #1, because the first note of the song is X5. There are five notes in the first line, and they are all part of Chord #1. Of course, the timing is different, and as before, I'll leave that up to you and to your "ear."
Your right thumb will be on Note 1, your index finger on Note 3, and your pinky on Note 5.
Next, move your hand to the First Inversion (blue) for the second note of the song, then the Second Inversion (red) for the third note. Back to First Inversion (blue) for the fourth note, and again Second Inversion (red) for the fifth note.
Can you hear it? You are playing the tune "on top" using your pinky finger, and the rest of the chord below that. Remember, for the entire first line we are playing the same three notes, the same chord - just putting a different melody note uppermost.

Next, you will play Chord #5 by keeping your thumb touching Note 5, and moving your index finger and pinky leftward, or "down" a little, from notes 1 and 3 to notes 7 and 2. This will sound Chord #5, for the word "how."
Notice that your hand is in the Root position for this chord.

Then move to Chord #4, also in the root (yellow) position by moving all three fingers leftward and "down" a little from notes 5, 7, and 2, to play notes 4, 6, and 1 with thumb, index finger, and pinky respectively. This is on the word "sweet."
Switching to the word "the" is done by moving your hand to the Second Inversion (red) position.

As you switch from one inversion to the next, it will now be essential to use the sustain pedal to keep the chord sounding as you move your right hand. Work on one line at a time of the score, and move your right hand from inversion to inversion as you play the melody note with your pinky.
You've got this.
Notice that once again I've slightly re-arranged the melody sequence to match all chord changes with your right hand. As before, each line in the "score" below has the chord that goes with it at the beginning of the line. That chord will remain the same all the way through the line, but your hand will move from one chord inversion to another as you play each note of the melody.
Give it a try, right hand only with sustain pedal:
CHORD    NOTES              LYRICS
#1   X5-1-3-1-3        "A-ma-zing grace,"
#5   2                 "how"
#4   1-X6              "sweet the"
#1   X5-X5-1-3-1-3-2-3 "sound that saved a wretch"
#5   5-                "like me."
#1   3-5-3-5-3-1-X5    "I once was lost, but"
#4   X6-1-1-X6         "now I'm"
#1   X5-X5-1-3-1       "found, was blind, but now"
#5   3                 "I"
#1   1                 "see."
Remember that the sustain pedal is your friend.
You can hold the sustain pedal down for the whole line because the chord remains the same. Release the sustain pedal at the end of the line, because you are about to begin a new chord. Press the pedal again as you begin each new line.
As always, the timing is up to your "ear." Just make it "sound right."
This video is a slow "how to" for you to study.
Note that though I've suggested the pinky finger for the highest note in each inversion, you may feel free to use your right hand ring finger. Use whichever "feels right" as you work on this.
What about your left hand?
I'm glad you asked!
For each chord, take the Root note of the chord (#1, #4, or #5) and, using pinky and thumb of your left hand, play that note to the left of your "chord" or right hand, but play two of the same note an octave apart. This will fill out the sound as you play each chord.
How are you?
Is there anything not quite clear? Please ask questions. Go back over the lesson, one line at a time, one finger at a time, and it will start to make sense.
Are we going too fast?
I've not heard from you recently. Did you "get" the last lesson? This one? Without your feedback, I can't tell if I'm getting through to you.
Remember, the goal is to make it sound right. If it is starting to sound right to you, then we're on track.
Please leave your comments below.
Let me know how you're doing.
List of Braille Piano Method Posts
The Braille Piano Method - Playing On The Black Keys 🎹
The Braille Piano Method - Lesson One 🎹 Melody
The Braille Piano Method - Lesson Two Chords
The Braille Piano Method - Lesson Three Inversions
FIN
LOOK! Check out our amazing product:
>>CLICK HERE!<<
You are why I'm here on Steemit!
I have very eclectic interests and hope, over time, to write about them all.
⬇️To Check Out @creatr's World⬇️CLICK Each Image Below⬇️

|

|

|

