It's so lovely how everyone is busy trying to create good content to the community and hope it gets many upvotes. When your article is formatted in a neat and profesional way, it attracts readers and allows them to more easily understand the ideas you wish to present.
In this article, i will try to point out some html\markdown syntax which you can use to beautify your work and make it more readable by others.
Note: The following html/markdown is applicable to both steemit and busy.org
Now here a simple guide to using basic syntax:
HEADER
Use headers to make a title for each section of a post. Especially long posts are easier to read when there are sections and headers so it's easy to scroll from section to section.

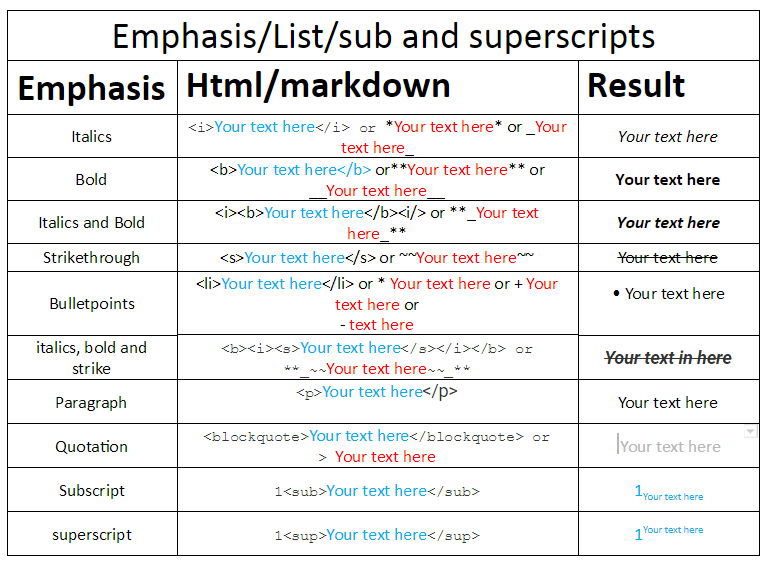
<h6>###### using hashtags or html, it is the same effect. The more complex post you make, the less you use markdown, because markdown and html don't mix well</h6>
Paragraph
To start a paragraph : <p>Your text here</p>
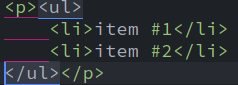
Bullet
* text here
- text here
Result below:
and here is the example in html:
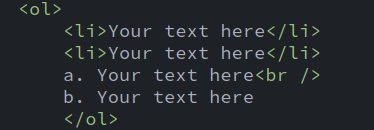
Numbering/Alphabet
Numbering/Alphabet
Markdown sample shown below:
1. Your text here
2. Your text here
a. Your text here
b. Your text here
Result below:
- Your text here
- Your text here a. Your text here
b. Your text here
Using Html for a numbered or bulleted list is almost the same thing. Here is an example of the ordered list shown above:
Quotation
Quotation > Text here or <blockquote>Text here </blockquote>
Result shown below:
Text here
For blockquote, if you are quoting more than one paragraph, you must open and close the blockquote for each paragraph. Otherwise Steemit will be confused and not render the code correctly.
Page break
Page break syntax: <br />. This creates a page break (space down or enter)
Multi-column
Multi-column allows you to have your text in two column. html syntax to use is : <div class=pull-left>
Your text in here for the Left column
</div>
<div class=pull-right>
    Your text  in here for the Right column
    </div>
Result: 
Centralize
Centralize allows your text or image to align to the center.
Text:<center>Your text here</center>
Line
draw a line of demacation <hr />
Result :
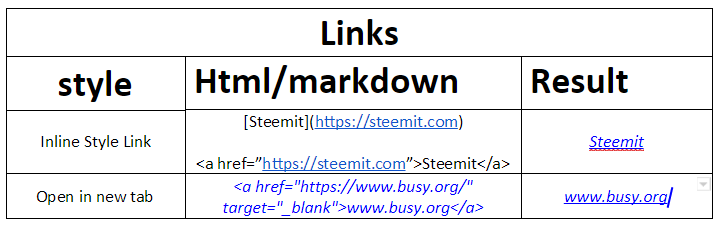
Link
Link for text [Your text in here](https:// Link here) or <a href="http link here">Your text here</a>
Inline code
Inline code syntax: `markdown/html code here`` or <code>markdown/html code here </code>
Result: markdown/html code here
Creating a Table
First, you have to write your text using "|" to seperate the text. This "-|-|-|-" to create the numbers of column. Example:
Number|Name|Objects
|-|-|-
Result shown below :
| Number | Name | Objects |
|---|
Now adding more text to the table, use the example shown below:
Number|Name|Objects|-|-|-1|knowledges|Syntax2|steem|powerResult shown below:
| Number | Names | Objects |
|---|---|---|
| 1 | knowledges | Syntax |
| 2 | Steem | Power |
Note: Where "Text" is written as shown in the box above, picture link can also be used which means, you can either add a text to the table or a photo.
Video
Videos can not be added directly so you simply copy the video url as shown in the image below.
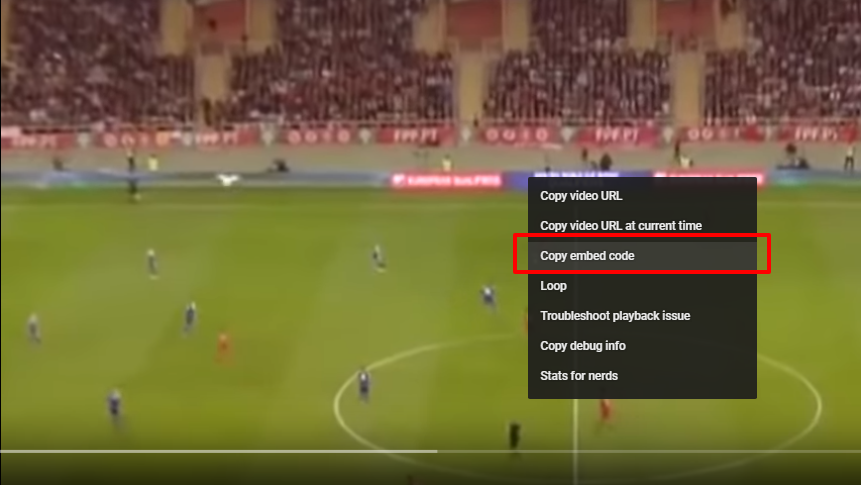
Once link is copied, paste it on your working space and centralise
The youtub embeded link looks like: <iframe width="1499" height="539" src="https://www.youtube.com/embed/-zf79kSZFAU" frameborder="0" allowfullscreen></iframe>
Image alignment
If you don't care about centering or aligning images just use the easy markdown to put and image in your document.
Image: 
Otherwise you can use the below html examples for a nicer looking post!
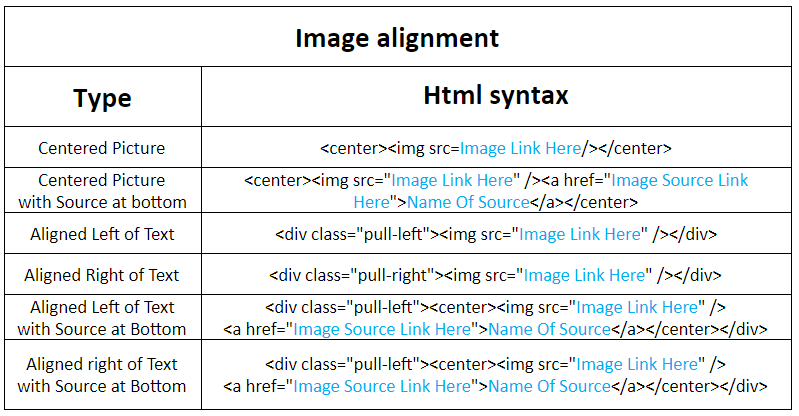
Copy/paste the following and edit
- Centered Image:
<center><img src=Image Link Here></center> - Centered Image
with Source at bottom:
<center><img src="Image Link Here" /><br /><a href="Image Source Link Here">Name Of Source</a></center> - Aligned Left of Text :
<div class="pull-left"><img src="Image Link Here" /></div> - Aligned Right of Text :
<div class="pull-right"><img src="Image Link Here" /></div> - Aligned Left of Text
with Source at Bottom:
<div class="pull-left"><center><img src="Image Link Here"/><br /> <a href="Image Source Link Here">Name Of Source</a></center></div> - Aligned right of Text
with Source at Bottom:
<div class="pull-left"><center><img src="Image Link Here"/><br /> <a href="Image Source Link Here">Name Of Source</a></center></div> - Align image with text and source:
<div class="pull-left"><center><img src="Image Link Here"/><br />
    <a href="Image Source Link Here">Name Of Source</a></center></div><p>Your text here</p>
<div class="pull-left"><img src="https://steemitimages.com/DQmUTo8NZXPWNuriBijmJHK65Pox641fwn4tYoPsQje3XYC/steemlll.png" /><br /><a href="https://i0.wp.com/kyusho.com/wp-content/uploads/2016/09/Steemit.png">[Image sorce]</a></div><p> It's good to see how the platform steemit is transforming, Creating a very powerful community that stands to help one another grow. Even if one is just starting today, with there good work, they could all become a whale as time goes on. People from all around the world are engaged in this community and are rewarding each other with steem.I am so happy to be a part of the community.If you aint in the community yet , consider joining now</p>
Result shown below :

It's good to see how the platform steemit is transforming, Creating a very powerful community that stands to help one another grow. Even if one is just starting today, with there good work, they could all become a whale as time goes on. People from all around the world are engaged in this community and are rewarding each other with steem.I am so happy to be a part of the community.If you aint in the community yet , consider joining now.
References and Further Reading
- Mastering Markdown
- Pimp Your Post with this Simple Cheat Sheet! Just COPY and PASTE!
- @steemitguide: How to display Content Floating Left/Right and learn to Paragraph Text with Linked Images
- @ottodv: Handy Steemit Markdown Guide with Samples
- @xeldal: How to Liven up your Steem Posts with Markdown
You may be intrested in
- The Blockchain, The People and the world at large
- Is steemit.com down? Why can't i access it ?
- An overview on the Smart Media Tokens (SMTs)
- Etiquette of Steemit
- I believe in you because you are unique and can change everything.
- Looking up to the sky and wish that one day , i would also travel round the world
- some basic html syntax to help format your text
It is a great opportunity for me to share my knowledge to everyone. It took me about 8 hours to set this up, trying to check for errors before publishing to the blockchain. I do hope this tutorial is helpful to you. Thank you for reading, and thank you to @inquiringtimes for helping with some editing.
Please Let me know if any of this is confusing, or if there are still things I have left out. Any questions or comments will be appreciated!