So far in this series have discussed
- Cameras and Lens
- Taking your first Astrophoto
- Camera Accessories
- Tracking and Guiding
- Polar alignment
In this installment - part 4 - of "Astronomical Imaging - The Basics" I will discuss techniques for obtaining accurate focus of both camera lenses and telescopes. Critical focus is extremely important in astrophotography and can be difficult for newcomers to get right. I will discuss some theory followed by some practical techniques for focusing (but feel free to skip the theory part to the "Focus Techniques" section).
Theory
Critical focus
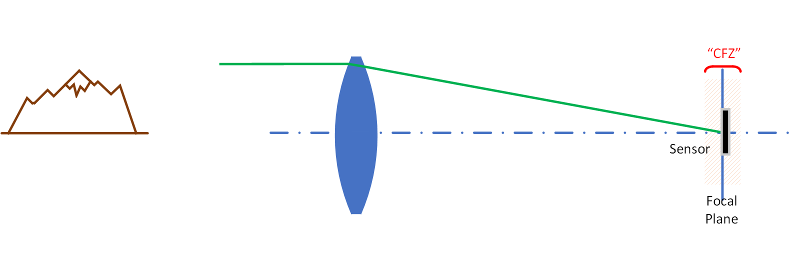
To obtain a sharp image, a camera sensor needs to be positioned in the Critical Focus zone (CFZ). This is zone is a very small region (as we will see shortly) and as a result the focusing mechanism needs to be very precise. CFZ is often estimated by the following formula.

λ is the wavelength of light being observed
N is focal ratio
This formula is based on the expansion of a star’s Airy disk as focus moves away from the point of perfect focus. The Airy disk is the result of the diffraction of light from a point source passing through an aperture. This is the behaviour seen with stars seen through a telescope and can in fact be seen in a telescope under good conditions.
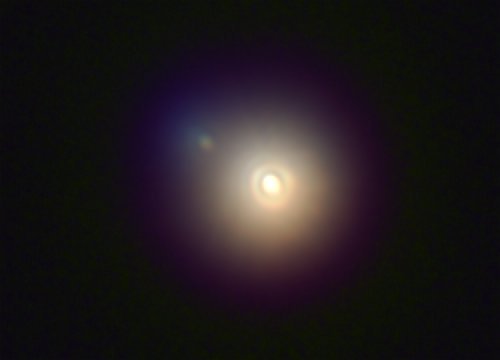
Supergiant star Antares was imaged by the author with a 14” telescope at high resolution under steady conditions. You can see the Airy disk diffraction rings clearly on the main star and faintly on the blue companion
A theoretical Airy disk is shown in the left-hand image below. As the image is defocused the light and rings of the Air disk begin to spread out, until the first light ring corresponds with the first dark ring from the in focused airy disk. This point is shown in the right-hand image and corresponds to when the CFZ is breached.
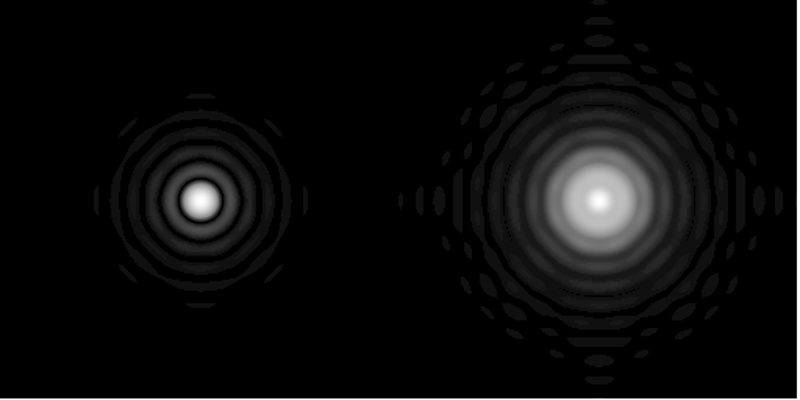
The original formula for CFZ originates back in 1955, from J.B. Sidgwick’s Amateur Astronomer's Handbook . With modern sensors however, it has been found that CFZ calculated this way is not sufficiently stringent for truly high-resolution work and a value of 1/3 of computed CFZ is a better criterion for optimally sharp focus. This is apparent when comparing the side-by-side images above, with the CFZ defocused image on the right being noticeably bloated.
Based on 1/3 of computed CFZ as the criteria for sharp focus, the computed defocus tolerance has been calculated for the following common focal ratios at a wavelength of 500nm (blue-green light). Additionally, the standard CFZ is also given.
| Focal Ratio | CFZ | 1/3 CFZ |
|---|---|---|
| 10 | 0.243 | 0.081 |
| 8 | 0.156 | 0.052 |
| 6.3 | 0.096 | 0.032 |
| 4 | 0.039 | 0.013 |
| 2.8 | 0.018 | 0.006 |
| 2 | 0.009 | 0.003 |
| 1.4 | 0.006 | 0.002 |
For comparison a sheet of A4 paper is typically 0.050 mm thick, so the tolerance for error at fast focal ratios is incredibly demanding. In fact, astronomers using fast focal ratio telescopes in astrophotography usually have temperature compensated focusers since as the components within the telescope expand or contract with temperature.
Having said this newcomer’s will likely not need to focus to within these demands, but this is a demonstration of how critical focus is for astronomers pushing for the best results.
Hyperfocal distance
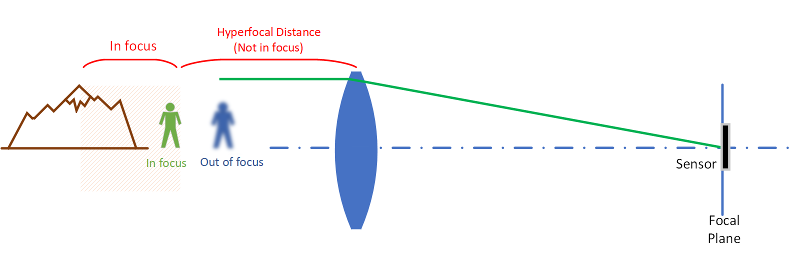
Hyperfocal distance defines the closest point in which objects are in focus
Hyperfocal distance is defined as the minimum distance at which objects are acceptably in focus, when a lens is focused at infinity. This can be useful distance to know when doing nightscape photography where you wish to have foreground objects in focus as well as the stars. It can be estimated as per the following:
 H is the hyperfocal distance
f is the focal length
N is focal ratio
c is the circle of confusion diameter
The circle of confusion equates to how much a point source is spread out and can be thought of as the amount of smearing of detail. It depends on the format and how much blurring of detail you wish to tolerate, but typical values run from 10-30 microns. If we were to talk critically sharp as per the previous section, then the value for c would be a lot smaller, but this is generally not the case since the main subject is at infinity. Suggested values for “c” are as follows:
| Sensor Format | c (mm) | Example Cameras |
|---|---|---|
| 1” | 0.010 | Sony RX100 |
| MFT | 0.015 | Olympus OMD/Pen, Panasonic MFT |
| APSc | 0.020 | Canon and Nikon Crop cameras |
| 35mm | 0.030 | Full frame cameras, eg Canon 6D |
As an example, let’s take a full frame camera equipped with a wide angle 24mm focal length lens. The subject will be an image of the milky way with a person standing in the foreground (and standing perfectly still). If we use a focal ratio of 2, how far does the person have to stand to be in focus while the milky way is sharply in focus? From the above formula then we would calculate the following:
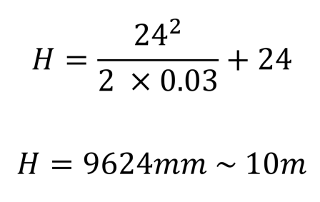
Therefore, a person would need to stand at least 10 meters from the camera to be “acceptably sharp”. If they needed to stand closer, then you would need to stop down the lens accordingly.
Focus Techniques
Camera Lens Autofocus
Camera lens autofocus is possible on longer lenses using a bright star, although this depends very much on the camera body itself. You will need to test this yourself. If the moon is available that is another option for autofocus. In general, I haven’t had much success using autofocus with stars, but this was with basic low end DSLR’s with inferior autofocus units, so your mileage may vary.
Camera Liveview
Live view is very handy feature on most modern cameras and can be used to get very good focus quickly and easily. It’s also quite simple as follows:
| Step | Process |
|---|---|
| 1 | Ensure camera is in manual focus mode |
| 2 | Verify that live view is configured best for low light. This will vary for camera to camera, but look at raising ISO, altering exposure, to see what works the best. |
| 3 | Aim the camera at a bright star and using either live view or viewing through the viewfinder, get the star as close as you can to be in focus. |
| 4 | Find a group of bright stars and aim the camera to them |
| 5 | Using liveview, zoom in and pan around to find a star that is easily visible but not too bright, and using the focuser get the star as sharp as possible. In case your wondering the animation below shows you what a star will look like as it comes to focus. |
| 6 | If possible zoom in to maximum and refine the zoom. A trick is to adjust the focuser just past best focus, then reverse back then forward again half way (keep track of turns of focuser). |
| 7 | Find another star in the view, repeating steps 5 and 6. |
| 8 | Take a single short exposure (maybe 5-10 seconds) and preview the image from one corner to the opposite corner to verify focus is good across the whole frame. |
| Your done! Keep in mind you may have to repeat this as the night progresses and the temperature drops |
For best results with live view you may wish to tether a laptop to the camera, assuming there is suitable remote control and live view capability. This is not always the case, but most of the recent Canon DSLR’s work well this way.
Bahtinov mask
There is very simple and easy to use focusing aid called a Bahtinov mask. It is simply a flat screen that fits on the front of the telescope which makes it much easier to find the point of best focus in a telescope. It can also be used also on lenses, but keep in mind the view is dramatically dimmed so you may not be able to get a bright enough star for this work with. An example of a Bahtinov mask design is shown below.
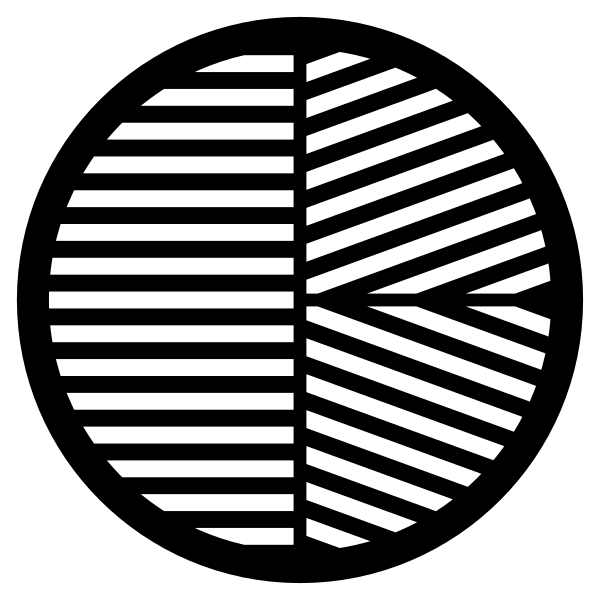
The operation of the mask is best explained by looking at the follow animation that shows how a star looks as the focus is adjusted from one side of focus to the other side of focus. The level of defocus is indicated in the animation in the information panel and perfect focus occurs when that value is 0 microns. Notice at the very point of perfect focus the 3 pikes all align in a symmetrical cross with a point in the center. This is what we strive for when using a Bahtinov mask.

Bahtinov masks are very easy to make, and an ideal material is black corflute which can be easily cut with a knife and is sturdy enough to keep its shape (as well as being dew resistant). To make one go to astrojargon.net input the parameters for your lens/telescope and generate an SVG file. Print out the SVG file and use this as a template to cut out the mask. Alternatively, you can purchase premade masks, but they need to be designed specifically for the lens or telescope you are using.
More sophisticated Focusing Methods
There are more sophisticated methods available that are more precise than the above techniques. These are implemented in many astronomical software packages, so let’s briefly look at some of these now.
FWHM : A method that constantly monitor’s a stars brightness profile using a Full width at half maximum calculation. The goal is to minimize the stars FWHM.
Intensity : Intensity is a measure of the central peak brightness of a star. As focus is reached more light is concentrated at the center of the stars brightness profile, so the goal is to maximize intensity.
Contrast : Contrast methods look at the transitions between detail, so for example the edge of a planet against the dark sky background. The goal is to have the steepest brightness gradient between the background and the planet edge.
In addition to these techniques electric focusers are often fitted to telescopes to prevent bumping and allow more controlled focusing.
Conclusions
Once tracking and focusing methods have been mastered it’s time to do some actual astrophotography! In the next instalment I would talk about different types of astrophotography including piggyback and prime focus methods (as applied to planetary and deep sky objects).
References/Further reading
1. J.B. Sidgwick. Amateur Astronomer's Handbook (1955)
2. D.S.Goldman, B. Megdal. Get Focused! (2010)
Aberrator
NOTE: All images and diagrams are the author’s unless otherwise noted. Please credit me if using these.