Today we will talk about there how to create a panorama in manual mode.
Many modern gadgets and cameras have the "Panorama" shooting mode in their arsenal. The device program itself stitches several frames and you get a photo in Jpeg format. On the one hand, this is convenient, but at the same time, you do not control the processing process. This format compresses digital information and part of it becomes inaccessible for further use. This means limitations in the digital processing of the final result (your panorama).
Сегодня мы поговорим о там, как создать панораму в ручном режиме.
Многие современные гаджеты и камеры имеют в своём арсенале режим съёмки "Панорама". Программа устройства сама сшивает несколько кадров и вы получаете фотографию в формате Jpeg. С одной стороны это удобно, но при этом вы не контролируете процесс обработки. Этот формат сжимает цифровую информацию и часть её становится недоступной для дальнейшего использования. Это означает ограничения в цифровой обработке конечного результата (вашей панорамы).
I bring to your attention a method that is devoid of this drawback. The result of frame stitching is written to a DNG file.
All the original information will be stored here in raw form, which allows processing this file with the greatest possible efficiency. This means that after receiving a panorama in this way, you can significantly edit it in Lightroom or another editor.
DNG (Digital Negative Specification), Digital Negative is an open format for Raw image files used in digital photography. Developed by Adobe Systems to create a standard format for Raw image files instead of many different formats from different camera manufacturers. Announced September 27, 2004.
Я предлагаю вашему вниманию способ, который лишён этого недостатка. Результат сшивания кадров записывается в файл формата DNGDNG (Digital Negative Specification), Цифрово́й негати́в — открытый формат для Raw-файлов изображений, используемый в цифровой фотографии. Разработан компанией Adobe Systems с целью создать стандартный формат для Raw-файлов изображений вместо множества различных форматов разных производителей фотокамер. Анонсирован 27 сентября 2004 года
Здесь будет храниться вся изначальная информация в сыром виде, что позволяет обрабатывать этот файл с максимально возможной эффективностью. Это значит, что получив панораму этим способом, вы можете значительно редактировать его в Лайтрум или другом редакторе.
How it works
Step 1 - Choose your subject. Usually, it is a landscape or urban landscape. Define the borders of the beginning and end of the panorama.
Step 2 - you need to take several pictures sequentially from left to right so that they include the start and endpoints of the panorama.
Как это работает
Шаг 1 - выбрать объект съёмки. Обычно это бывает пейзаж или городской пейзаж. Определить границы начала и окончания панорамы.
Шаг 2 - необходимо сделать последовательно слева направо несколько снимков так, чтобы в них попали начальная и конечная точка панорамы.
Further work is done using a computer.
Some details of the shooting
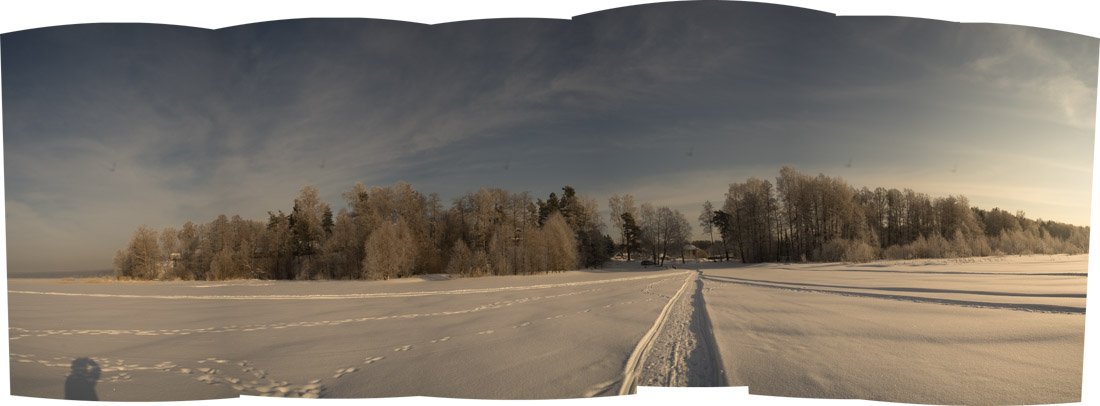
It is advisable to use a tripod oriented to the level of the horizon so that the horizon does not rise or fall while turning the camera. I shot handheld, so the result of stitching the pictures had jagged edges.
It is necessary that each subsequent frame slightly overlaps the previous one.
Дальнейшая работа происходит с использованием компьютера.
Некоторые нюансы съёмки
Желательно использовать штатив ориентированный по уровню горизонта, чтобы во время поворачивания камеры горизонт не поднимался и не опускался. Я снимал с рук, поэтому результат сшивания снимков имел неровные края.
Необходимо, чтобы каждый последующий кадр немного перекрывал предыдущий.

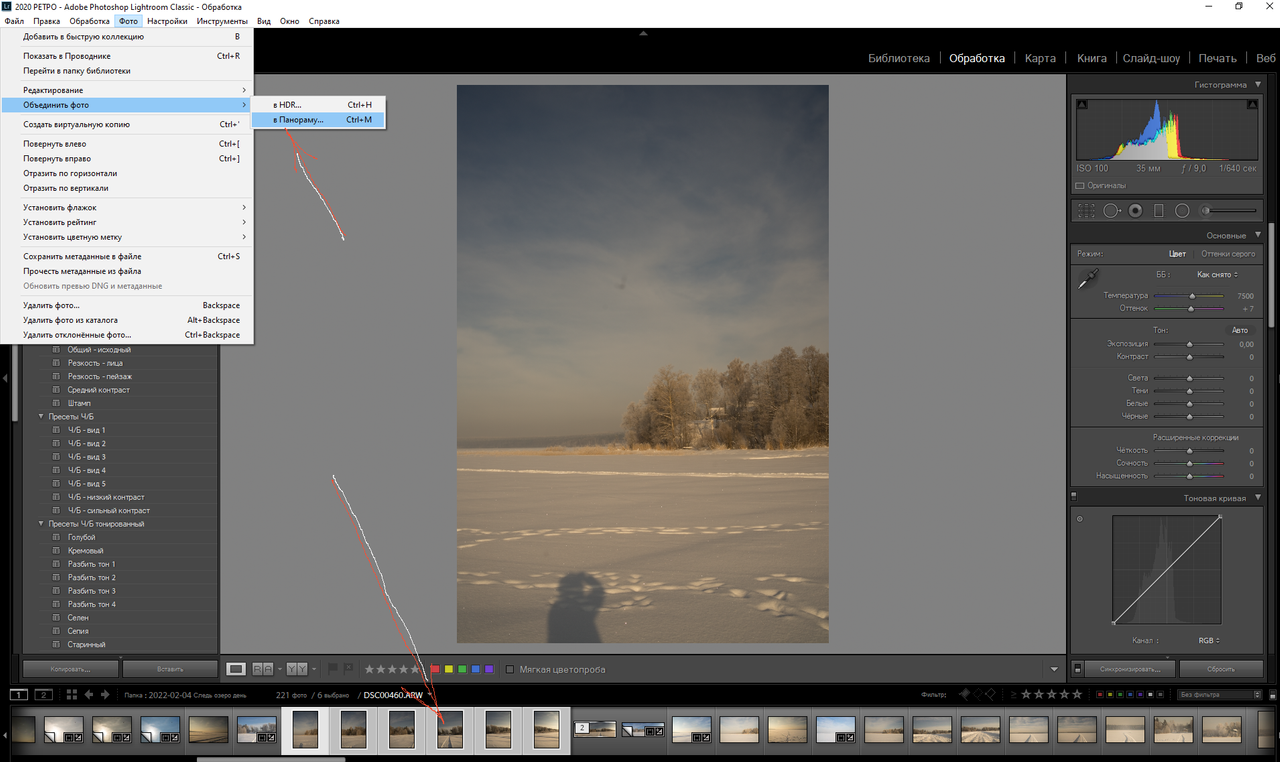
This screenshot shows that I used Lightroom and six original frames for processing. You can see that I took vertical shots. If I took horizontal shots, then with the same width of the panorama, it would have a much smaller height. This would be the narrow strip that can be cropped out of our shot.
So, I have selected those photos that need to be combined into a panorama. In the upper left corner of the screenshot, you can see the tabs that I clicked: "Photo" - "Combine photo" - "To panorama".
Из этого скриншота видно, что я использовал для обработки Лайтрум и шесть исходных кадров. Вы можете видеть, что я делал вертикальные снимки. Если бы я делал горизонтальные снимки, то при той же ширине панорамы она бы имела гораздо меньшую высоту. Это была бы узкая полоска, которую можно получить из нашего снимка кадрированием.
Итак, я выделил те фотографии, которые необходимо объединить в панораму. В левом верхнем углу скриншота видны те вкладки, которые я нажимал: "Фото" - "Объединить фото" - "В панораму".

After a while, a preview of your panorama will appear. Here you can select some correction options, but I usually just click on the "Stitch" button.
Через некоторое время появится превью вашей панорамы. Здесь можно выбрать некоторые варианты коррекции, но я обычно просто нажимаю на кнопку "Сшить".

After a while, the program will complete its work and you will receive its result. You can continue to work with this file, as with a regular RAW file in the same program. Obviously, cropping is needed here to even out the edges. The rest is up to your taste.
Через некоторое время программа завершит работу и вы получите её результат. С этим файлом можно продолжить работу, как с обычным RAW файлом в этой же программе. Очевидно, что здесь необходимо кадрирование для выравнивая краёв. Остальное по вашему вкусу.

To get such an image, I used the settings that are visible in the screenshot.
Чтобы получить такое изображение, я использовал настройки, которые видны на скриншоте.

Basic photo editing for beginners
Manual camera settings: exposure
Applying a polar coordinate filter

100% SP (manual translation to SP)
#club100

The time has come to build our own steem power
| ▽ | ▽ |
|---|---|
| Camera | Sony A7М2 |
| Lens | Samyang 35 1,4 |
| Location | Russia |
| Post-production | in LR |
Manual processing in Lightroom
From Russia with Love


SUBSCRIBE Here to join WORLD OF XPILAR Community
Regards, @bambuka
