Welcome to Part 5 of The Beginner's Guide to Steemit, a project seeking to demystify Steemit to brand new users and make joining the platform a seamless experience. If this is your first encounter with the Beginner's Guide, be sure to read previous installments:
- Introduction
- Part 1: Steemit Quick-Start Guide
- Part 2: Logging In and Keeping Your Account Safe
- Part 3: Steemit Currencies: STEEM, STEEM Power, and STEEM Dollars
- Part 4: Your Account's Wallet
In Part 1 of this series, we quickly went through the basic functions of your Steemit account, including the social media aspects. This lesson will provide more details about the specific social actions you can take with your account here on Steemit! Let's get started:
Image created by @ethandsmith using CC0 resources and Nexa Bold and Alegreya Sans fonts. Released under a CC0 1.0 Universal License.
What You'll Learn:
- How to share a blog post
- How to tag and title your blog posts
- How to comment on other users' blogs
- How to follow other users
- How to resteem a post
- What is reputation, and how does it change?
Social Account Functions

Image created by geralt. Used under a CC0 1.0 Universal License.
Every Steemit account may perform several basic functions that you'll recognize from other social media websites. All of these functions involve sharing content and interacting with others.
First, you'll need to share content by publishing blogs, or posts, as you'll hear used interchangeably. Similar to a blog post on Wordpress, a status on Facebook, or a photo on Instagram, blogging is the main way to share content on your profile on the STEEM blockchain.
Next is commenting. Similar to comments on most other social media sites, you'll be able to share your thoughts on others' posts or your own by typing out text responses below any blog or previous comment.
You may also follow other users to keep track of what they share. If you like their content, you may choose to resteem it so it shows up on your blog.
Finally, there's voting. On Facebook and Instagram, users "like" or "react" to content to show their approval. On Reddit, users may "upvote" or "downvote" to express their approval or disapproval. Steemit's voting system is most similar to Reddit, in that you vote on content you like as a way of showing approval (however, remember that your Steemit votes have value!).
Voting on Steemit is a bit more complicated than it may seem on the surface. It is absolutely a way to show your approval of other content, but voting has some limitations and other uses that I plan to devote the entire next lesson to understanding fully.
Now that we've reviewed the main social functions, let's look at each one in a bit more detail:
Blogging
Image created by geralt. Used under a CC0 1.0 Universal License.
Blogging on Steemit is your outlet for creativity. It's how you share your thoughts, stories, photos, music, videos, and other content with the Steemit community. Posts will show up on your profile in chronological order. Don't worry, there aren't any sorting algorithms, so users visiting your profile will see things exactly as you have shared them. To see how a profile looks with blog posts, feel free to visit mine to get an idea of what the layout looks like on Steemit.com.
Sharing a blog post is easy. When you login to Steemit, you'll see a circular button with a pencil on it in the top right of the page:
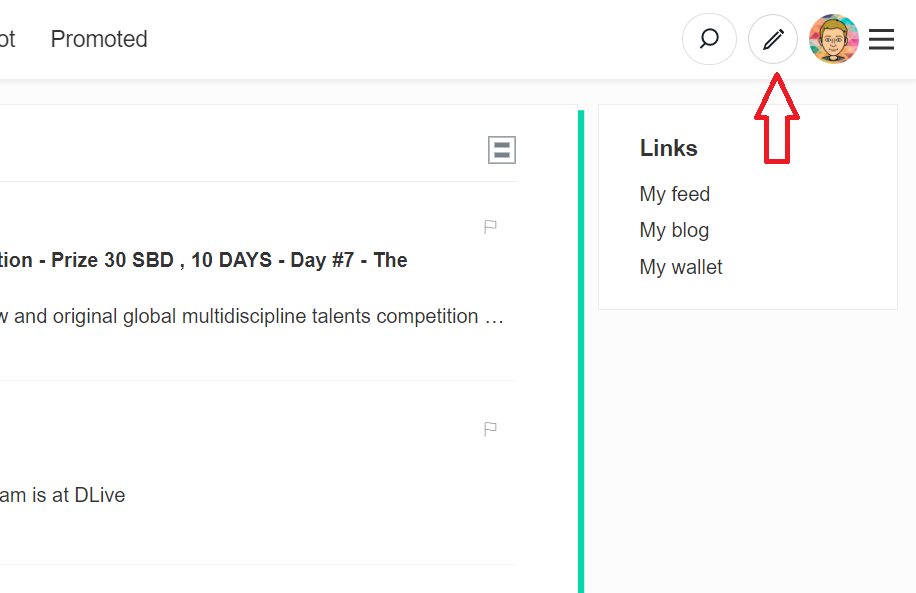
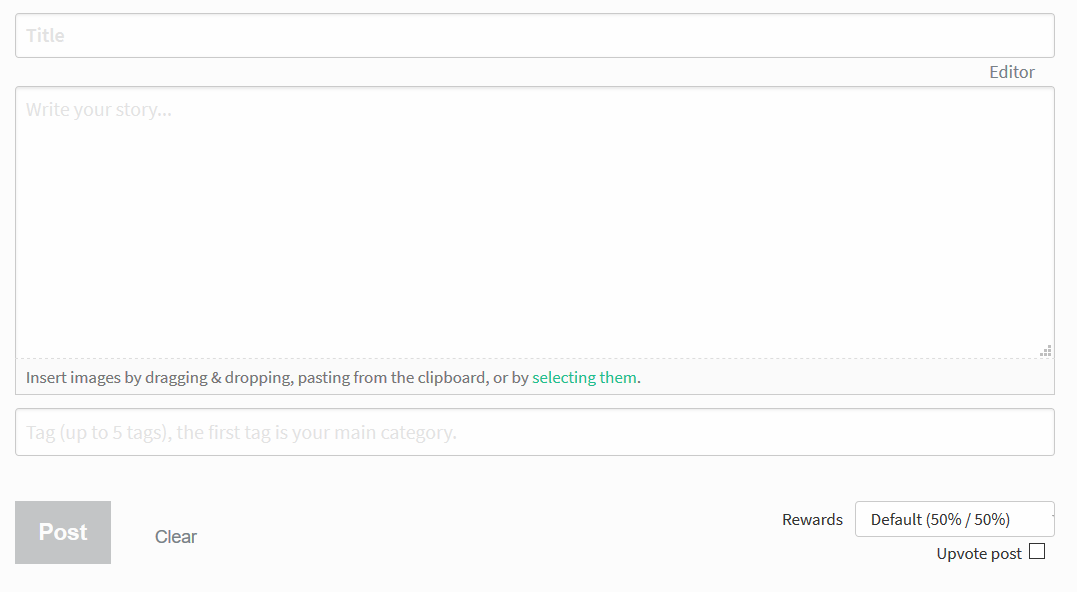
When you click it, you'll be taken to a fairly bare-bones input field that consists of a text field for a title, a paragraph field for your post's content, and a field for tags:
Titles
The title of your post is what will appear in bold on your profile and elsewhere on Steemit. Visit my blog or the Steemit home page to see examples of titles. These are usually designed to give users an idea of what your post is about, so you'll want to make sure your title does a good job of summarizing your post. There are various strategies for creating good titles, but as a general rule, make it interesting, but be sure to communicate the main idea of the post!
The Body of Your Blog Post

Image created by mohamed_hassan. Used under a CC0 1.0 Universal License.
The next field is where the world is open to you. What you include in the "Write Your Story..." field will forever be immortalized on the blockchain (Forever? Yes, that's right, the blockchain is permanent. We'll talk about the implications of this in a later lesson).
You can blog about anything your heart desires. Food, travel, news, cryptocurrencies, your pets. Anything. If you're thinking of something right now, grab a piece of paper or open Notepad and write it down! All ideas could turn into fantastic posts on Steemit!
Markdown
Blogs on Steemit may be formatted using a language called Markdown or by using the "Editor" button on the Compose page to open a menu with formatting options.
Markdown can be intimidating at first, but once you learn the basics, formatting will be easy! If you've ever used HTML, markdown is similar, and markdown works alongside most HTML code. If you're new to Markdown and HTML, don't worry. I'm going to dedicate an entire lesson to post formatting.
If you're interested in learning more about how Markdown works as well as some of the formatting tools you can use on Steemit, check out the Markdown Styling Guide! Here's an example:
Consider how I've used links in my posts so far. I can take part of a sentence and link it to whatever I want.
How? Markdown makes it simple. You include the text you want to link in brackets and the link in parentheses right beside it. So this:
[Here's a link to my blog](https://steemit.com/@ethandsmith)
becomes this:
Neat, right?
If you were paying attention, you'll even notice that I used a markdown trick to make the above code appear as code instead of a link!
There are many more tricks like this that will help you format your posts, so check out the Styling Guide or a guide I wrote a while back if you're interested, or simply keep reading. We'll talk all about Markdown in a later lesson.
Images
You can also use images in Steemit posts. Steemit allows you to drag and drop images into the text field or use links to images you've already uploaded on your personal blog or a hosting service like Imgur. If you choose to drag and drop an image into the Compose field, Steemit will host the image for you and generate the proper markdown code. If you're self-hosting images, you can use the following markdown to display an image:

so an example of this is

which I used to display the image you see underneath "The Body of Your Blog Post" header!
Please be sure that if you are using images in blog posts that they are either your own images or licensed for commercial use.
Using content that is not your own without proper license and attribution may result in negative consequences here on Steemit. For more information on this subject, here are a few helpful links:
- Let's talk about: Copyright - @xposed
- Rose's Creative Commons Resource Library :: Where To Find Images - @therosepatch
- Creative Commons Licenses: Reuse and Attribution
You may have noticed that each of the images in this post (that aren't screenshots) have a small attribution text below them. I invite you to adopt this general strategy, which was inspired by @rubencress:
<center>
<sub>
Image created by [Image Creator Name](link to original source). Used under a [Insert License Name Here](License URL).
</sub>
</center>
For example, consider the image I used at the beginning of "The Body of Your Blog Post" section. Here's what the code looks like:
<center>
<sub>
Image created by [mohamed_hassan](https://pixabay.com/en/silhouette-it-business-laptop-man-3165210/). Used under a [CC0 1.0 Universal License](https://creativecommons.org/publicdomain/zero/1.0/).
</sub>
</center>
Note: These codes use a combination of HTML and Markdown, just in case some of the code looks unfamiliar. Steemit is great because it accepts both!
We will discuss plagiarism and attribution in more detail in later lessons!
Once you've typed up your post, now you need to decide what categories to place it in!
Tags

Image created by TheDigitalArtist. Used under a CC0 1.0 Universal License.
Tags are categories. When you browse to the Steemit home page, you'll see a list of the most popular tags on the left side. Each Steemit post may have up to five tags, one primary tag, and four secondary tags. These tags will allow other users to find your post if they are browsing through posts that have specific tags.
You can try it! Browsing a specific tag on Steemit is pretty easy because the URL structure on Steemit is elementary. You may browse through tags that are "trending," meaning they have received the most votes and engagements over the past few days, or "hot," meaning they have received large amounts of votes and engagements in a short amount of time, or "new," which simply shows the latest posts shared with a given tag.
Pick a tag you're interested in and add it to
https://steemit.com/hot/[your tag here] or
https://steemit.com/trending/[your tag here] or
https://steemit.com/new/[your tag here]
Alternatively, browse to the Steemit home page and select one of the tags on the left side of the page.
Tags may be used strategically since they can be almost anything. If you're running a contest, for example, you could create a new tag that all entries may be tagged with, which would allow you to view all entries with relative ease. Think of tags as similar to hashtags on Twitter or Facebook, in fact, tags may appear with the pound sign within Steemit blogs, e.g. #steemit. Clicking on them will take you to view all of the latest posts with that tag.
Commenting

Image created by OpenClipart-Vectors. Used under a CC0 1.0 Universal License.
Once you have shared a blog post, other users will have the opportunity to comment on your posts, similar to how you can comment on other social media websites like Facebook and Instagram.
It's simple: just scroll to the bottom of a post that you like, click reply, and a field will appear for you to leave your response. This field also supports markdown, so you'll have the full range of formatting options that you already do when sharing a blog post.
Click submit to share your comment, and then others may reply to your comment in a similar way. These threads may continue as long as someone keeps responding! Other users may vote on comments that they like, so you can earn rewards for great comments and reward others for their responses!
Commenting is also one of the best ways to engage other users and gain followers.
If you find a post you like, read through it, find parts that you like, and comment directly about them. Engage the user about their post. Tell them what you like and what you don't like. We will talk more about engagement in a later lesson, but for now, here's a great guide for how to leave excellent comments which I strongly encourage you to read before beginning to engage others on Steemit.
Following

Image created by Alexas_Fotos. Used under a CC0 1.0 Universal License.
When you register for Steemit and login for the first time, you'll be taken to your "feed" page, which will be empty. This page is where posts by users you follow will appear.
Following a user on Steemit is very similar to following a user on Twitter or Instagram. If you find a post you like, click a user's name at the bottom, and you'll see a small box pop up that has a "follow" button.
This follow button also appears at the top right of any user's profile, which may be accessed by placing someone's username after steemit.com/@, for example, the URL of my profile is @ethandsmith. If you click that, you'll see a follow button in the top right of my profile!
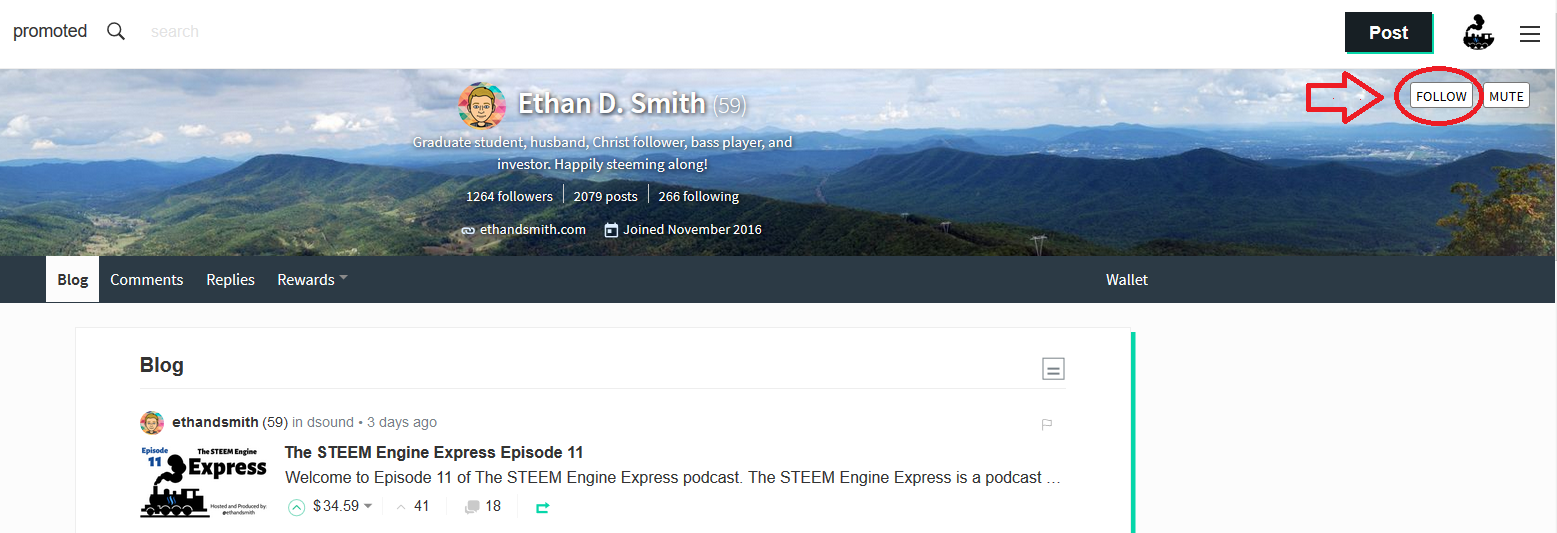
Clicking follow will make all posts by a given user show up on your feed page (steemit.com/@yourusername/feed). All posts show up in chronological order, so if you enjoyed having that "novel" feature on Facebook, Twitter, and Instagram back when they first got started, you'll like Steemit. There are no sorting algorithms, no suggested posts, just a feed sorted by date and time.
Resteeming
Resteeming is the act of sharing someone else's blog post that you like so that it shows up on your blog as well, and thus shows up to your followers. Resteeming a post on Steemit is accomplished by clicking the small arrow icon that you'll find at the end of every post:

Resteeming is a great way to show your support for someone else's post, but keep in mind that resteeming is permanent. You'll be asked to confirm the action when clicking the resteem button, and this is your last opportunity to say no. Resteems will appear on your profile with a small "resteemed" icon above them so other users will know that it has been resteemed by you.
This is similar to retweeting or sharing a post on Twitter or Facebook.
Reputation
Image created by fotoblend. Used under a CC0 1.0 Universal License.
Across Steemit, each time a user's name appears beneath a blog post or atop a comment or at the top of their profile, you'll see a number in parentheses. This number is that user's reputation score. On Steemit, reputation is a numerical measure of the notoriety of your account.
As a new user, your reputation will begin at 25. As you begin to receive votes and comments, you'll see your reputation score rise. Reputation increases and decreases based on the STEEM Power of the users who vote on your content.
Therefore, a typical strategy for increasing your reputation involves consistently posting quality content on your blog and receiving votes from a variety of users.
Increasing your reputation also becomes more difficult the higher you get. The current highest reputation on Steemit is in the upper 70s.
Your reputation may also decrease if you receive a significant amount of flags or downvotes, which will be discussed in the next lesson. Therefore, it is wise to avoid behaviors that may warrant flagging (we'll talk about dos and don'ts later).
Again, I suggest a consistent pattern of blogging, voting, and commenting in order to raise your reputation. Achieving a high reputation level does not happen overnight, so I encourage you to keep at it in order to reach the ranks of rep 60+.
It is also worth noting that just because someone has a high reputation on Steemit does not necessarily mean that he or she will produce quality content. Be sure to evaluate someone's full profile and resist the urge to rely only on reputation when evaluating quality content.
Voting
The last social function on Steemit that I'm going to discuss is voting, which is arguably the most important since it is how users assign value to other users' blog posts. As I mentioned earlier, voting seems straightforward, but there are many topics to discuss when it comes to voting. Therefore, the next lesson will be devoted entirely to discussing voting on Steemit.
What You Should Know
- What blog posts are and how to share one
- How to engage others with comments
- How tags are used across Steemit
- How to follow other users on Steemit
- How to resteem a post
- What reputation is and why it is important
Final Thoughts
I debated including this chapter of the guide at all since most of these topics are covered in the Quick-Start Guide. Let me know what you think. It might be useful to refer someone to this post instead of the Quick-Start guide so they won't have to scroll through the registration steps in order to read about social functions. Once again, I'm open to any and all feedback on this series! Thank you so much for reading and supporting this initiative. Next up is a lesson on voting!