An inevitable part of working with metals, is the almost alchemical practice of using different chemical for surface treatment.
In this post I will tell you about how I patinate my bronze pommels using Liver of sulfur, and how I mount it on the sword.

After the part is cast in bronze, it is covered in residue of the burnt sand and the scamolex I use on the inside to make the hole for the tang. I clean this of using a wirebrush, lots of water and various scrapers (to make sure i get all the little details cleaned)
I also grind down any imperfections and do some rough polishing. I am not to careful with this step, as it is to be a training sword(and just for myself, not for sale) and thus the level of finish is not that important. It is going to be beat up pretty bad in no time anyways.
After this treatment the metal is nice and shiny but it is not clean in the actual sense of the word. I need to get it completely clean and free of fat or oil before I can use any chemicals on it. Oil or fat act as a barrier to most chemical agents and so I clean it in an ultrasonic bath before doing any surface treatment.

I mix up some of the Liver of sulfur with a little bit of water, app. 2 parts Liver of sulfur to one part water. I have been experimenting with this and found that to be an acceptable mix. Remember potassium sulfide is not good for you! it will dissolve your skin and is both harmful for you and the environment so use with caution and don't get it on your fingers

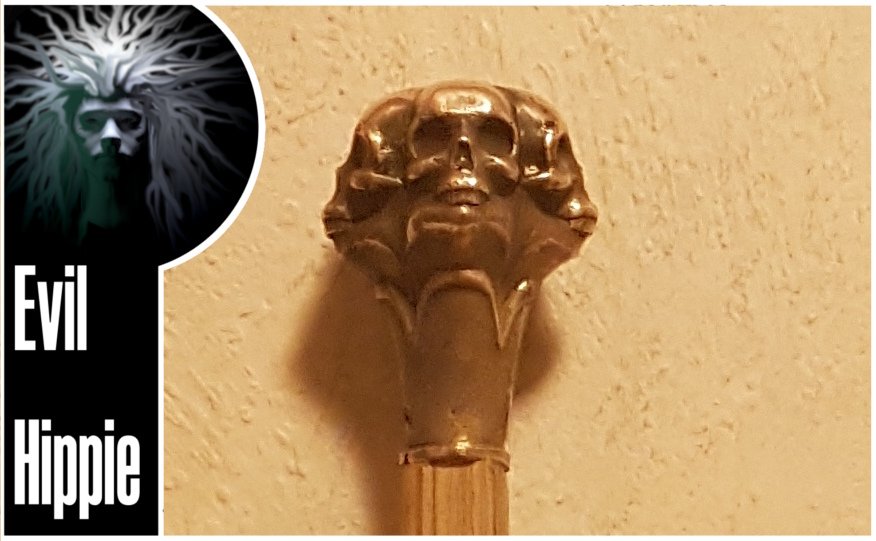
After having soaked for a few minutes the bronze will have a very nice blackish brown colour. It look really cool, but it is not very durable, so the raised areas are going to get rubbed clean and shiny again in no time. That is OK, because that is exactly the effect I am looking for.

The bronze will get an aged look, and an increased contrast which will make the pattern stand out more. I give it a short polish before going on to the peening.
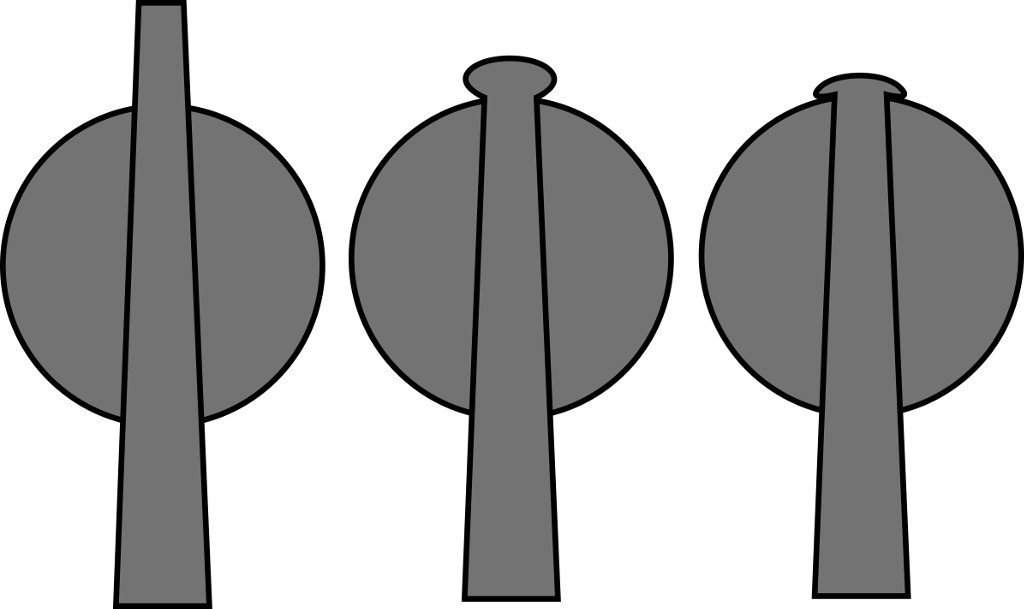
Unfortunately I do not have any pictures of the peening process, but I have made a small diagram to show how it is done.
The pommel sits on the tang in such a way that is cannot go any further down because the tang gets broader.
To fix it in place it is necessary to make the tip of the tang broader as well. this is what is done with peening. Basically it is a matter of hammering on the tip until it mushrooms out sufficiently to fix the pommel in place. If you ever wondered what the wedge shaped part of a hammer is for, this is it.
I usually cold-peen the copper pommels because they drain the heat very quickly if I try to hot-peen them. For this to work the tang and pommel must be fairly tight fitting to begin with, otherwise the metal will work-harden and crack. If this is not the case, I sometimes make a small inset of copper, to fill the cap before I peen it.

finally the pommel is securely mounted and ready for the final polishing, and removing the marks from the peening process. After that, I can do the final step in finishing the sword which is mounting and wrapping the handle scales. If you have followed all my sword making in details posts, you will probably have noticed that i have not shown how i make and mount the quillons(cross guards).
That is true. I didn't get any good pictures of the process, so I will have to make another cross-guard to be able to make that post, but do not worry it will come.

Im EvilHippie, a compulsive creative and jack o' trades. If you want to know more about me, check out my introduction post here
If you like what you see, feel free to upvote, follow and resteem
or you can check out these recent posts
handling handles
printing tolerances
alternative pommel
silent wood
upgrade!