For all of you DIY lovers and enthusiasts, I have another treat for you. A couple of years back, when I was opening my gift shop, me and my hubby decided that everything inside will be hand-made, including the furniture. That included the main counter too.
ARE YOU READY FOR SOME DIY STUFF?
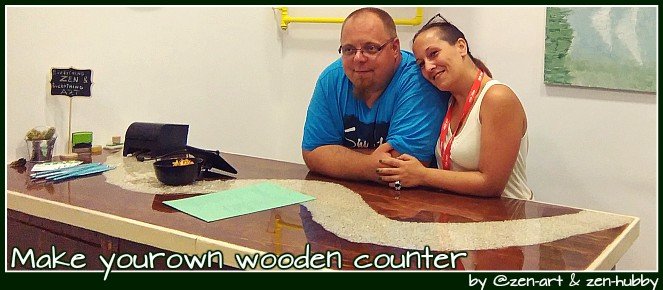
This was our biggest project and it took us some 10 days to finish it. For 10 days we have been working morning to night on this and are still very happy with an end result. Using scrap material and recycling always brings a smile to my face, especially when you see that thing you made with your own two hands that no money can buy. Follow my steps and see how we did it.
List of material and tools
- tape measure, pencil, and paper
- circular saw
- electric hand sander
- paint and brushes
- metal screws
- ACCU screwdriver
- wood varnish
- 2 wooden beams cut into 6 pieces
- wooden planks
- white pebbles 3mm in size
- epoxy resin
- hand woodworking router

The first thing we did was something like a design. We talked a lot and measured the area the counter would go to, it was custom made. When we had all the measurements some drawing came next.
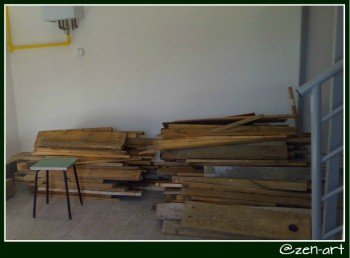
Planning was very important because we had to work with what we had, and what we had was a bunch of old planks and beams that were dusty and dirty. They were sitting in the garage for ages, almost forgotten. This is a picture of those old planks that we brought to the store. When I looked at them, I knew we were giving them new life and a new glorious purpose.

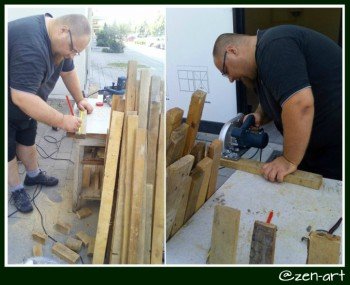
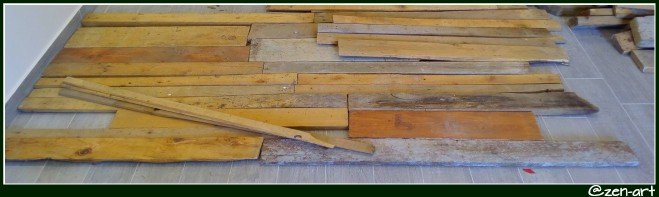
Measure - cut, measure - cut, measure - cut. This was our first day. Using the circular saw we made 2 beams into six smaller ones and played some "tetris" with the planks. I marked the area on the floor and had to find and arrange the planks so they would fit in.
I wanted a big counter and a tall one because I hate hunching over and wanted a large enough surface on top so I could have room for everything. We made it 1 meter in height, 1,7 meters long and 0,5 meters wide. When we made all the pieces that we needed, it was time to start arranging them and putting them together. Or was it?
Nope. It was not the time for putting the pieces together yet. Remember when I said that we had old, dirty and dusty material to work with? We needed to clean it up fist. That took some time.

BE CAREFUL!


made by @simgirl
Each and every plank had to be cleaned and hand sanded on all sides. It took me two days for this. Two entire days. We had a lot of material to work with and all of it had to be sanded to perfection.

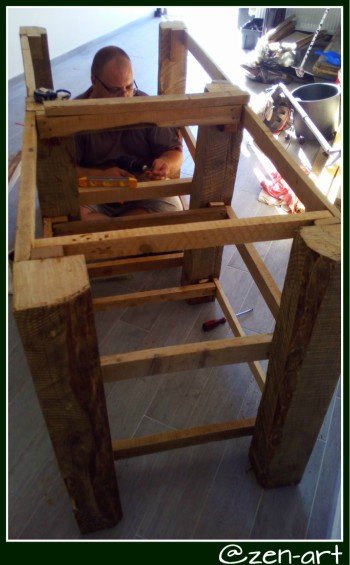
While I was getting blisters from all the sanding, my hubby was busy with making the core structure with the beams. That is why I had to finish sanding those beams first and then move onto planks. While I was doing the planks, he was making the structure.
Every pair of adjacent beams had to be connected with 3 small planks, one at the bottom, at the middle and one at the top. This not only connected them but insured stability. 21 small planks were used for that, and each one had to be the same in size. This was somehow tricky, but we managed. Luckily we had that circular saw that came to the rescue when needed.
This could have been made with only 4 supporting beams, like most of the tables and counters are made, but we wanted it to be extra durable and strong. Every beam and every small connecting plank was painted and varnished. Always remember to protect your wood.

Ok, time for putting the pieces together finally came. I have sanded everything and we could begin actually making the counter.
Using the ACCu screwdriver, we started attaching planks to the core structure. We had to be careful because every plank had its specific place. There was no room for error in this tetris game because only one mistake could be the difference between a job well done and a total disaster.
This would be so much easier if all our planks were the same but since we wanted that rustic and natural look and used old planks that we recycled, concentration had to be at high level and there was triple checking before any of the planks were attached.
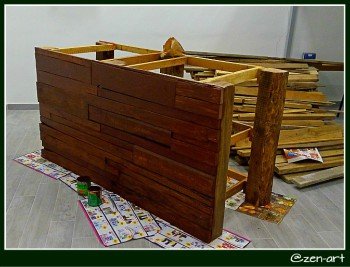
When the first side of the counter was finished, I started the paint job while hubby was doing the rest of the sides. We decided on the brown oak color that looked nice and natural, very rustic.

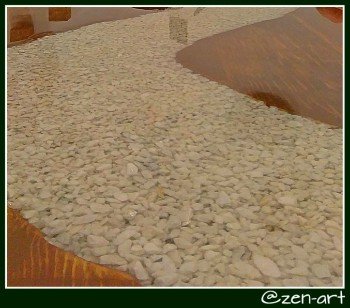
I wanted the top of the counter to be extra special and I did not want glass but wanted it to look like glass. I know, I am complicated sometimes. Hubby suggested raisin and when I researched the material, I agreed that it was the perfect option.
I wanted the top to really stand out so when we attached the planks I made my hubby make a river shape hole that went from one side to the other, using a woodworking router. I wanted a white river of rock so we went and bought some small white pebbles that would be my river.
On this picture, you can see that I already started painting the small sides of the top in white color. I love contrast so I decided that some more white was in order.
After we put the pebbles in the river hole, we had to put the raisin over. You can buy raisin in hobby art stores or in the construction stores. We bought the two component one and mixed it ourselves. Be sure to make a cardboard mold and put some cardboard on the floor too because you will be spilling and raisin is hard to remove.
BE CAREFUL!
Mixing of those components is an exothermic reaction and it generates a lot of heat!
When you mix the components you have to be careful because not only it gets hot really fast but it also gets hard really fast so you have to be sure to mix it and then put in over your surface right away.
Those two components that I am talking about are raisin and activator and they have to be mixed in the ratio 2:1, so, on 1 L of raisin you have to put 0.5 L of activator. We used 2 L of raisin and 1 L of activator because we needed to cover the rock river too. If it were a plain surface, we would have needed much less than that.
I takes 30 minutes for raisin to harden and then you have to let it rest for 48 hours to be finished. Do this in areas that are well ventilated because as the components are mixed together, they also generate a pretty bad smell that is kind of toxic if you breathe it in too much.
After the raisin was done and looking like the glass, all we needed to do is put wood varnish on all wooden surfaces and let it dry out. When that was done, so was our counter and we could finally rest. We did a really good job.
@zen-art & zen-hubby were very happy!
Let me know in the comments if you liked my project and if it was easy and interesting for you to follow. If you made something similar yourself, show me! I would love to see it. And... The most important thing...
Remember your 3 R’s: Reuse, Reduce & Recycle!
All images used in this post are mine and made by me, please ask for permission if you wish to use them, thank you.
For my recent Philosophy of hapiness posts follow these links:
- What is the difference between fault and responsibility?
- Are you carrying prejudices?
- Thank your parents, they did the best they could
- Where attention GOES, energy FLOWS
- How to decipher your DREAMS
- Panic attacks - a heart-attack monsters
For the "Into the quantum world..." novel that I am writing exclusively for steemit click here:
made by @simgirl