It has been 4 days since my father had his heart surgery and I decided to make him a little get well gift. Here is a tutorial for a felt toy heart that looks like it has been through a lot but is still happy and smiling. It is a short and easy project that took me 2 hours to make. Here is how it turned up at the end:

List of materials used
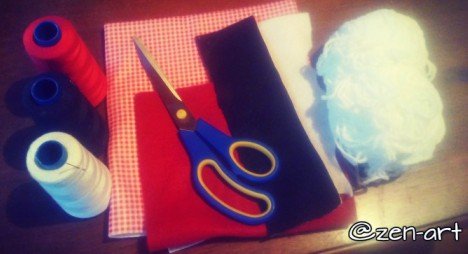
- black, red and white thread
- sewing needle and scissors
- black, white and red felt
- paper and pencil
- 2 black buttons
- 1 bandage and cotton wool
- thicker white thread for hair
Preparations
The first thing you will have to do is take your paper and pencil and draw your moulds which will help you when cutting felt into needed shapes. Draw one heart, one circle (for eyes), mouth shape, arms and one semi-large shape that will act like a patch you will sew on a heart. I usually write the numbers on my paper moulds so I know how many parts out of felt I need to cut out.
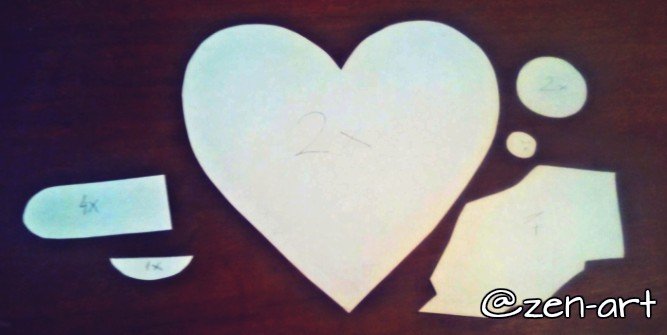
The next part is cutting felt. I use felt that is recycled out of plastic bottles and urge you to do the same. It is soft and easy to work with. I first thought that I would make those tiny black parts for eyes out of it too but then decided to go with the buttons instead, it looked cuter. After seeing the parts I was not happy with the mouth so I made a larger one and cut a small red piece of felt to be the tongue. I wanted the heart to look as happy as possible.
The sewing part
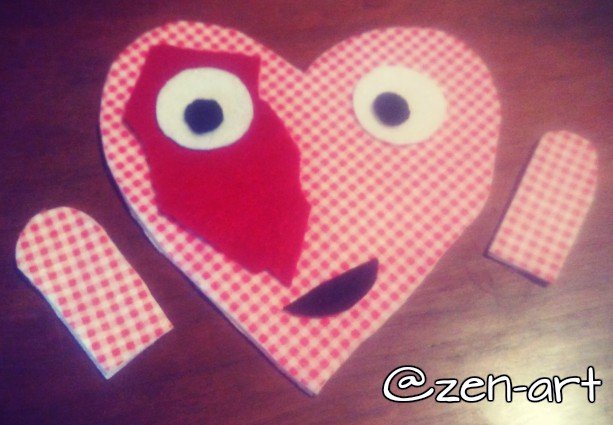
- Take one piece of your heart and first sew on the red patch on it with red thread
- sew the buttons to white circles with black thread and then use the white thread to stitch it to the heart. Now you have eyes
- use your red and black thread to sew on the mouth
- take two pieces of arms and sew them together leaving a small hole for your cotton stuffing, fill it and finish your sewing. Repeat that with the other arm.
Finishing
Cut about 20 pieces of thicker white thread and bind it together in the middle. You will have a little lump at one end and fuzzy hair at the top. That lump will be sewn to the top of the head but do not worry, you will not feel it because the stuffing will even it out and make it smooth and soft.
Now all you have to do is sew the two pieces of the heart together and attached the arms. I start at the bottom of the heart and go counterclockwise so when I am at the end I have a hole at the bottom that I use for stuffing the toy with cotton.
While you are sewing it together keep in mind that you have to put the arms between two hearts and sew them to the large heart pieces of felt for them to be properly attached. When you get to the top, do the same with the hair, put the lump between two pieces and just sew.
Do you like my little cute felt heart that just got out of the surgery? Will my dad like it? I hope he will 😁. Feel free to leave me your opinions and reactions in the comments below.
KEEP YOUR SMILE ON!

For my "Philosophy of happiness" posts, please follow these links:
- Thank your parents, they did the best they could
- Where attention GOES, energy FLOWS
- How to decipher your DREAMS
- Panic attacks - a heart-attack monsters
- Contrasting experiences lead to appreciation
- A TABOO topic, shhh...
- Why do you hate Mondays?
- Lucid dreaming - being aware that you are in a dream
- Mirror, mirror, on the wall...
- Personal journey to a land of mental disorders and back
- FAKE smiles are unhealthy
- What are the ROOTS of the embarrassment WEED?
- Why do we and how do we learn ANYTHING?
- How to train your brain to be positive
- Do you KNOW how to love and be loved?
- What is the philosophy of HAPPINESS?
- Are you carrying emotional WOUNDS or emotional SCARS?
- THE BRAIN talking about A BRAIN
- Science behind "THE CHANGE" and why are we so good at procrastination


made by @simgirl